Turn Glass Bottles into Painted Vases for Almost Nothing
Recycling bin bottles, chalk paint, and an afternoon — the designer vase grouping that looks like a boutique find and costs essentially nothing
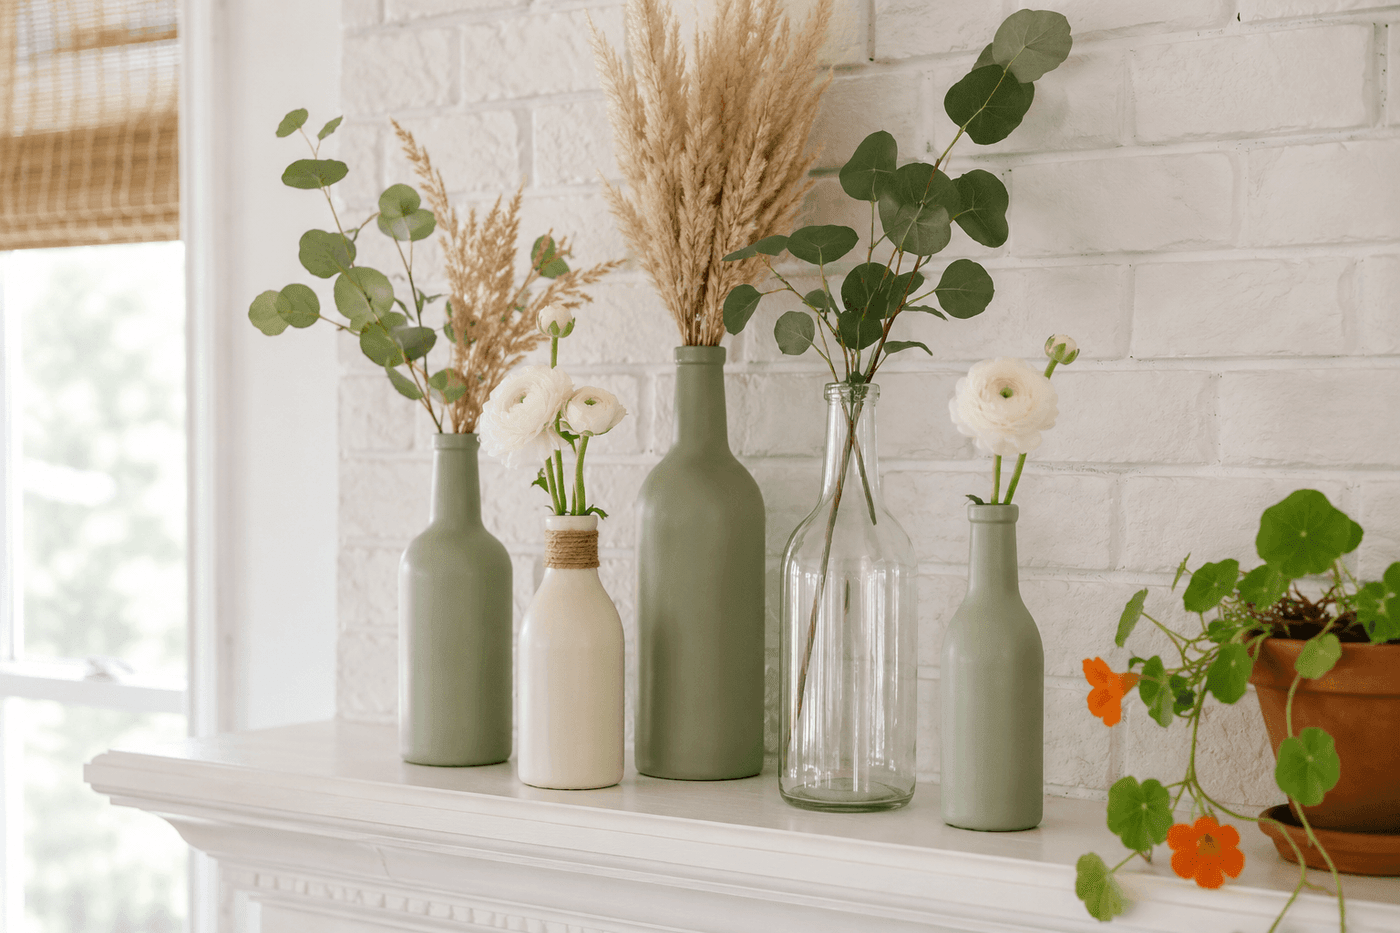
Glass bottles from the recycling bin are some of the most undervalued raw material in any home — varied in height and silhouette, already finished with smooth, paint-receptive surfaces, and possessing the interesting proportions of objects designed to hold and pour liquids in ways that purpose-built vases rarely replicate. A coat of chalk paint in a carefully chosen color, a light sanding between coats for the silky matte finish that makes chalk paint so appealing, and a clear sealer coat transforms a wine bottle or olive oil bottle into a vase so convincingly designer-quality that guests routinely assume it came from a boutique home goods shop. Group three to five painted bottles in a graduated height arrangement on a mantel or windowsill and the collective effect is dramatically more impressive than the sum of free-from-recycling parts — the kind of thoughtful, cohesive vignette that takes five minutes to assemble and looks like someone with genuine design instincts arranged it specifically for that spot in that room.
What You Need
- Glass bottles in varying heights and silhouettes — wine bottles, olive oil bottles, sparkling water bottles, vinegar bottles, and hot sauce bottles all have interesting and distinct proportions; collect five or more so you can select the best combination after labels are removed (free from recycling)
- Chalk paint in 1–2 colors — chalk paint adheres directly to clean glass without primer and dries to the matte, velvety finish that makes painted bottles look like ceramic; one small sample pot covers three to four bottles with two coats each (~$8–12 for a sample pot)
- Fine-grit sanding sponge, 220-grit — for the light sanding between chalk paint coats that produces the silky, ultra-smooth surface finish that distinguishes chalk-painted objects from simply painted ones; one pass of 220-grit between the first and second coat removes any brush marks and grain texture from the dried first coat
- Matte or satin clear sealer spray — essential for bottles that will hold water for fresh flowers; unsealed chalk paint on glass is not waterproof and will soften, streak, and eventually peel where it contacts water (~$7–9 for a spray can)
- Natural twine, jute cord, or lace trim — optional, for wrapping sections of bottles to add texture variation within the grouping; a section of twine-wrapped bottle neck between two plain painted bottles creates visual rhythm and material contrast that elevates the grouping beyond a simple matching set (~$2–3 for a small roll)
- Cooking oil and baking soda paste — for removing adhesive label residue after the paper label has been soaked off; the most reliable method for the sticky residue that hot water alone never fully removes
How to Make Them
- Remove all labels by submerging bottles in hot soapy water for fifteen minutes, peeling the paper label away, then applying a paste of cooking oil and baking soda to any remaining adhesive residue and scrubbing with a cloth until the glass surface feels completely smooth and clean under your fingertip. Label adhesive that is even partially present beneath chalk paint creates a slightly textured surface that telegraphs the presence of the original label through multiple coats of paint — no amount of additional painting corrects what thorough label removal before the first coat prevents.
- Dry each bottle completely inside and out before painting — glass bottles retain moisture in the interior for hours after rinsing, and the humidity that evaporates through the glass wall during painting can cause chalk paint to dry with a slightly chalky, uneven surface texture rather than the smooth, velvety finish that makes chalk paint so appealing on glass surfaces.
- Choose the color palette for the grouping before painting any individual bottle — the most sophisticated painted bottle groupings use a monochromatic approach where all bottles are painted in the same color or closely related shades of a single color, which creates a cohesive, edited look that reads as intentionally designed. A grouping where every bottle is a different color reads as assorted rather than curated, while a monochromatic grouping with one or two bottles carrying a subtle variation — a slightly darker shade, a section of contrasting twine — produces the visual interest of variety within the unity of a considered palette.
- Apply the first chalk paint coat with a foam brush or a soft bristle brush in smooth, even strokes from the bottle base upward, working the paint into any embossed text or texture detail on the bottle exterior. Chalk paint on glass is self-leveling to a degree that minimizes brush marks, but long strokes in a consistent direction during application produce a more even first coat than short back-and-forth strokes that create overlapping marks at each stroke end.
- Allow the first coat to dry completely — chalk paint on glass typically dries in twenty to thirty minutes in normal indoor temperatures — then sand lightly with the 220-grit sponge using gentle circular motions across the full bottle surface. The sanding step between coats is what produces the extraordinarily smooth, ceramic-like surface quality that makes chalk-painted glass look more expensive than it is; skipping it produces a surface that looks painted rather than finished.
- Apply a second coat of chalk paint over the lightly sanded surface, again in smooth strokes from base to top, and allow to dry fully before handling. Two coats of chalk paint on glass produce complete, opaque coverage on most bottle colors; dark amber or green glass may show through lighter paint colors and benefit from a third coat, while clear or white glass is fully covered in two coats of almost any chalk paint color.
- Add any decorative details after the final paint coat is dry — wrap a section of bottle neck or body with natural twine secured at both ends with a small dot of hot glue, paint thin stripe details with a fine brush in a slightly darker or lighter version of the base color, or apply small dots with a pencil eraser tip dipped in contrasting paint. Decorative details should be kept simple and applied to no more than one or two bottles in a grouping; too much decoration on too many bottles produces a busy, crafty quality that undermines the polished, designer character the monochromatic approach achieves.
- Seal every finished bottle with two light coats of clear spray sealer, allowing the first coat to dry completely before applying the second. Sealer is non-negotiable for bottles that will hold water — even a single fresh flower stem in unprotected chalk paint will cause the paint to soften at the waterline within hours and peel within days. Two coats of satin or matte sealer protect the chalk paint surface against water contact, fingerprints, and the incidental handling that removes paint from heavily trafficked display surfaces over time.
Interior stylists who work with vase groupings for professional home shoots always arrange bottles in a triangle formation rather than a line — positioning the tallest bottle slightly back and off-center, the second tallest at the front opposite side, and the shortest bottles filling the triangle's remaining positions creates a three-dimensional arrangement with depth and visual interest from every angle rather than a flat row that looks good only from directly in front. They also always include one bottle left unpainted or painted in a subtly different finish within the grouping — a single bottle with a natural twine wrap or a clear-sealed raw glass finish among painted bottles creates the material contrast that prevents a monochromatic grouping from reading as too uniform, and it is the detail that most consistently produces the "collected over time" quality that distinguishes a styled vignette from a matching set.