
Gardening/Outdoor

Recent Content

Shoe Bench Build: The Cubby Depth That Keeps Pairs Upright

Shoe Bench Build: The Cubby Depth That Keeps Pairs Upright

Build a wooden entryway shoe bench for $35—the cubby depth is what keeps boots standing instead of toppling into a pile every morning.

Style a Layered Nightstand Vignette in 1 Hour for $35

Style a Layered Nightstand Vignette in 1 Hour for $35

Turn a cluttered nightstand into a cozy styled vignette with the height-rule trick—1 hour, $35, instant bedroom upgrade.

The Cafe Rod Trick for a Fake Built-In Vanity

The Cafe Rod Trick for a Fake Built-In Vanity

Fake a built-in bathroom vanity shelf with a tiny cafe rod and basket—zero drilling, zero suction cups, full deposit intact.

Tension Rod Shelf: The Rod Width That Won't Slip

Tension Rod Shelf: The Rod Width That Won't Slip

Build a hidden double-decker shelf under your sink for $6—the rod tension width is what keeps it from crashing down on cleaning day.

Mulch Perennial Beds for Winter in 1 Hour for $25

Mulch Perennial Beds for Winter in 1 Hour for $25

Tuck your perennials in right! A 3-inch mulch blanket now saves roots from winter heave for about $25.

logo
  • Home Improvement
  • DIY Projects
  • Interior Design
  • Gardening & Outdoor
  • Real Estate
  • Home Improvement
  • DIY Projects
  • Interior Design
  • Gardening & Outdoor
  • Real Estate
  • ​

Tiered Birdbath: Terra Cotta Saucers, $18

Stack a few saucers, add some hardware, and suddenly your garden has a birdbath that looks like it cost five times the price.
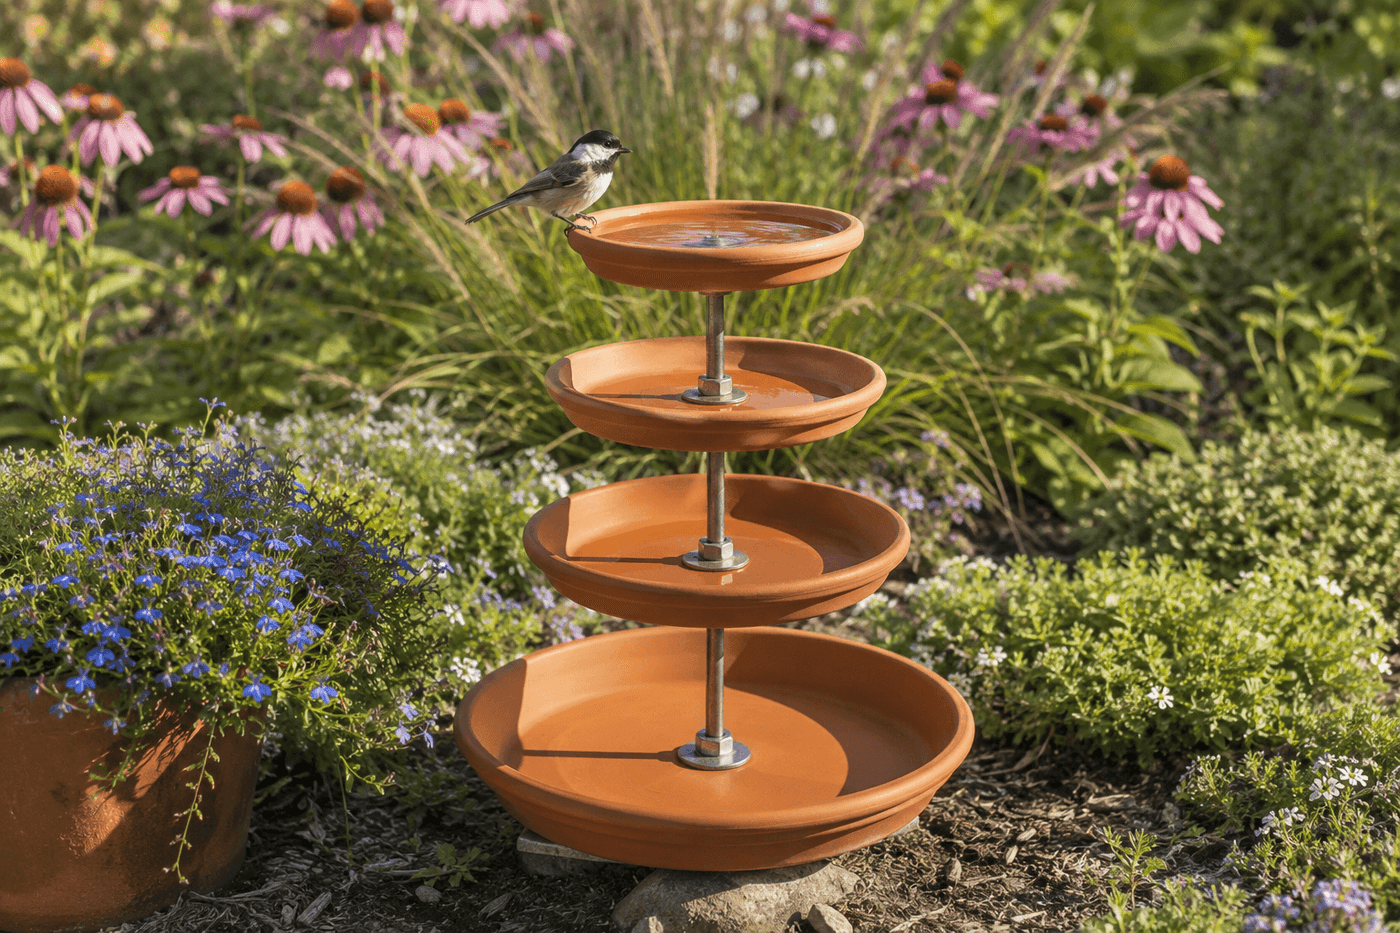
Tiered terra cotta saucer birdbath with three graduated levels in a sunny garden bed, surrounded by perennial flowers and greenery
Gardening/Outdoor

Birdbaths at the garden center are either flimsy plastic that fades by August or heavy concrete that costs $60 before you've even picked a spot for it — and neither one looks particularly special. This version, built from stacked terra cotta saucers threaded onto a single rod, lands somewhere the store-bought options never do: genuinely charming and clearly handmade, for around $18. The tiered design isn't just visual either; different birds prefer different water depths, and multiple levels mean more visitors at once without the squabbling. You can leave the saucers their natural warm terra cotta, or paint them before assembly to match your garden's color story. Either way, this is a Monday morning project that's sitting in your garden by afternoon — and attracting its first visitors by the end of the week.

What You'll Need

  • Terra cotta saucers in graduated sizes — 14", 10", 8", and 6" (garden centers sell these individually; ~$8–12 total)
  • 36" threaded steel rod, ½" diameter — available at any hardware store (~$4–6)
  • Nuts and washers to fit rod diameter — you'll need 8–10 of each (~$2–3)
  • Masonry drill bit, ½" — for drilling centered holes through saucers
  • Drill
  • Two wrenches or pliers — for tightening nuts against each other to lock spacing
  • Outdoor masonry sealer — to waterproof saucers and protect paint if used (~$6–8)
  • Outdoor masonry paint — optional; turquoise, coral, or classic terra cotta left natural
  • Painter's tape — optional, for crisp paint edges or color blocking between tiers

How to Do It

  1. Mark the center of each saucer by drawing two light pencil lines corner to corner — where they cross is your drill point. Accuracy here determines whether your finished birdbath stands straight or leans, so take the extra thirty seconds.
  2. Drill a centered ½" hole through each saucer using a masonry bit at slow speed with light pressure. Support the saucer flat on a piece of scrap wood, and keep the drill perpendicular — rushing this step is how terra cotta cracks.
  3. Paint and seal all saucers before assembly if you're adding color — it's dramatically easier to paint flat, individual saucers than to paint around hardware after the fact. Apply two coats of outdoor masonry paint, let dry fully, then coat all surfaces (including the interior basin of the top saucer) with outdoor sealer. Let cure 24 hours.
  4. Assemble the base by threading a nut and washer onto the bottom of the rod, sliding the largest 14" saucer onto the rod from below, then adding another washer and nut on top to sandwich and secure it. This bottom saucer sits flat on the ground and anchors the whole structure.
  5. Stack the remaining saucers from largest to smallest, placing a washer and nut both below and above each saucer to lock its position. Space tiers 6–8" apart — close enough to look intentionally tiered, far enough that birds on lower levels aren't splashed from above.
  6. Tighten all nuts firmly using two wrenches — one to hold the lower nut stationary, one to tighten the upper nut against it. This double-nut locking method is what keeps the tiers from slowly spinning or settling over time.
  7. Position your birdbath in a spot with partial shade — full sun evaporates water quickly and encourages algae, while deep shade makes birds feel exposed and vulnerable. Within 10 feet of shrubs or a fence gives birds a quick escape route and dramatically increases how often they'll visit.
  8. Fill the top saucer with 1–2" of fresh water and check it every 2–3 days in summer heat. Clean the basin weekly with a stiff brush and plain water — avoiding soap, which leaves residue harmful to birds — and your birdbath stays clear and active all season.
DESIGNER TIP

Wildlife garden designers who spec birdbaths for habitat-focused landscapes consistently recommend adding a single flat stone or a few pebbles to the main water basin — a technique borrowed from permaculture water feature design. The stone gives smaller birds and insects a safe, shallow landing point so they can drink without risk of slipping into deeper water, which measurably increases the variety of species that visit. For the most compelling garden focal point, set your finished birdbath slightly off-center within a planted bed rather than centered in open lawn; flanking it with tall ornamental grasses on one side and lower flowering perennials on the other creates a naturalistic frame that makes the whole composition look designed rather than simply placed.


Related Content

Gardening/Outdoor

03 November 2026

Post

Mulch Perennial Beds for Winter in 1 Hour for $25

Tuck your perennials in right! A 3-inch mulch blanket now saves roots from winter heave for about $25....

Gardening/Outdoor

31 October 2026

Post

Glow Skeleton Fence: The UV Primer Coat That Pops

Paint glowing skeleton silhouettes onto your fence for Halloween—the UV primer coat underneath is what makes them blaze under black light, not fade flat....

Gardening/Outdoor

29 October 2026

Post

Plant a Fall Pansy Container in 1 Hour for $25

Pansies shrug off frost but not soggy roots—plant them right this week for months of color through the first hard freezes....

Gardening/Outdoor

24 October 2026

Post

Divide and Replant Perennials in 90 Minutes for $15

Overgrown hostas and daylilies? Split them now for free plants and healthier beds—90 minutes, $15, zero green thumb required....

Gardening/Outdoor

18 October 2026

Post

Wrap Tree Trunks for Winter Protection in 30 Minutes for $15

Rabbits and frost cracks love bare bark—wrap young tree trunks now to save them from winter damage for just $15....

Gardening/Outdoor

17 October 2026

Post

Winterize Your Outdoor Fountain in 1 Hour for $15

Don't let ice crack your fountain! Drain, clean, and seal it right in an hour for $15 before the first hard freeze hits....

Gardening/Outdoor

08 October 2026

Post

Winterize Your Rain Barrel in 45 Minutes for $20

Don't let freezing water crack your rain barrel! Drain, disconnect, and store it right in 45 minutes for about $20 before the first hard freeze....

Gardening/Outdoor

05 October 2026

Post

Broken Umbrella Planter: The Drainage Cut That Saves It

Turn a busted umbrella canopy into a hanging garden planter—the drainage slits you cut first are what stop root rot before it starts....

Gardening/Outdoor

02 October 2026

Post

Sow a Cover Crop in Your Garden Beds in 1 Hour for $20

Skip the bare dirt this fall! Sow a cheap cover crop now and let it build free, crumbly soil for next spring's garden....

Gardening/Outdoor

28 September 2026

Post

Overwinter Tender Bulbs Indoors in 1 Hour for $20

Dig up dahlias and cannas before frost hits! Cure and pack them right so they wake up healthy again next spring....

Gardening/Outdoor

22 September 2026

Post

Build a Leaf Mulch Cage in 1 Hour for $25

Stop bagging leaves for the curb! A wire mulch cage turns fall leaf drop into free garden gold by spring....

Gardening/Outdoor

19 September 2026

Post

Plant Spring Bulbs in 1 Hour for Under $25

Plant tulip and daffodil bulbs the right way this fall—pointy-end-up depth and drainage make all the difference come spring!...

Gardening/Outdoor

17 September 2026

Post

Build a Root Vegetable Storage Bin in 2 Hours for $35

Stash your fall harvest right! A DIY sand-layered storage bin keeps carrots and beets crisp for months, no root cellar needed....

Gardening/Outdoor

16 September 2026

Post

Pumpkin Display Stand: Weight First, Then the Angle

Put your biggest pumpkin on the wrong tier and this stand becomes a tipping hazard. Build it right....

Gardening/Outdoor

31 August 2026

Post

Hanging Herb Jars: The Pebble Layer Isn't Optional

Jars have no drainage hole — skip the pebble layer and your herbs slowly rot. Mostly free, 90 min....
Terms and ConditionsDo Not Sell or Share My Personal InformationPrivacy PolicyPrivacy NoticeAccessibility NoticeUnsubscribe
Copyright © 2026 DIY HomeBoost












