Reading Retreat Canopy: Magical Corner for $20
A ceiling hook, an embroidery hoop, three yards of sheer fabric, and 45 minutes — and the armchair you walk past every day becomes the most intentional spot in the house.
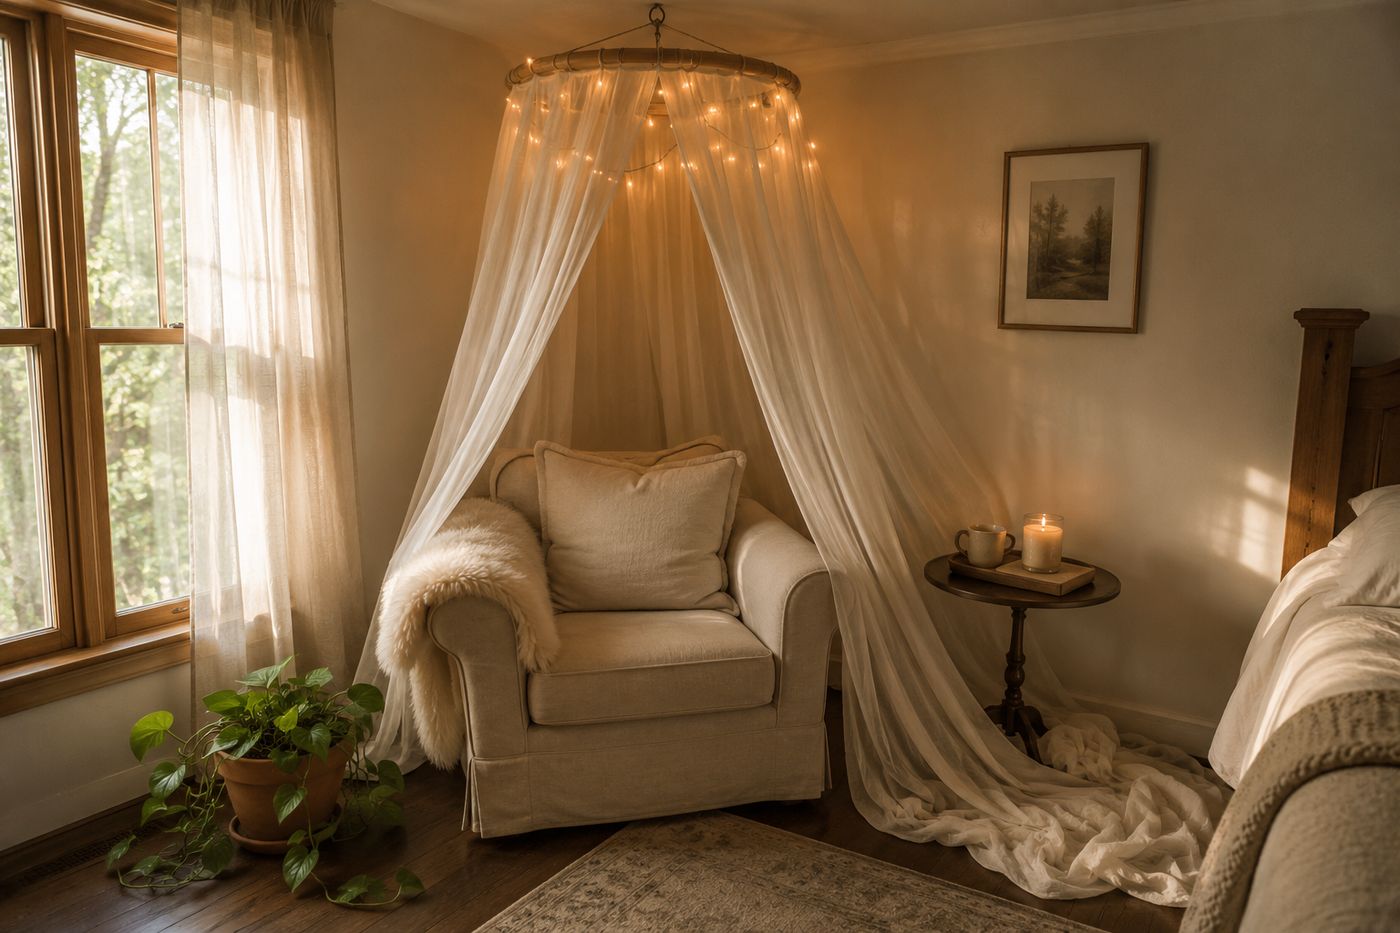
The armchair that sits in the bedroom corner and never gets used is one of the most common interior design situations in any home — comfortable enough to purchase, positioned well enough to keep, but never quite compelling enough to choose over the bed or the sofa for actual reading and relaxing. A sheer fabric canopy gathered through a ceiling-hung embroidery hoop and draped around the chair changes the psychological relationship with that corner entirely: the canopy creates a sense of enclosure and destination that an open corner cannot produce, and the filtered light quality inside the draped fabric has the specific quality of somewhere that was intentionally designed to be inhabited rather than merely positioned in. Twenty dollars in sheer fabric, an embroidery hoop, a ceiling hook, and ribbon produces an installation that looks like something from a magazine editorial on bedroom styling — and more usefully, produces the reading hours that were previously spent planning to read rather than actually doing it. The corner that was walked past becomes the corner that is protected in the daily schedule, which is the most meaningful thing any $20 room project has ever accomplished.
What You'll Need
- Sheer or lightweight fabric, 3 yards — the fabric choice determines the light quality and the aesthetic register of the finished canopy:
- Ivory or white voile or chiffon — the most romantic and most light-filtering choice; diffuses afternoon sun into warm, even glow; reads as luxurious at low cost because sheer fabric drapes beautifully even without hemming
- Soft blush or sage chiffon — adds color to the filtered light; tints the interior of the canopy in the fabric color when afternoon sun passes through; produces a colored-light atmosphere that plain white cannot
- Lightweight linen or muslin — less sheer but more textural; produces a more substantial, less romantic canopy that suits a more relaxed, organic aesthetic; does not filter light as dramatically as true sheers
- Fabric stores sell sheer and chiffon fabric from $2–6 per yard; three yards at the low end keeps the full project under $20 total (~$6–18 for three yards depending on fabric choice)
- Embroidery hoop, 10–14 inch diameter — the crown element that gathers the fabric at the top and gives the canopy its architectural center; larger hoops produce a wider, more dramatic crown with more fabric fall on each side; the inner ring only is used — remove the outer ring and keep it for another project; wood hoops have a more natural, organic appearance than plastic; purchase the largest diameter hoop available for the fullest canopy crown (~$3–5 at craft stores)
- Ceiling hook with toggle bolt or stud anchor — the single ceiling attachment point from which the hoop hangs; a toggle bolt ceiling hook rated for 15–20 lbs installs in any ceiling material including drywall without requiring a stud; confirm the hook is rated for the combined weight of the hoop and fabric — typically under 2 lbs for the full canopy — with significant margin (~$3–5 at hardware stores)
- Coordinating ribbon or twine, 1 yard — for hanging the embroidery hoop from the ceiling hook; satin ribbon in a coordinating color produces the most finished look; jute twine produces a more organic, boho appearance; the ribbon length determines how far below the ceiling the hoop hangs, which determines the canopy height above the chair (~$1–2 per yard)
- Fairy lights or small battery LED string lights — optional but transformative; draping a 20-foot battery-operated fairy light string loosely within the gathered hoop and allowing it to trail into the fabric folds produces a canopy that is magical in daylight and genuinely enchanting after dark; warm white LEDs rather than cool white for the most flattering and cozy light quality (~$8–12 for a quality battery string)
- Ceiling hook installation tool — a drill for toggle bolt installation; confirm whether the installation location is drywall, plaster, or has a stud directly above the chair before choosing the anchor type; a stud allows a simple screw hook without additional hardware
- Layering elements for the chair — choose what you have:
- Sheepskin or faux fur throw draped over the chair arm or seat
- Small side table or stool within reach for a drink, candle, and current book
- One or two throw pillows in coordinating tones
- A small tray on the side table corralling candle, matches, and a bookmark
How to Install It
- Position the chair in its final location before installing any ceiling hardware — the ceiling hook must be directly above the center of the chair seat for the canopy to fall symmetrically around the chair, and repositioning the chair after the hook is installed requires either a second hook or moving the original, which leaves a patched ceiling hole. Stand in the chair position and hold a ruler or straightedge vertically against the ceiling to mark the point directly above the chair center; this mark becomes the hook installation point.
- Install the ceiling hook at the marked position — for drywall without a stud directly above, use a toggle bolt ceiling hook: drill a hole the diameter specified on the toggle bolt packaging, fold the toggle wings and insert through the hole, pull back until the wings spread against the ceiling interior, and tighten the hook until the base sits flush against the ceiling surface. Confirm the hook is secure by applying 10–15 lbs of downward pull before hanging any fabric; a hook that pulls loose under hand pressure will not hold the canopy reliably.
- Prepare the fabric by shaking it out fully and checking that it is free of fold creases from packaging — sheer fabric holds crease marks from folding that are visible in the finished canopy; steam lightly with a clothes steamer or hang in a steamy bathroom for 20 minutes before installation to release any persistent creases. Do not iron sheer synthetic fabric directly; the heat melts the fibers and produces irreversible shiny marks at the iron contact points.
- Thread the fabric through the embroidery hoop inner ring to create the gathered crown — hold the fabric at its lengthwise center point, gather it loosely in one hand so the full width of the fabric bunches together, and pull the gathered center point up through the interior of the hoop ring so the gathered section protrudes above the hoop and the fabric falls in panels below. Adjust the gather so the fabric is distributed evenly around the full hoop circumference and each fabric panel falls at roughly equal weight on each side of the hoop.
- Tie the ribbon through the gathered fabric section above the hoop — loop the ribbon through the gathered fabric at the center point above the hoop, bring both ribbon ends together above the gather, and tie a secure knot that holds the gather firmly at the hoop level without the fabric slipping through the ring. The ribbon length between the knot and the ceiling hook determines the canopy height; a ribbon of 6–10 inches positions the hoop approximately 8–12 inches below the ceiling, which allows the fabric panels to fall to approximately chair arm height when the hoop is at the correct elevation above an average-height chair.
- Hang the assembled hoop from the ceiling hook by looping the ribbon over the hook and adjusting the position until the hoop hangs level — a hoop that hangs level with an even gap between the hoop and the ceiling on all sides produces a canopy that falls symmetrically; a tilted hoop sends more fabric to one side and makes the canopy read as carelessly installed rather than intentionally draped. Step back and assess from the doorway before making any fabric arrangement decisions; the full canopy silhouette is only visible from a distance, and adjustments made from directly beneath the hoop address individual panels rather than the overall effect.
- Arrange the fabric panels — this is where all the visual quality of the finished canopy is determined. Pull panels forward and to each side of the chair rather than allowing all panels to fall straight down around the hoop perimeter; panels draped to each side of the chair at a slight angle create the sense of enclosure that makes the canopy feel like a destination rather than a curtain hanging above a chair. Tuck one or two panels loosely behind the chair back to create the enclosed feeling at the rear, allow the front panels to fall open at chair width, and pin or tuck any panel that needs to be held in a specific position without draping naturally.
- Style the surrounding elements to complete the reading retreat — position the side table within arm's reach of the seated position rather than at a distance that requires leaning out of the canopy to reach it; drape the sheepskin throw over the chair arm or seat; arrange two pillows at the chair back corners for lumbar support during extended reading; place a candle, a current book, and a beverage on the side table tray. Sit in the chair and assess everything from the actual reading position — the height of the side table, the reach to the throw, the light quality through the fabric at the specific time of day you intend to use the space — and adjust any element that is not exactly right from the seated perspective rather than from the standing design perspective.
Interior designers and bedroom stylists who create reading nook installations for residential and editorial projects consistently recommend one fabric quantity and arrangement adjustment that produces a canopy that reads as genuinely luxurious and full rather than spare and tent-like: use five yards of fabric rather than three, and arrange the additional two yards in a deliberate puddle on the floor at the base of the chair on the most visible side. A three-yard canopy produces fabric panels that reach approximately to chair seat height when the hoop is hung at the standard 12-inch-below-ceiling position — functional and attractive but with a slight austerity that more fabric eliminates. A five-yard canopy produces panels that reach the floor with enough additional length to pool at the base in soft folds, which is the specific quality that makes a sheer fabric canopy read as a designed architectural moment rather than a decorative addition. Interior designers who specify this puddled-floor detail for editorial bedroom shoots describe it as the difference between a canopy that is pretty and one that stops visitors at the door — and the additional two yards of sheer fabric costs $4–12 depending on the fabric choice, which makes it the most impactful $6 upgrade available to any reading retreat installation.