Pressed Flower Suncatchers: 4 for $5
Two squares of contact paper, a handful of pressed flowers, and 30 minutes — and your kitchen window becomes the most beautiful spot in the house.
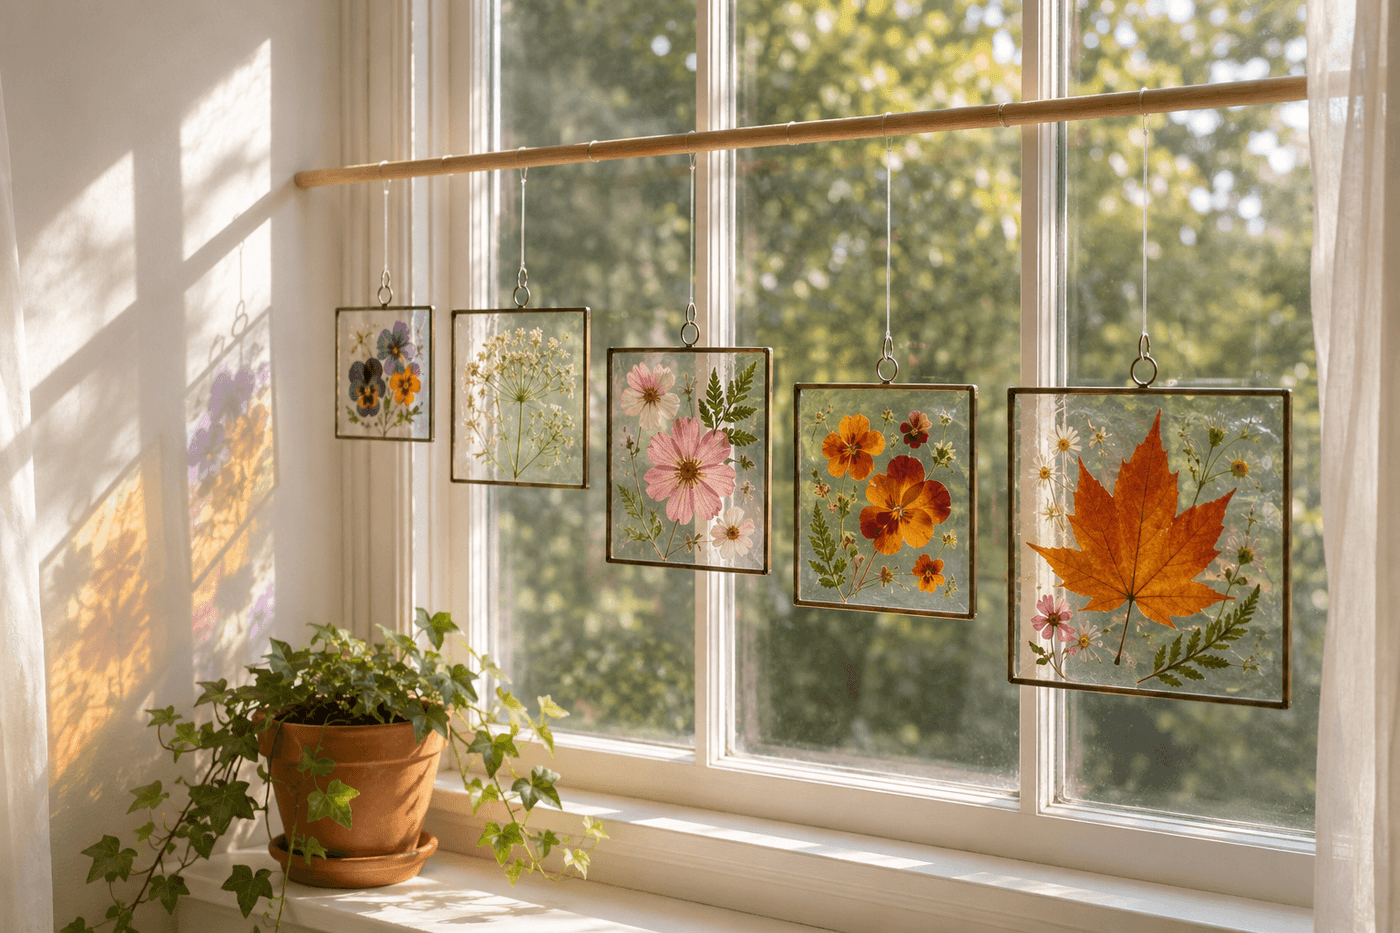
Most window treatments exist to manage light — to block it, filter it, or diffuse it into something less harsh. This project does the opposite: it takes morning light and turns it into something you actively want to watch, casting shifting pools of color across your walls as the sun moves through the day in a way that makes an ordinary kitchen window feel genuinely magical. The technique is contact paper sandwiched around pressed flowers, which sounds too simple to produce results worth showing anyone — and then you hang the finished pieces and watch the first person who walks into the room stop mid-sentence to stare at the window. Four suncatchers take about 30 minutes and cost approximately $5 in contact paper, with pressed flowers sourced from your garden, bought dried, or pressed fresh in the pages of a heavy book over a few weeks. Hung at graduating heights across a window in a series of five, the shifting colored light they cast throughout the day genuinely transforms the quality of the room they're in — which is an outcome most $5 craft projects cannot honestly claim.
What You'll Need
- Clear contact paper — the completely transparent kind, not frosted or patterned; Con-Tact brand or similar; one standard roll makes dozens of suncatchers (~$5–6 per roll)
- Pressed flowers and leaves — fully dried and flat; source options include:
- Press your own — place fresh flowers face-down between pages of a heavy book with absorbent paper, weight with additional books, and wait 2–3 weeks
- Buy pre-pressed — craft stores and online retailers sell assorted dried pressed flower sets for $4–8
- Use herb leaves — fern fronds, maple leaves, and herb sprigs press beautifully and are often already flat enough to use within days
- Scissors — sharp craft scissors for clean contact paper cuts; decorative edge scissors produce beautiful scalloped or deckled suncatcher borders
- Hole punch — standard ¼" punch for the hanging hole at the top corner
- Twine, ribbon, or monofilament — for hanging loops; monofilament makes the suncatcher appear to float in the window with no visible support
- Ruler and cutting mat or cardboard — for measuring and cutting consistent square sizes
- Tweezers — for placing delicate petals precisely without disturbing the surrounding arrangement
- Small brayer or credit card — for pressing the top contact paper layer down firmly without air bubbles
How to Make Them
- Cut pairs of identical contact paper squares for each suncatcher — for a series of graduating sizes, try 4", 5", 6", and 7" squares, which produce a visually cohesive set when hung at different heights. Cut all pairs at once before peeling any backing, which keeps the work surface clear and prevents the sticky side of a peeled piece from attracting dust and pet hair while you're still measuring.
- Arrange your pressed flowers on the paper backing side of one square in each pair before peeling — use this dry rehearsal to work out a composition you're happy with without the pressure of a sticky surface that locks decisions immediately. Asymmetric arrangements with one dominant flower, supporting smaller blooms, and a few leaf or fern frond accents read as more considered and botanical than evenly distributed or centered single-flower compositions.
- Peel the backing from one square of each pair and lay it sticky-side up on a clean flat surface — work on one suncatcher at a time rather than peeling all squares at once, which allows dust to settle on exposed sticky surfaces before flowers are placed and produces a cloudy, speckled result when held to light.
- Place flowers face-down onto the sticky surface following your rehearsed arrangement, using tweezers for delicate petals and small blooms that fingertips would crush or displace. Face-down placement is what produces the most vivid color transmission through the contact paper — petals placed face-up sit against the second layer with a slight air gap that diffuses light rather than transmitting it cleanly.
- Press each flower element gently but firmly onto the sticky surface once placed, ensuring full contact between the petal surface and the adhesive — any section of petal that isn't fully adhered to the bottom layer will trap a small air bubble when the top layer goes on, which appears as a white cloudy patch in the finished suncatcher when held to light.
- Peel the backing from the second square and lower it carefully onto the first, starting at one corner and working across rather than dropping it flat all at once — the corner-to-corner application method allows you to smooth out air bubbles progressively as the layers meet rather than trapping a large central bubble that a brayer cannot fully work out after the fact.
- Smooth the sealed suncatcher firmly with a brayer or credit card edge from center to edges, pressing out any remaining air bubbles and ensuring complete adhesion between both contact paper layers across the entire surface. Hold the finished piece up to a light source to check for trapped air — any remaining bubbles appear as white or silver patches and can sometimes be worked toward the nearest edge with sustained firm pressure before the adhesive fully sets.
- Punch a hole at the top center or top corner of each finished suncatcher and thread a loop of twine, ribbon, or monofilament through for hanging. For the most magical window installation, hang a series of five in graduating sizes at different heights using monofilament attached to a single horizontal length of thin dowel or driftwood suspended across the window frame — this single-rod installation creates a mobile-like arrangement where the suncatchers shift gently in air currents and cast constantly moving light patterns across the room.
Botanical artists and pressed flower designers who create work for gallery exhibition and interior installation use one flower selection principle that makes the difference between a suncatcher that glows and one that simply appears opaque when backlit: choose flowers and leaves by transmitted light rather than reflected light before pressing them. Hold fresh flowers up to a bright window or lamp before pressing — petals that transmit light clearly at this stage will produce vivid, jewel-toned color in the finished suncatcher, while thick or densely pigmented petals that appear opaque in transmitted light will produce dark, muddy patches regardless of how beautiful they look in daylight. The best performers are pansies, violas, Queen Anne's lace, cosmos, and thin fern fronds — all of which transmit light so beautifully in a finished suncatcher that they appear almost stained-glass-like when the sun is behind them. Roses and dahlias, by contrast, are too thick to transmit light effectively and are better reserved for opaque botanical art rather than suncatcher applications.