Pool Toy Storage: Organized Garage for $35
Mesh bins, wall hooks, and a bungee cord noodle corral — and the garage obstacle course of pool gear becomes a system kids can actually use themselves.
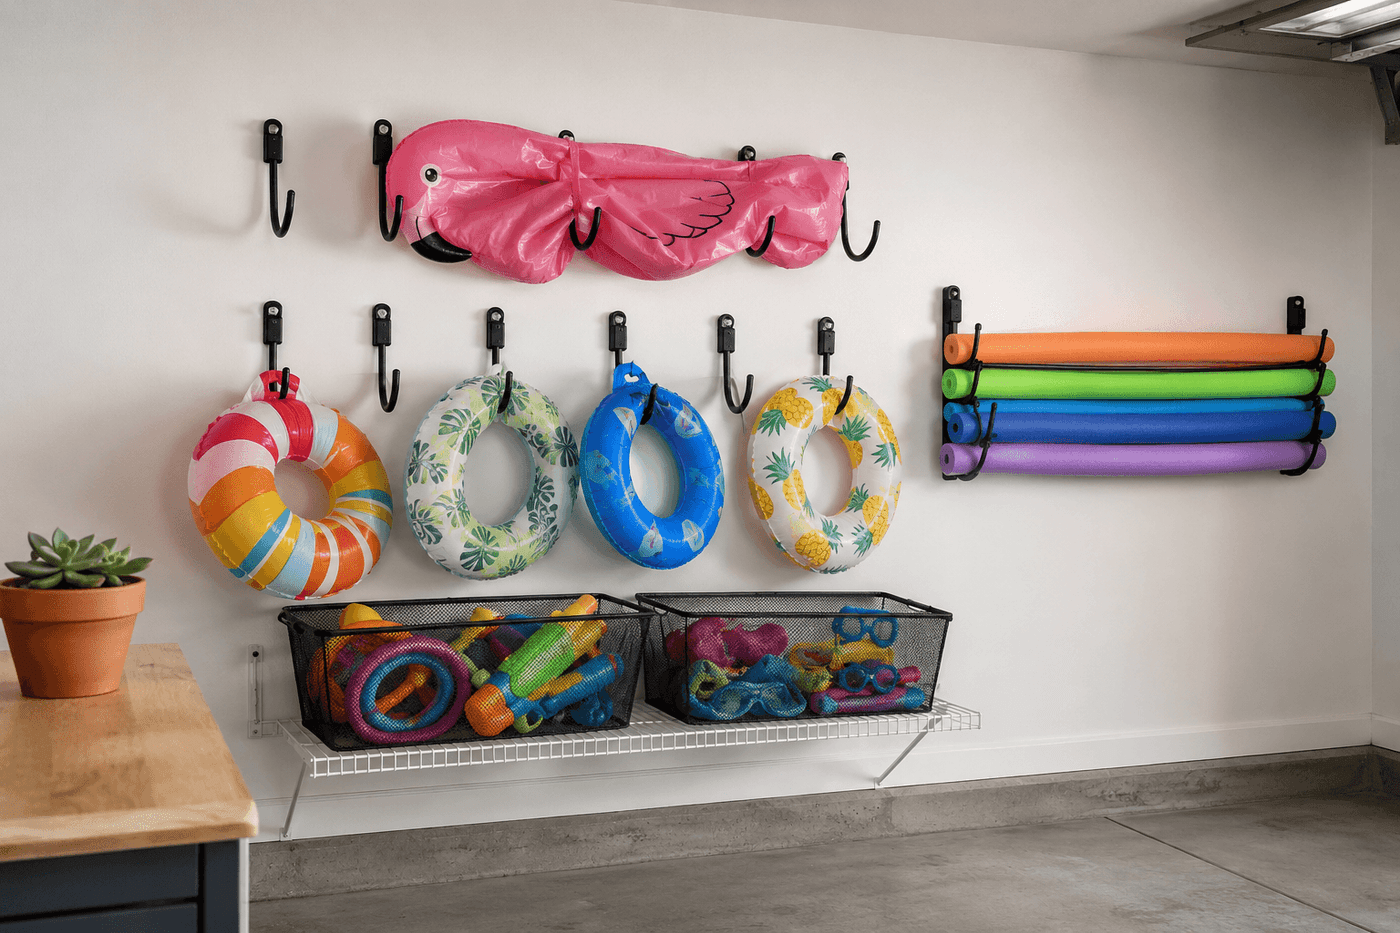
Summer pool gear has a specific organizational failure mode that is different from almost any other category of household storage: it is always wet, it takes up an enormous and irregular amount of space, and it needs to be accessed by children who will not remember where anything is unless the system makes finding it completely obvious without adult assistance. The solid bins that work for dry storage fail immediately for pool gear because wet equipment develops mildew inside any container that does not allow airflow and drainage — and that mildew smell, once established in a pool float or a mesh bag of dive toys, does not come back out. Mesh bins are the specific solution: everything drips through the sides, dries in place, and is visible from the outside so the dive stick is findable without excavating the bin. Wall hooks at varying heights handle the floats and larger gear. A two-hook bungee cord system corrals pool noodles horizontally against the wall rather than rolling across every flat surface in the garage. The complete system costs about $35, installs in two hours, and produces the specific outcome that makes every subsequent pool day faster and less frustrating: kids who can find their own gear without asking.
What You'll Need
- Large mesh storage bins, 2–3 — the non-negotiable choice over solid bins for wet pool gear; mesh allows drainage and airflow that prevents mildew, and the see-through sides allow contents to be identified without pulling everything out; look for bins with handles for portability from garage to pool deck (~$8–12 each, or $15–20 for a set of two at big box stores)
- Heavy-duty wall hooks, 6–8 — rated for at least 25 lbs each to handle the weight of large deflated floats and wet gear; screw-mount utility hooks in a J or U shape accommodate pool float handles, water gun trigger guards, and net bags; avoid adhesive hooks for this application, which fail under sustained weight in a warm garage (~$8–12 for a pack of six)
- Bungee cords, 2–3 in 24–36 inch lengths — for the pool noodle corralling system; two wall hooks spaced 18–24 inches apart with bungee cords strung between them at two heights create a horizontal corral that holds noodles against the wall without rolling; the bungee cord flexibility also accommodates the varying diameter of different noodle brands (~$5–8 for a pack)
- Wall anchors and screws appropriate for your garage wall type — drywall anchors for standard garage drywall walls; concrete anchors if mounting into a concrete block or poured concrete garage wall; confirm wall type before purchasing hardware to avoid a second hardware store trip (~$4–6 per pack)
- Wire shelf or tension rod — for supporting the mesh bins at a height accessible to children without requiring them to lift bins off the floor; a single wire shelf bracket mounted at 24–30 inches from the floor puts the bins at child-reach height while keeping the floor underneath clear (~$10–15 for a bracket shelf kit)
- Label maker or waterproof labels and marker — for labeling each bin or hook zone so children can return items to the correct location without adult guidance; waterproof labels are essential in a zone where wet gear is the norm (~$0–8 depending on whether a label maker is already owned)
- Drill and bits — for mounting wall hooks, shelf brackets, and bungee cord anchor hooks; a standard drill with a Phillips bit and the appropriate masonry or wood bit for your wall type handles all mounting tasks in this installation
- Level — for ensuring wall hooks and shelf brackets are installed level rather than visibly tilted, which affects both the aesthetic of the finished storage zone and the function of hooks that hold gear by gravity
How to Set It Up
- Sort every piece of outdoor and pool gear before installing a single hook — pull everything out of its current location, sort into categories (floats, noodles, small toys and dive gear, water guns, inflatables), and discard anything that is broken, missing parts, or has been replaced and kept by accident. The sort step is what determines how many bins and hooks are actually needed rather than guessing before seeing the full inventory, and doing it before installation prevents building a system sized for the wrong amount of gear.
- Select the wall section based on access frequency and proximity to the garage door — pool gear leaves the garage multiple times per week during summer and should be stored closest to the door rather than at the back of the garage behind other seasonal items. Confirm the selected wall section has no electrical conduit, plumbing, or structural elements behind it before drilling by using a stud finder and checking for outlet locations; pool gear storage zones need to be relocatable over time as gear volume changes, and knowing what is behind the wall now prevents damage during future modifications.
- Plan the full layout on paper before drilling any holes — sketch the wall section with approximate dimensions and mark the position of each hook row, the shelf bracket for mesh bins, and the two bungee cord anchor hooks for the noodle corral. Planning on paper rather than improvising on the wall prevents the misplaced hook that requires patching and redrilling when the spacing does not accommodate the actual gear, and confirms that the full system fits the selected wall section before any mounting hardware is installed.
- Install the shelf bracket first as the lowest mounted element — this is the most structurally significant installation and the one that needs to hit studs rather than drywall anchors alone, because the combined weight of two or three full mesh bins of wet pool toys is substantial. Locate studs with a stud finder, mark them clearly, and drive the shelf bracket screws into studs at both mounting points; a shelf that is anchored only in drywall pulls away from the wall under the weight of full bins within one season.
- Mount the wall hooks above the shelf level in two rows at different heights — a lower row at 48–54 inches from the floor for medium floats and hanging mesh bags, and an upper row at 60–66 inches for the largest inflatable floats and items that need to hang without touching the shelf below. Space hooks within each row at 8–10 inch intervals, and check level across the row before driving each screw so the finished hook row reads as a deliberate storage system rather than randomly placed hardware.
- Install the bungee cord noodle corral at the end of the hook section — drive two screw-mount hooks into the wall approximately 18–24 inches apart horizontally, at a height of 36–42 inches from the floor which places the noodle stack at a reachable height for children without requiring them to lift noodles over their heads. String two bungee cords between the hooks at the front and back of the noodle depth to create a horizontal pocket that holds the noodles against the wall in a stable stack rather than the rolling pile they form on any flat surface.
- Load the system with the sorted gear categories — deflated floats hung from the upper hooks by their handles or inflation valves, water guns and net bags of dive toys on the lower hooks, small toys and accessories sorted by category into labeled mesh bins on the shelf, and pool noodles stacked horizontally in the bungee corral. Place the heaviest and most frequently used items at the most accessible positions and the least-used or seasonal overflow items at the extremes of the system where reaching requires more effort, which naturally maintains the system's organization over time without requiring anyone to actively enforce it.
- Label each bin, hook zone, and corral section with waterproof labels that describe the contents in terms children will recognize — "dive toys," "water guns," "floaties" rather than adult organizational categories — and mount a simple hook at child eye-level near the garage door specifically for the pool bag so it is findable and returnable independently of adult involvement. The child-readable label is the detail that determines whether the storage system is maintained by the household or quietly abandoned as the summer progresses, because a system children can navigate without asking produces behavior that sustains the organization rather than requiring an adult to periodically restore it.
Professional organizers who design seasonal storage systems for residential garages and mudrooms consistently recommend one maintenance protocol that keeps a pool gear organization system functional through an entire summer rather than collapsing into disorder by mid-July: establish a single weekly five-minute reset as a household routine rather than relying on item-by-item returns after each pool day. Pool gear used daily by children returns to storage in the approximate right zone but not necessarily the exact right bin or hook — and approximate returns accumulate into full disorder within two weeks if the system depends on perfect item-by-item accuracy from children who are wet, tired, and finished with the pool. A Sunday evening five-minute family reset — everyone spends five minutes returning anything that is in the wrong place to its correct location — maintains the full system accurately without requiring perfection from daily use. Professional organizers who implement this single-session reset protocol with client families report summer gear systems that stay functional all season rather than requiring a full reinstallation by August, because the weekly reset interval is short enough that disorder never accumulates to the overwhelming level that makes the system feel broken rather than merely temporarily messy.