Patriotic Jar Centerpieces: July 4th for $7
Dollar store mason jars, ribbon, flags, and layered filler — and your Fourth of July table looks like you actually planned it.
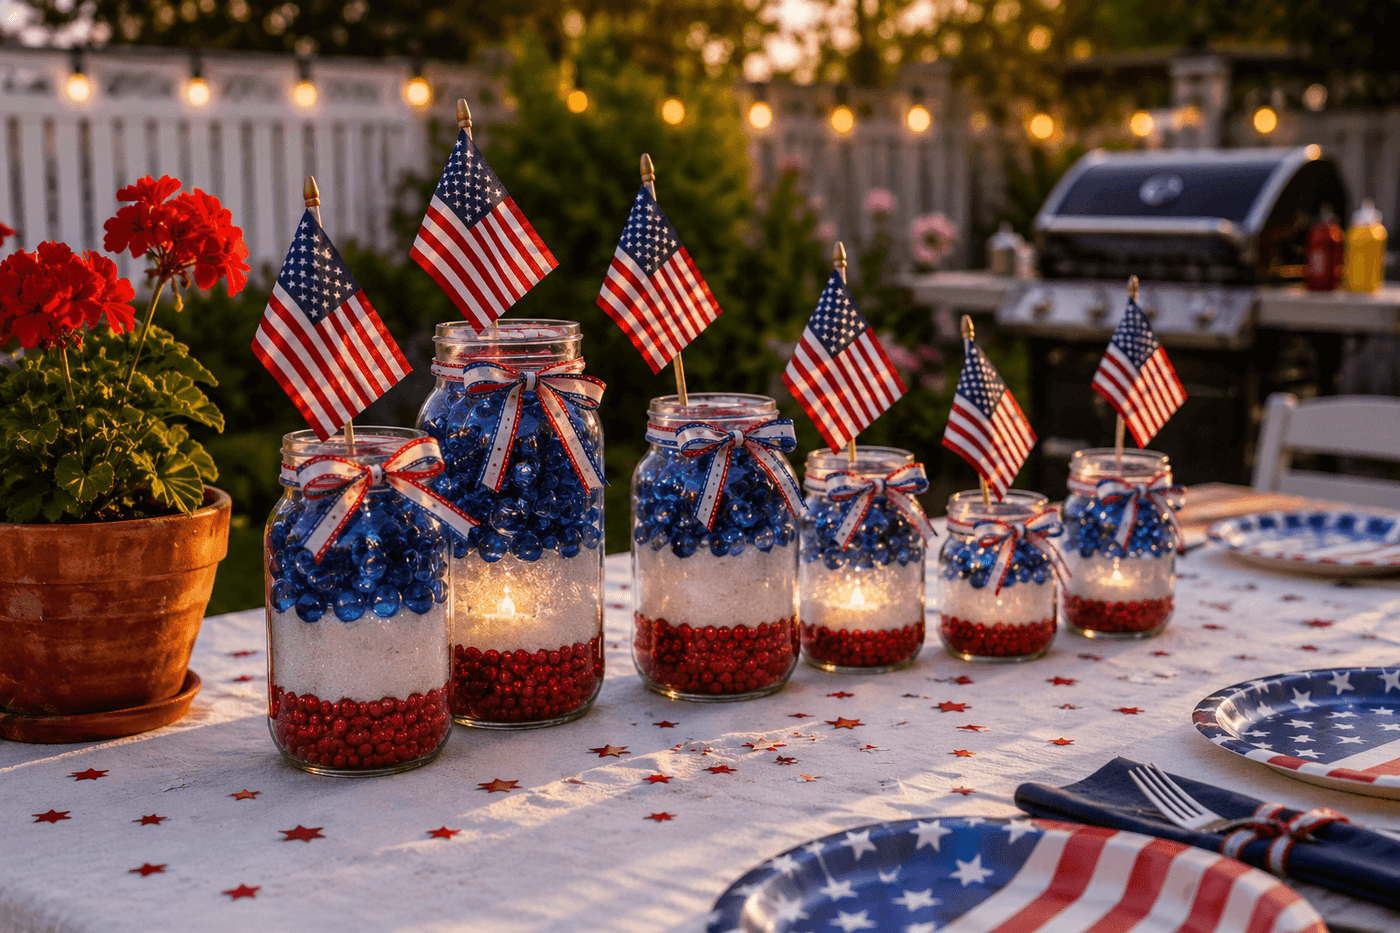
The Fourth of July table deserves more than a paper tablecloth and a bag of star-shaped chips arranged hopefully in the center — and the gap between a table that looks festive and one that looks genuinely put-together is smaller and cheaper than the party supply store wants you to believe. Dollar store mason jars filled with layered red, white, and blue materials, tied with ribbon, and clustered at varying heights down the table center produce the kind of cohesive, intentional tablescape that gets photographed and complimented before the food even comes out. The whole setup costs $5–8 total for five to seven jars, takes about 30 minutes to assemble, and works equally well as indoor dining table décor or outdoor BBQ centerpieces — and when the party is over the jars get washed and repurposed while the flags get saved for next year. This is the holiday décor project where the dollar store genuinely delivers everything the party supply store sells for four times the price, because red, white, and blue ribbon looks exactly the same regardless of where it was purchased.
What You'll Need
- Mason jars or glass jars in varied sizes — pint, half-pint, and quart sizes together create the height variation that makes a grouped centerpiece look designed; dollar stores carry these reliably in summer (~$1–2 each)
- Red, white, and blue ribbon — wired ribbon holds bows without wilting in outdoor heat; ¼-inch gingham or ⅝-inch grosgrain in all three colors; one spool of each covers five to seven jars (~$1 per spool)
- Small American flags on sticks — 4x6 inch flags are the most proportional for standard mason jars; dollar stores typically carry packs of 12 (~$1 per pack)
- Layered jar fillers — choose by approach:
- Layered fill approach: red decorative beads or cranberries on bottom, white sand or rice in the middle, blue glass marbles or navy beans on top — the three distinct color layers visible through clear glass are the most graphic and photographable option
- Floral approach: red silk roses or carnations, white daisies or baby's breath, blue hydrangea or delphinium stems; cut to graduated heights and arranged loosely in water or floral foam
- Mixed approach: a base layer of blue marbles for weight and color, stems of red and white faux flowers, and a flag accent — the most visually complete and easiest to assemble
- Battery-operated tea lights — flickering LED versions for evening events; drop one into each filled jar for a glow that shows through the layered filler and ribbon at dusk (~$3–4 for a pack of 12)
- Star confetti or star stickers — scattered on the table surface between jars to extend the patriotic theme across the full tablescape rather than concentrating it only in the jars (~$1 per pack)
- Painter's tape and acrylic craft paint — for the painted stripe or flag design option on solid-color jars; red, white, and navy blue craft paint (~$1 per bottle at dollar stores)
How to Make Them
- Choose your primary jar style before shopping — the layered fill approach requires clear glass jars without any texture or embossing that would obscure the color layers, while the floral approach works with any jar including textured mason jars whose surface detail adds visual interest. Confirm the jars are fully clear rather than slightly tinted green or amber, which muddies the red and white layers and makes the finished centerpiece look less crisp than the design intends.
- Wash all jars thoroughly and dry completely before filling — any moisture inside the jar causes dry fillers like sand, rice, or beads to clump into an uneven mass rather than settling into the clean horizontal layers that make the layered approach so visually striking. For outdoor BBQ centerpieces in direct sun, consider whether your chosen fillers will fade, melt, or attract insects before committing to organic materials like real cranberries or rice that degrade in summer heat.
- Fill layered jars slowly and deliberately — pour each color layer separately, tapping the jar gently on a flat surface after each addition to level it before adding the next. The layer boundaries between colors are the most visually important feature of the finished jar; pouring too quickly disturbs the previous layer and blurs the boundary into a gradient rather than a crisp horizontal line. Aim for roughly equal-depth layers of each color for the most balanced and flag-suggestive proportion.
- Insert flag sticks and flower stems before tying ribbon — stems and flags pushed into the jar after the ribbon is tied disturb the bow and require retying, while inserting them first allows the ribbon to be tied around the fully assembled jar in one clean step. For layered fill jars without flowers, push the flag stick straight down through the center of all three layers until it reaches the jar bottom, which anchors it upright rather than leaning against the jar wall.
- Tie ribbon around the jar neck in a double bow — wrap the ribbon twice around the neck rather than once before tying, which creates a fuller, more substantial bow that holds its shape through an outdoor event in summer heat and humidity. Wired ribbon is the specific product that produces a bow that stays perky rather than drooping by the time guests arrive; unwired ribbon in outdoor summer conditions wilts within an hour of tying regardless of how carefully it was arranged.
- Mix ribbon colors across the jar grouping rather than tying every jar in the same color — a red bow on one jar, white on the next, blue on the next, then repeating the sequence across the full cluster creates color rhythm along the table length that reads as more intentional and designed than a uniform single-color ribbon on every jar, even though the effort is identical.
- Arrange the filled jars in a cluster down the table center varying heights deliberately — tallest jars at the center of the cluster where they create a visual peak, medium jars flanking them, and the smallest jars at the ends where they frame the arrangement and lead the eye back to the table surface. A flat arrangement of same-height jars reads as a row of objects; a varied-height arrangement reads as a designed centerpiece, and the difference is entirely in the sequencing rather than the jars themselves.
- Scatter star confetti across the table surface between and around the jar cluster immediately before guests arrive rather than during setup — confetti placed during setup migrates into food and drinks as the table is arranged, while confetti added as a finishing touch immediately before the party stays on the table surface where it belongs and creates the fully patriotic tablescape effect without ending up in anyone's lemonade.
Event stylists and tablescape designers who create holiday tablescapes for catering and editorial photography use one proportion rule for patriotic color arrangements that prevents the finished table from looking like a flag store exploded rather than a curated celebration: use red as the dominant color, white as the secondary color, and blue as the accent — in roughly a 60/30/10 split across the full tablescape. Blue is the most visually dominant of the three colors at equal quantities and overwhelms the other two when used in equal proportion, pulling the eye away from the full composition rather than contributing to it. Event designers who specify patriotic tablescapes for Fourth of July events consistently arrive at this ratio through experience: the table that reads as festive and cohesive rather than overwhelming almost always has significantly less blue than red or white when the full surface is assessed. Apply this to the jar grouping by using blue as the top accent layer in filled jars and the ribbon on one jar in three rather than alternating equally across all three colors — the restraint on blue is what makes the red and white read more vividly and the full table feel more elegant than emphatic.