
Paint a Bold Rock Garden Border for $18
Twenty or thirty painted rocks lined up along your garden bed will make traditional edging feel terminally boring
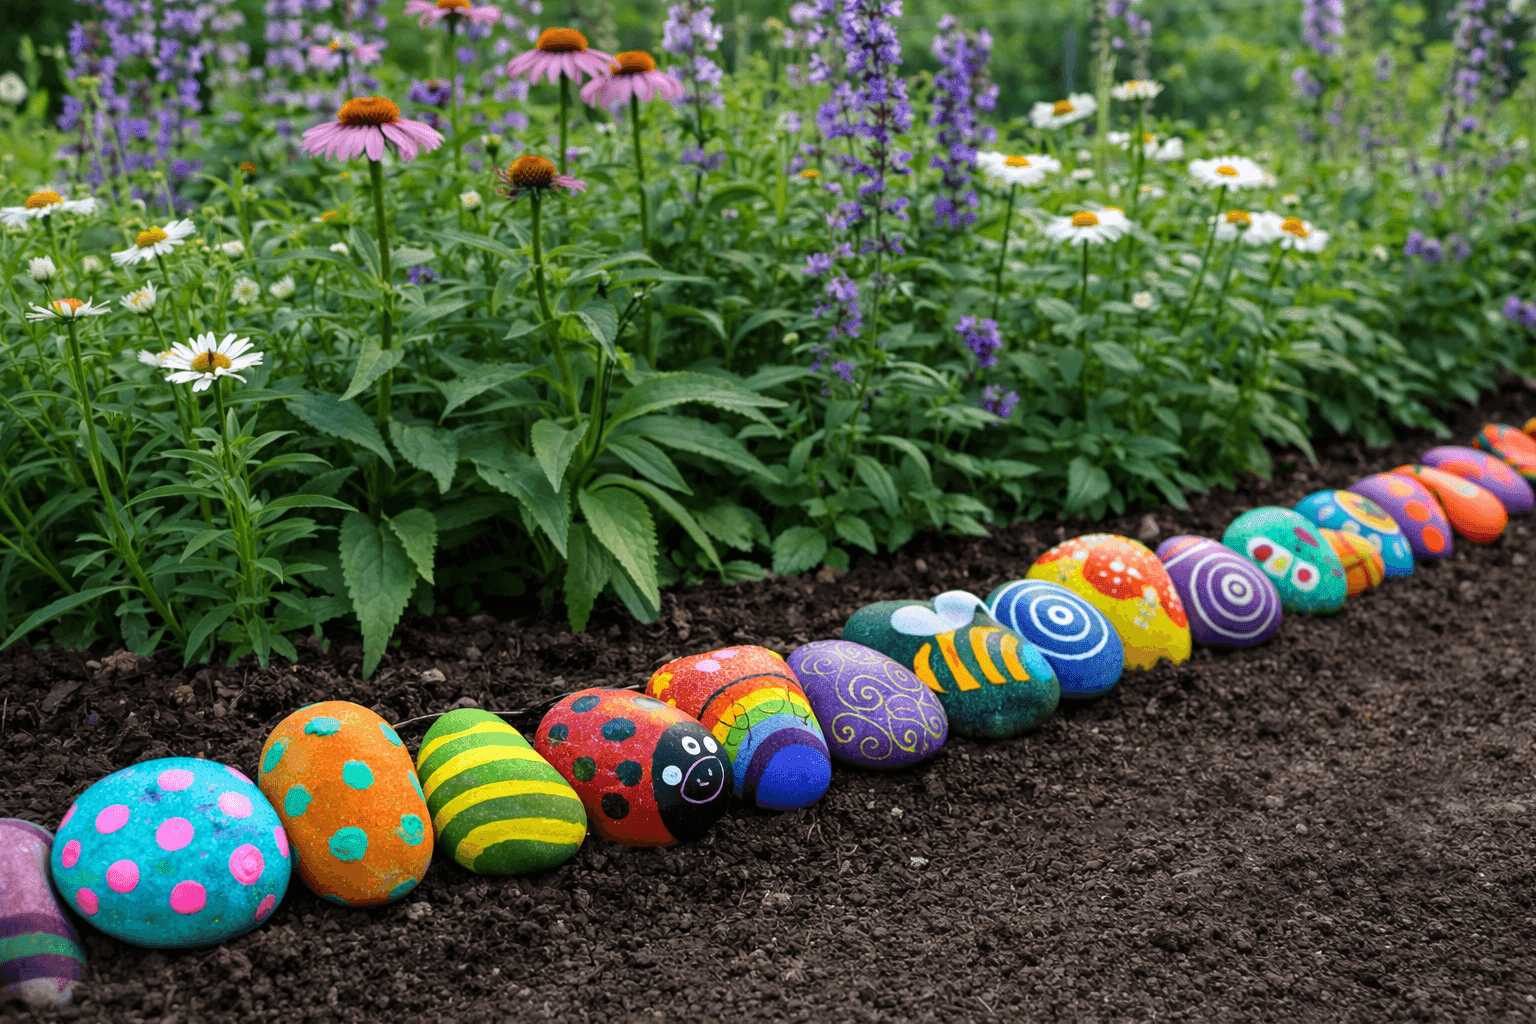
Most garden edging options — black plastic borders, gray concrete blocks, uniform river rock — do their functional job and absolutely nothing else. They contain the bed and that's it. A border of 20 or 30 hand-painted rocks in full joyful chaos is a completely different statement: it turns a garden edge into something people walk over to look at, something kids immediately want to touch, something that makes the whole yard feel like it belongs to someone who actually enjoys being out there. The Sassy Saturday energy here is fully intentional — this is not a project for muted tones and tasteful restraint. Hot pink dots on turquoise, lime green stripes on orange, metallic gold on deep purple, ladybugs with actual personalities, bees with little worried expressions — the more committed you are to the chaos the better the border looks, because joyful visual variety is the whole design principle at work. Twenty to thirty rocks at $15–20 total in paint and sealer makes this one of the highest-personality-per-dollar projects in the whole garden.
What You'll Need
- The Rocks
- Smooth river rocks in varied sizes — collect from a creek, lake shore, or gravel bar for free, or buy a 20-pound bag of landscape river rocks at any garden center for $6–10; a mix of egg-sized to fist-sized rocks gives the border visual rhythm
- Smooth surfaces are essential — rough, porous rocks don't hold paint detail cleanly and the designs blur into the texture; river rocks and tumbled landscape stones are ideal
- Rinse collected rocks thoroughly and let dry completely for at least 24 hours before painting — any surface moisture causes paint adhesion failure
- Paint
- Outdoor acrylic craft paint — the outdoor-rated formula is non-negotiable for anything living in the garden through rain and freeze cycles; indoor acrylics look the same going on and look completely different after one winter (~$1–2 per bottle; you need 8–12 colors for genuine joyful chaos)
- Bold color recommendations that work together without planning: hot pink, turquoise, lime green, bright orange, cobalt blue, sunshine yellow, deep purple, and white for detail work and dots
- Metallic gold and silver paint — even one or two rocks with metallic accents elevates the entire collection without requiring any additional skill
- White paint as your base coat for any rock getting a light or bright design — a single white base coat makes every color on top appear more saturated and true
- Brushes and Tools
- A set of small craft brushes in varied sizes — a wide flat brush for base coats, a medium round for stripes and larger designs, and a fine liner brush for dots, faces, and detail work (~$3–6 for a basic set)
- The eraser end of a pencil dipped in paint makes perfectly uniform polka dots without a brush — the single most satisfying rock painting technique
- Cotton swabs for large dots and stippling effects
- Sealer
- Outdoor polyurethane spray or outdoor Mod Podge — 2–3 coats over every rock is the difference between a border that looks great for one season and one that holds up for years; sealing is not optional for anything living outdoors (~$7–10 for a spray can that covers all 30 rocks)
- Total Cost
- $15–20 for paint, sealer, and brushes if rocks are collected free; $22–28 if purchasing a bag of landscape river rocks
How to Make Them
- Collect and prep all rocks first so they're clean and fully dry before you open a single paint bottle — rinse off dirt and debris, scrub any stubborn deposits with a stiff brush, and spread rocks in a single layer in the sun for at least a few hours. Damp rocks under paint produce adhesion bubbles that peel within the first rain. While rocks dry, lay out all your colors and assign rough design ideas to each rock so you're not making every decision in the moment with wet paint.
- Apply a base coat to any rock getting a white, light, or very bright design — one coat of white outdoor acrylic paint applied with a wide brush and allowed to dry completely before the design layer dramatically improves color saturation. Dark rocks with no base coat require three or four design coats to achieve vibrancy; the same design on a white-based rock is done in one. Rocks destined for dark designs (deep purple, navy, forest green) can skip the base coat entirely.
- Work in batches by design type rather than finishing one rock at a time — paint all the polka dot rocks first while that technique is flowing, then move to stripes, then to creatures, then to geometric patterns. Batch painting maintains momentum, keeps colors consistent across similar designs, and means you're not constantly washing brushes between every rock. Set each finished rock on a protected surface to dry before the next stage.
- Make polka dots with a pencil eraser rather than a brush — dip the eraser end into a puddle of paint, blot once on scrap paper to remove excess, then stamp evenly spaced dots across the rock surface. The consistent round shape the eraser produces looks more intentional than any brush dot, works at any scale by using different eraser sizes, and is genuinely the most satisfying technique in rock painting once you try it once.
- Commit fully to the creature rocks — ladybugs, bees, caterpillars, snails, and frogs are the rocks that make children immediately crouch down for a closer look and adults smile against their will. A ladybug is two coats of red, a black oval head, and a black line down the center with black dots. A bee is alternating yellow and black stripes with two tiny white wing ovals. Neither requires artistic skill — just shapes and confidence. Give them eyes with a white dot and a smaller black dot on top, and suddenly they have personalities.
- Add metallic accents last on any rock that wants a finishing touch — a ring of gold dots around the edge of a painted design, a silver chevron on a bold purple base, or a swipe of metallic copper across a striped rock creates highlights that catch sunlight in the garden and elevate the visual quality of the whole collection. Metallic paints are unforgiving of wet underlying layers, so always apply over fully dry base designs.
- Seal with 2–3 coats of outdoor polyurethane spray once all designs are completely dry — hold the can 8–10 inches from the surface and apply thin, even passes rather than heavy saturating coats that pool in crevices and dry with a streaky finish. Allow each coat to dry for the time specified on the can (usually 30–60 minutes) before applying the next. Flip rocks over and seal the bottom faces too — unsealed rock bottoms wick moisture into the paint layer from underneath during wet weather.
- Arrange along the garden bed with intentional variety rather than any attempt at order — mix sizes, alternate creature rocks with pattern rocks, cluster two or three similar colors and then break the run with a contrasting surprise. Stand back and look at the full border from about ten feet away to spot any section that's too monotonous and needs a more disruptive rock inserted. The border should look like organized chaos — deliberate in its joyfulness, consistent in its commitment to color, and completely unlike anything you can buy at a garden center.
Landscape artists and garden installation designers who work with mixed decorative elements almost always establish what they call a "color thread" running through an otherwise chaotic composition — one color that appears on at least every third or fourth element, even briefly, to give the eye a rhythm to follow through the variety. For a rock border this might be a white dot or accent that appears on rocks painted in every other color, a gold metallic highlight that shows up on the ladybug's spots and the geometric rock and one polka dot rock, or a single consistent background color used on a handful of rocks interspersed throughout. The full chaos of varied designs and colors reads as intentional art rather than random mess when there's a quiet repeating thread the eye can follow even if no one consciously notices it's there.














