Neon Stair Risers: Geometric Art for $30
Painter's tape, neon paint, and one Sassy Saturday — and a staircase that was background furniture becomes the most talked-about feature in the house.
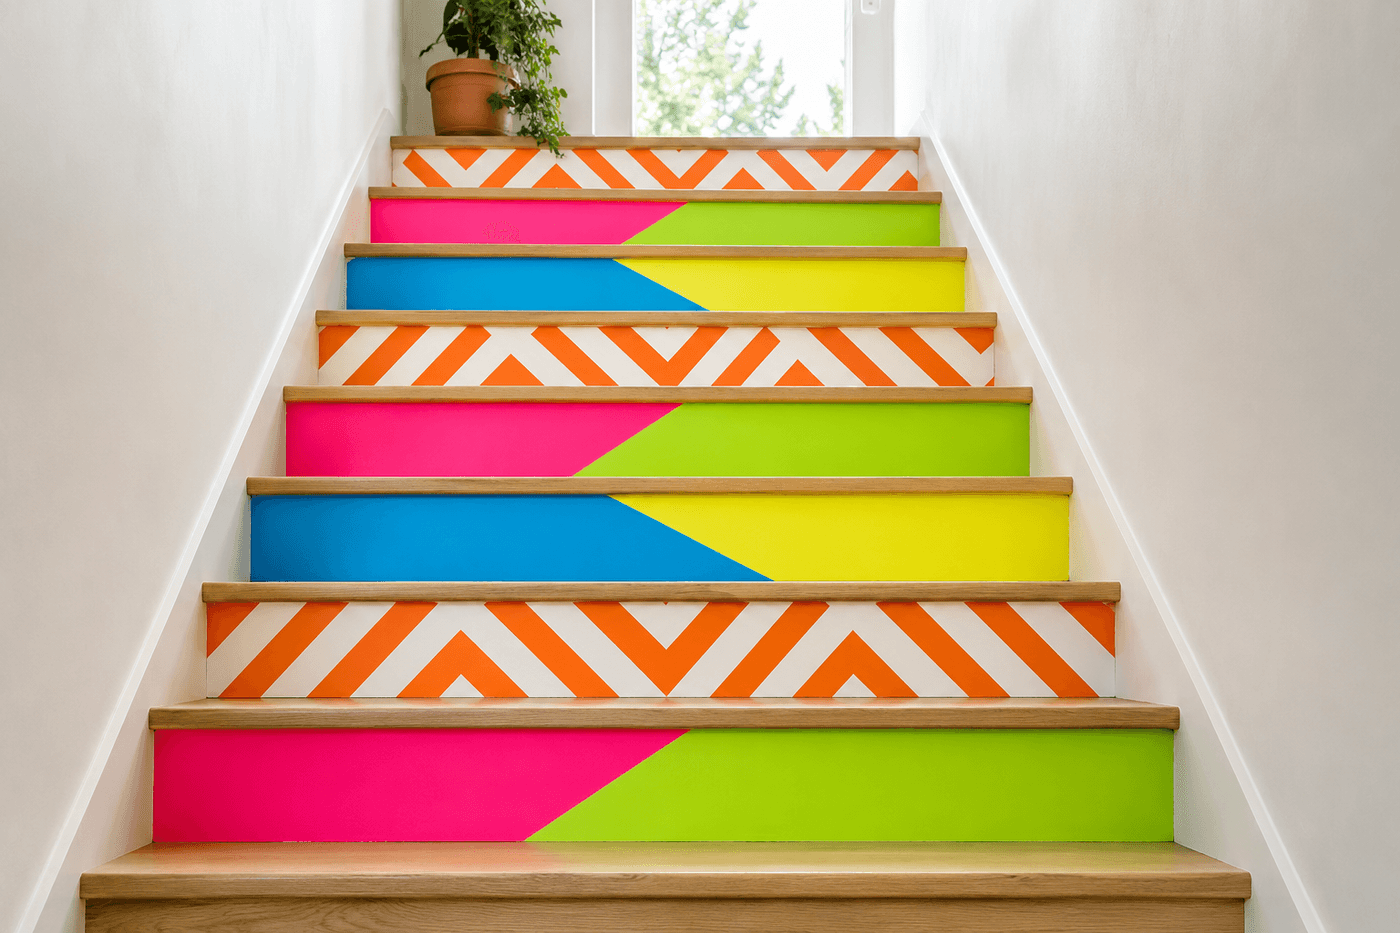
A staircase is one of the most overlooked surfaces in any home — it is used multiple times daily by every person in the household and seen by every guest who walks through the door, and in most homes it is painted the same white or beige it has been since the house was built, which is to say it contributes exactly nothing to the visual identity of the space. Neon geometric painted risers change this completely and permanently, and the specific quality of the change is not subtle: a staircase with electric pink diagonal color blocks, lime green chevrons, and bright orange triangles on alternating risers is not a staircase anyone walks past without noticing, commenting on, or photographing. The technique is painter's tape geometry applied to the vertical riser surfaces — the treads stay neutral so foot placement is always clear — and neon paint in two coats per riser. A white primer coat under every neon section is what makes the colors vibrate at full saturation rather than reading as muted approximations of themselves. Clear polyurethane over the finished design handles the daily foot-adjacent contact and scuffing that stair risers experience without the color fading or chipping. This is not a subtle project. That is entirely the point.
What You'll Need
- White primer spray or brush-on — applied to all riser surfaces before any neon color; neon pigments are fluorescent dyes that cannot overcome a dark or even off-white existing riser surface without a white primer base; this is the non-negotiable first step that separates neon paint that glows from neon paint that looks muddy and faded (~$6–8 per can)
- Neon paint in 4–5 colors — choose your palette:
- Electric pink — Rust-Oleum Fluorescent or DecoArt Neon Pink
- Lime green — Rust-Oleum Fluorescent Yellow-Green
- Bright orange — Rust-Oleum Fluorescent Orange
- Electric blue — Rust-Oleum Fluorescent Blue or DecoArt Neon Blue
- Shocking yellow — Rust-Oleum Fluorescent Yellow; sample or small craft sizes cover multiple risers (~$4–6 per color in craft size)
- FrogTape painter's tape, ¾-inch and 1-inch widths — FrogTape specifically rather than standard blue tape for the sharpest geometric edges on painted surfaces; the ¾-inch width navigates tight geometric corners more precisely than the 1-inch for complex patterns; buy two to three rolls for a full staircase (~$5–7 per roll)
- Clear polyurethane, semi-gloss or satin — two to three coats over the fully cured neon design; stair risers experience daily foot-adjacent scuffing and cleaning that requires a durable clear coat rather than the thin craft sealers appropriate for decorative objects; Minwax Polycrylic water-based formula dries quickly and does not yellow neon colors the way oil-based polyurethane does (~$10–12 for a quart)
- Foam rollers and small foam brushes — foam rollers produce the smoothest neon coverage on flat riser surfaces; small foam brushes reach into corners and along tape edges where a roller cannot contact the surface
- Painter's tape for tread protection — applied along the full length of each tread edge where it meets the riser to keep neon paint off the neutral treads during painting; remove and replace this protection tape before each new riser color application
- Pencil and ruler or speed square — for marking geometric division lines on each riser before taping; consistent geometry across multiple risers requires marking rather than taping by eye
- Fine-grit sandpaper, 220-grit — for lightly scuffing existing riser surfaces before priming to improve adhesion, and for light sanding between polyurethane coats
How to Paint Them
- Plan the full staircase design on paper before touching a single riser — sketch each riser as a rectangle and fill in the intended geometric pattern and color for each one. The staircase reads as a unified installation from the bottom when viewed all at once, and patterns that seem unrelated riser-by-riser can be designed to flow across the full staircase as a connected composition — a diagonal that begins at the bottom left of the first riser continuing as the same diagonal angle across every subsequent riser produces a graphic effect visible only when the full staircase is viewed that individual riser decisions cannot anticipate.
- Clean all riser surfaces thoroughly with a degreaser and allow to dry completely — stair risers accumulate shoe scuff marks, cleaning product residue, and foot oils that prevent primer and paint from adhering; this is particularly important on painted wood risers where previous paint layers may have a semi-gloss finish that needs light sanding with 220-grit before primer application to provide mechanical adhesion rather than relying on chemical bond alone.
- Prime every riser surface completely with white primer before any geometric taping or neon color application — apply one even coat of white primer to every riser from edge to edge, allow to dry fully, and confirm the coverage is complete with no thin spots where the existing riser surface shows through the primer. A primer coat with thin spots produces neon sections of inconsistent color intensity in the finished design where the full-coverage areas glow and the thin-spot areas appear muted, which is immediately visible across the full staircase view.
- Mark the geometric divisions on each primed riser with a pencil and ruler before applying any tape — consistent geometry requires measurement rather than estimation, particularly for diagonal patterns where the angle must be identical across multiple risers for the design to read as intentional rather than casually applied. Mark both the starting point and the ending point of each geometric line and connect them with a straight edge before the tape goes on.
- Tape the geometric boundaries with FrogTape, pressing every tape edge firmly and continuously against the primed riser surface — the same firm-edge sealing technique that produces crisp lines on saucers and mats produces crisp geometric lines on risers, and the same consequence of any lifted tape section applies: paint wicks under the gap by capillary action and produces a soft, blurred edge rather than a sharp geometric line. Apply the tread protection tape along the full tread-to-riser joint before painting each riser.
- Paint each color section in two thin coats with a foam roller — thin coats dry faster, cover more evenly over the primer base, and produce less bleed under tape edges than heavy coats that pool at the tape line. Work color by color across the full staircase — complete all risers that have the first color before moving to the second color, which is more efficient than completing each riser individually and eliminates the need to repeatedly reload and clean for the same color.
- Remove tape from each color section while the second coat is still slightly tacky — the 45-degree slow peel technique that produces crisp borders on any taped paint application is equally critical here, and the tacky-not-wet timing window is what produces the cleanest geometric lines on stair risers where the paint film is thin enough to tear rather than separate cleanly if the tape is pulled from fully cured paint. Inspect each revealed edge immediately after tape removal and touch up any bleed spots with a fine brush before moving to the adjacent color section.
- Apply three coats of water-based clear polyurethane over the fully cured completed design — allowing full dry time between coats and sanding lightly with 220-grit between the first and second coat to remove any dust particles that settled during drying. Water-based polyurethane is the mandatory choice over oil-based for neon colors; oil-based polyurethane yellows as it cures and within one year shifts every neon color toward a warmer, less saturated version of itself that significantly diminishes the electric quality that makes the installation so visually compelling.
Interior designers and decorative painters who create staircase art installations for residential and commercial spaces use one composition strategy that elevates a painted stair riser project from a collection of individual colored risers to a unified visual installation: design one or two geometric elements to flow continuously across every riser as a through-line, even while the colors and secondary patterns change from riser to riser. A diagonal line that begins at the lower left corner of the first riser and exits the upper right corner of every subsequent riser at the same angle creates a visual through-line that the eye follows upward through the full staircase — making the installation readable as a single composition rather than a series of individual design decisions. Decorative painters who use this continuous through-line technique describe the result as giving the staircase a sense of movement and intentionality that individual riser designs cannot produce, because the connecting element gives the eye a path to travel rather than a series of individual stopping points. Apply this by marking the through-line angle on every riser before taping any individual geometric pattern, using it as the organizational backbone that the riser-specific patterns are built around.