Mirror Mosaic Gazing Balls: Garden Disco, $15
A bowling ball from the thrift store, a bag of mirror tiles, and E6000 — and your garden throws dancing light reflections across everything in a twenty-foot radius.
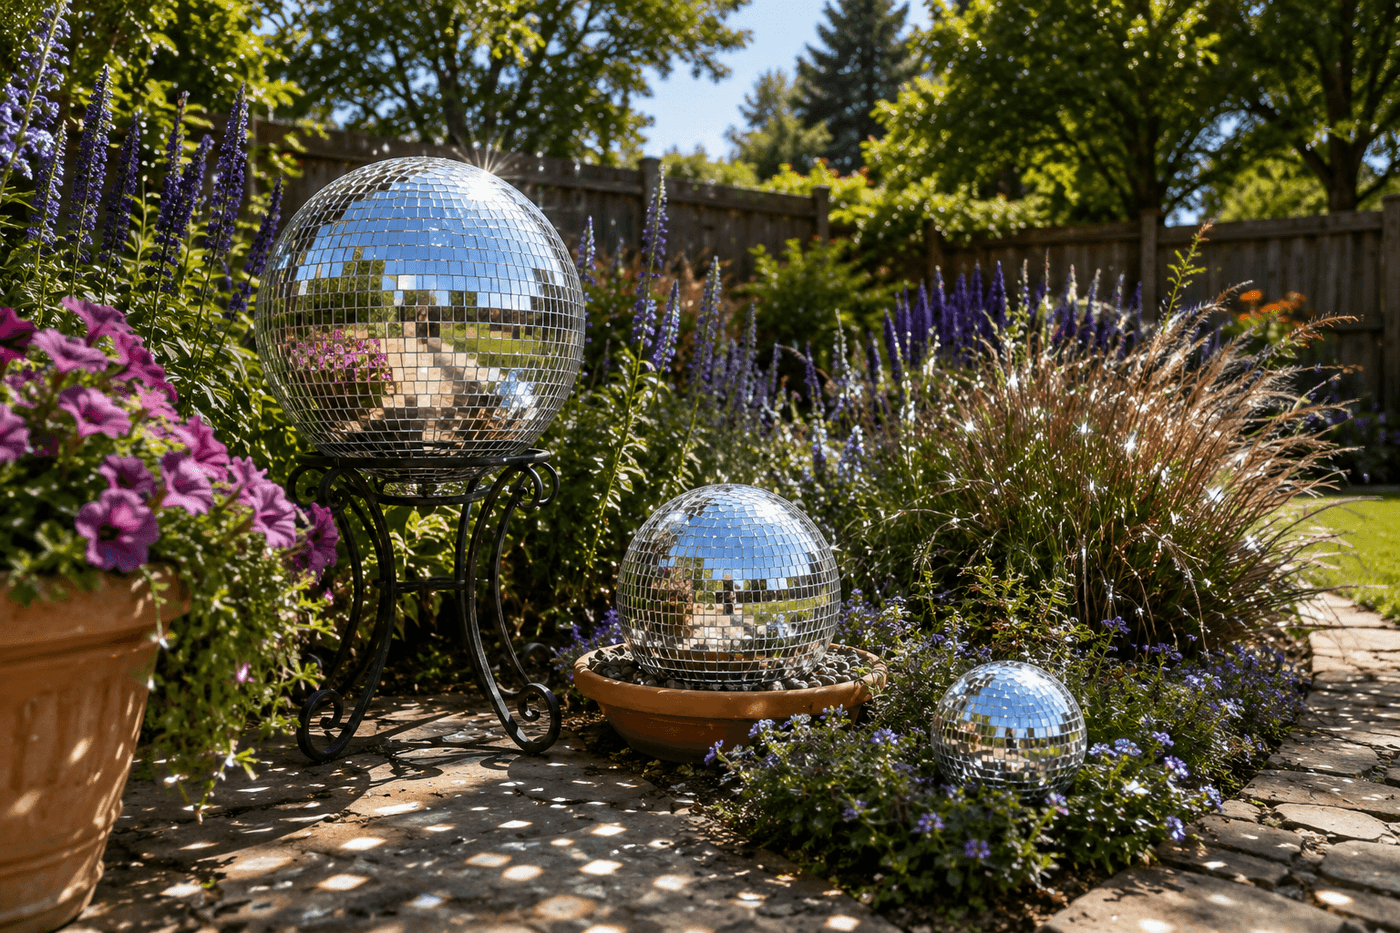
Commercial gazing balls cost $40–80 for something that sits in a garden bed and glints mildly in the sun — pretty enough, but nowhere near the full-garden-disco experience that a proper mirror mosaic sphere produces when afternoon light hits it and sends dancing reflections across every surrounding plant, the garden path, and the fence twenty feet away. The DIY version starts with a bowling ball from the thrift store — often free from bowling alleys rotating out old stock — covered completely in small mirror tiles or mosaic squares adhered with E6000 and optionally grouted with silver metallic grout for a finished look. The result is not a garden accent but a light-throwing event that changes the atmosphere of the entire garden bed when the sun is at the right angle, producing the kind of visual drama that makes guests stop mid-conversation to watch the reflections move. Make three in graduated sizes, place them at different heights in a single garden bed, and the combined light effect is genuinely spectacular — the kind of garden feature that is difficult to explain in words but impossible to look away from in person. Total cost per ball: $10–20 depending on sphere source and mirror tile quantity, versus $40–80 for the commercial version that does a fraction of what this one does.
What You'll Need
- Sphere base — choose one:
- Bowling ball — the ideal weight and density for a garden sphere that will not tip or blow over; thrift stores carry them for $1–3; bowling alleys often give away retired balls for free — call ahead and ask; finger holes can be filled with two-part epoxy putty before tiling
- Plastic craft sphere — available at craft stores in 4"–12" sizes; lighter than bowling balls and requires a weighted base or display stand to prevent rolling; good for elevated display on a plant stand (~$5–8 each)
- Old globe light fixture globe — salvaged from lighting stores or architectural salvage; already glass and heavier than plastic spheres; requires careful handling during tiling
- Mirror tiles or mirror mosaic squares — 3/4" or 1" square mirror tiles from craft stores or online produce the most reflective surface; smaller tiles follow the sphere curve more naturally than larger ones and produce more individual reflection points; a 200-piece bag covers one bowling ball (~$6–10)
- E6000 adhesive — the specific adhesive required for mirror-to-curved-surface bonding; other adhesives including hot glue and construction adhesive do not maintain bond strength through outdoor temperature cycling; E6000 remains flexible when cured, which accommodates the expansion and contraction that mirror tiles experience through seasons (~$5–7 per tube, covers one to two balls)
- Metallic silver grout — optional but produces a dramatically more finished result than gaps between tiles; unsanded grout for gaps under 1/8"; pre-mixed silver or metallic gray grout eliminates the color-mixing step (~$8–10 for a small tub covering one ball)
- Grout sealer — applied over cured grout to prevent outdoor moisture penetration that causes grout to crack and crumble through freeze-thaw cycling (~$5–8)
- Safety glasses and heavy gloves — required for handling broken mirror pieces; even pre-cut mosaic tiles have sharp edges that cause cuts during the close-contact work of individual tile placement
- Toothpicks or craft sticks — for applying E6000 adhesive precisely to individual tile backs without getting adhesive on fingers or the tile face
- Display stand or decorative bowl — for elevating the finished sphere in the garden bed so it is visible above surrounding plants and positioned to catch maximum sunlight; a terracotta pot saucer filled with gravel makes an inexpensive and natural-looking sphere cradle
How to Make Them
- Prepare the sphere surface by cleaning thoroughly with rubbing alcohol and allowing to dry completely — E6000 adheres poorly to dusty, oily, or even slightly damp surfaces, and bowling balls specifically accumulate lane oil on their surface over years of use that must be fully removed before tiling. Wipe twice with fresh alcohol on a clean cloth and allow to air dry for 30 minutes before touching the surface with hands, which immediately redeposit skin oil.
- Fill bowling ball finger holes with two-part epoxy putty — press the mixed putty firmly into each hole, overfill slightly, and allow to cure for 30 minutes before sanding flush with the ball surface. Unfilled finger holes create a visible, untileable interruption in the mosaic surface that draws the eye in exactly the wrong way in a finished gazing ball; a flush-filled and sanded hole tiles over invisibly and maintains the uninterrupted sphere surface that produces the full reflection effect.
- Plan your tiling approach before opening the adhesive — work in sections from the bottom of the sphere upward, completing each horizontal band before moving to the next, which prevents the situation of reaching across freshly adhered tiles to place new ones and accidentally dislodging them before the adhesive sets. Mark the horizontal band lines lightly with a paint marker if the sphere curve makes section visualization difficult.
- Apply E6000 to the back of each mirror tile individually using a toothpick rather than spreading adhesive on the sphere surface — tile-by-tile application allows precise adhesive placement that prevents squeeze-out onto the mirror face where it dries to a cloudy film that reduces reflectivity. Apply a pea-sized amount to the center of each tile back, press firmly onto the sphere surface, and hold for 10 seconds before releasing; E6000 achieves initial tack within seconds but full cure requires 24 hours without disturbance.
- Place tiles as closely together as possible while following the sphere curve — the gap between tiles naturally increases slightly as you work toward the widest circumference of the sphere and then decreases again toward the top, which is a geometric inevitability of tiling a curved surface with flat tiles rather than a placement error. Keeping gaps as consistent as possible across the full surface produces the most uniform finished appearance whether grouted or left open.
- Work in sessions of 30–45 minutes with the sphere resting in a stable cradle — a bowl filled with dry rice or sand holds the sphere at whatever angle is most convenient for the current tiling section without rolling. Attempting to tile beyond 45 minutes per session leads to rushed tile placement on tired hands that produces uneven spacing and tile misalignment in the final sections that is visible in the finished ball; resting between sessions and returning with fresh attention produces more consistent work than pushing through fatigue.
- Allow the fully tiled sphere to cure undisturbed for 24 full hours before grouting — E6000 that has not fully cured is reactivated by the moisture in the grout mix and loses tile adhesion at the most recently placed tiles, which shift position during grouting and produce a visible irregularity in the finished surface. Set the sphere in its rice-filled bowl in a stable indoor location where it will not be bumped during the cure period.
- Grout the gaps between tiles by pressing silver metallic grout into the spaces using a gloved fingertip — work in small circular motions to pack the grout fully into each gap, then wipe the excess from the tile faces with a damp sponge before it dries. Grout dries quickly on mirror surfaces; work in small sections of approximately 10 square inches at a time and wipe each section before moving to the next. Allow the grout to cure fully per package instructions before applying grout sealer, and allow the sealer to cure before placing the finished sphere outdoors.
Garden designers and landscape artists who create reflective garden features for residential and public installations use one placement principle that maximizes the light-throwing effect of mirror mosaic spheres and is almost universally overlooked by first-time makers: position the sphere so its center sits at approximately the same height as the top of the surrounding plants rather than at ground level, and orient it to face the primary sun angle for your garden's sun exposure. A sphere placed at ground level in a garden bed reflects primarily the soil and lower plant stems back at the viewer and throws light upward past the level of the garden; a sphere elevated to the plant canopy height on a stand or decorative column reflects the full garden scene — sky, plants, fence, and architecture — and throws light horizontally across the garden at the level where it illuminates plants, pathways, and people. Landscape artists who install mirror spheres for garden photography and residential feature gardens consistently elevate them to canopy height specifically because the reflections at this height are both more beautiful in the sphere's surface and more spectacular in the dancing light they project onto the surrounding garden. The stand costs less than the sphere to build and makes the entire project perform at a level that ground placement cannot approach regardless of sphere quality.