Make Punched Tin Can Lanterns for Summer Evenings for $8
Frozen cans, a hammer, a nail, and one evening — the patio lanterns that cast the most intricate dancing shadows you have ever seen for $8
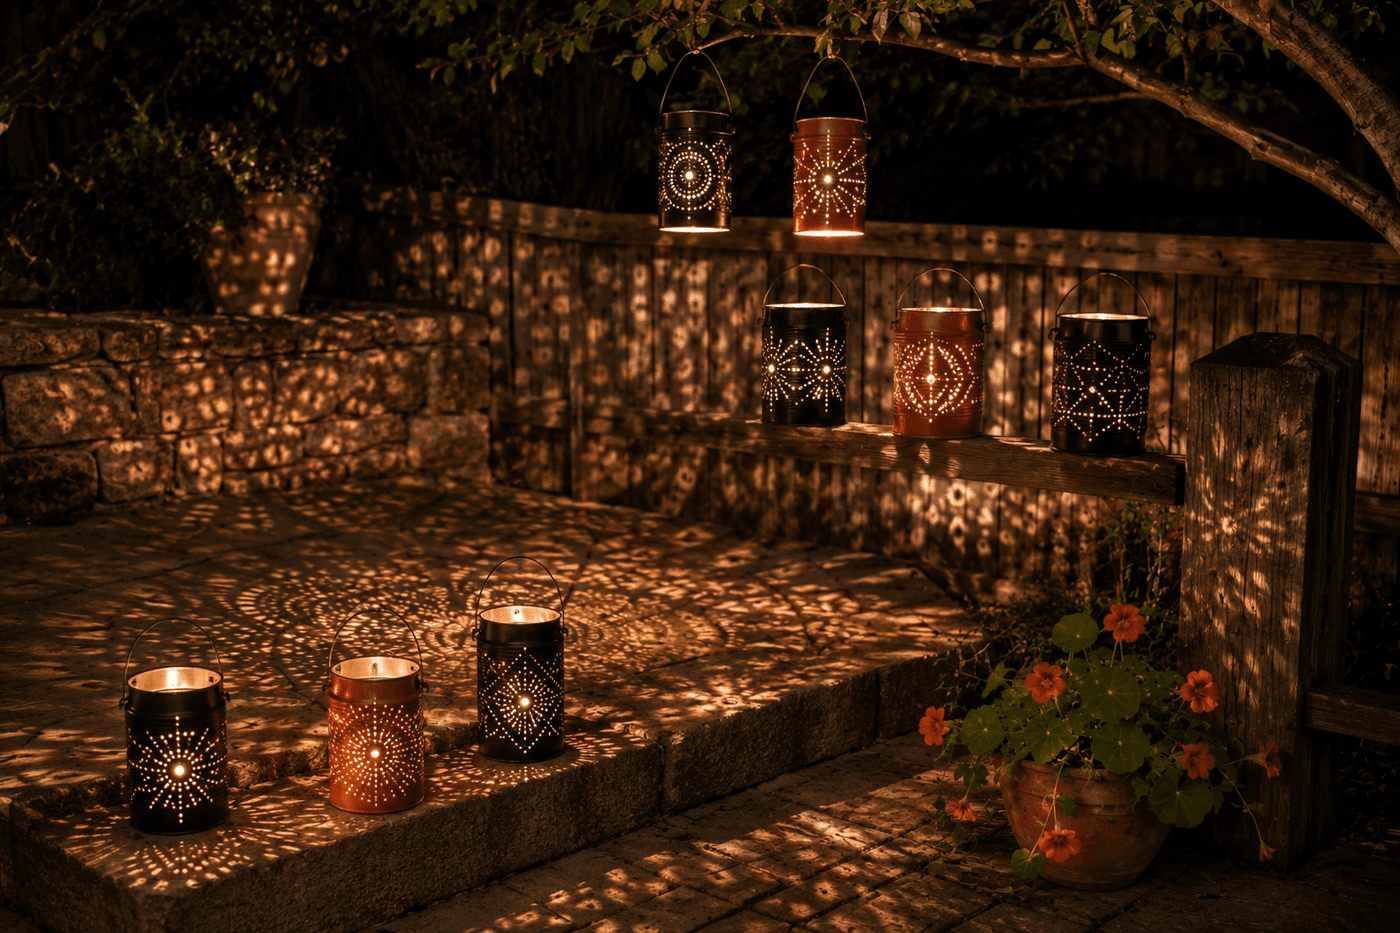
There is a specific kind of outdoor magic that only light through small holes can create — the way a punched pattern throws intricate, moving shadows across a fence or patio surface in a radius far beyond the lantern itself, turning an ordinary backyard into something that feels genuinely otherworldly after dark. Tin cans from the recycling bin become the vessel for this effect with nothing more than a frozen ice core, a hammer, a nail, and a marked pattern, and a cluster of eight lanterns arranged along patio steps and fence rails creates the kind of ambient evening lighting that guests photograph before they even sit down. The freezing technique is the one piece of knowledge that separates a successful punched lantern from a dented, collapsed can that goes in the trash on the first attempt — ice supports the tin walls from inside while the nail punches through cleanly, and it costs nothing beyond the patience to freeze the cans overnight before the Tuesday evening project begins. Eight lanterns for $8, one evening of quiet, satisfying work, and every summer evening on your patio becomes something worth staying outside for.
What You Need
- Large tin cans, qty 6–10 — 28-ounce tomato cans and large coffee cans both work beautifully; taller cans produce more dramatic shadow projection than short squat cans because the light source sits deeper inside a taller vessel and the punched pattern extends over a larger surface area (free from recycling)
- Sharp nails in two sizes — a 16d common nail (3½ inches) for larger holes that allow more light through, and a finish nail (1½ inches) for smaller accent holes; varying hole sizes within a single pattern creates depth and visual complexity in the shadow projection that uniform holes cannot achieve (~$3–4 for a small box of each)
- Hammer — a standard 16-ounce claw hammer drives nails through frozen tin cleanly; heavier hammers hit with more force than is needed and increase the risk of driving the nail too deep and deforming the can interior
- Exterior craft paint or spray paint — for painting the outside of each can after the ice has melted; black and dark navy produce the most dramatic shadow contrast when lit; terracotta, copper, and deep green give a warmer, more organic character (~$4–6 for two small bottles or a spray can that covers all eight lanterns)
- Permanent marker — for drawing the punch pattern on the can exterior before freezing; the marker lines are punched through and then covered by paint, so precision matters more than aesthetics at the drawing stage
- Battery-operated LED tea lights or small LED pucks — safer than real candles in metal containers that heat up with flame; LED tea lights flicker realistically and are completely safe left unattended (~$4–6 for a pack of 10)
- Wire, 18-gauge, optional — for forming hanging loops at the can rim if you want to suspend lanterns from branches or hooks rather than setting them on surfaces (~$3 for a small roll)
How to Make Them
- Fill each clean, label-removed can completely with water to within a quarter inch of the rim and place in the freezer for a minimum of eight hours — overnight is ideal. The ice must be frozen solid all the way through, not just at the surface; a can with a liquid core beneath a frozen surface layer will dent and deform when the nail breaks through the outer ice and contacts the liquid interior. Tap the can bottom against the counter after freezing — a hollow sound indicates incomplete freezing; a solid thud indicates ice all the way through.
- Draw your punch pattern on the can exterior with a permanent marker before removing the cans from the freezer — work quickly and return cans to the freezer between the drawing and punching phases if working on multiple cans, because ice that has begun to thaw provides significantly less wall support than fully frozen ice and allows denting at the punch points. Simple geometric patterns — evenly spaced dots in rows, star outlines made from dot clusters, diagonal grid patterns — produce the most satisfying shadow projections; complex freehand designs are difficult to execute with a nail and tend to look less intentional in the finished lantern than structured geometric patterns.
- Work on a folded towel or piece of scrap lumber to protect the work surface and absorb hammer vibration — tin cans placed directly on a hard floor or table surface ring loudly with each hammer strike and the vibration transfers back into the can in a way that can shift the pattern or make the nail skid across the surface before penetrating. The towel provides just enough cushioning to dampen vibration without allowing the can to sink or tilt under hammer pressure.
- Punch each marked dot by placing the nail tip precisely on the marker dot and striking it with a single firm hammer blow — one confident strike punches through frozen tin cleanly, while multiple light taps allow the nail tip to skid across the surface between strikes and produce ragged, irregular holes rather than the clean circular punctures that create crisp shadow patterns. The ice inside absorbs the nail tip after it breaks through the tin and prevents the nail from traveling deeper than necessary; remove the nail with a slight twisting motion after each punch.
- Vary hole sizes within each lantern by alternating between the larger common nail for primary pattern elements and the smaller finish nail for accent dots — a star pattern punched with large holes at the star points and small holes filling the spaces between stars creates a shadow projection with two distinct visual elements that read at different distances from the lantern, which is significantly more interesting than a uniform single-size hole pattern across the full can surface.
- Allow the ice to melt completely after punching is finished — stand each completed can upright in a sink or bucket and allow the melt water to drain through the punched holes and out the open top. Do not attempt to accelerate the melting by running hot water over the frozen can; the rapid temperature change can warp the tin at the punch points and blur the crisp hole edges that produce clean shadow projections. Room-temperature melting takes one to two hours and produces the cleanest results.
- Dry the interior of each can completely before painting — any residual moisture trapped inside a painted can causes the paint to bubble and peel from the inside out within the first few days of outdoor use. Set the cans upside down on a drying rack for at least an hour after the ice has fully melted, then place them right-side up in a warm location for another hour to ensure any moisture at the punched holes has fully evaporated before paint is applied.
- Paint the exterior of each dry can with two coats of exterior craft paint or spray paint, working the paint into the punched holes from the outside so the hole edges are fully covered and the paint line is clean and consistent around each puncture. Allow full drying time between coats. Drop an LED tea light into each finished lantern, and at dusk place the cluster along patio steps, fence rails, or suspended from branch hooks — the shadow projection begins the moment the ambient light drops below the LED output level and continues to intensify as full dark arrives.
Event lighting designers who work with punched metal lanterns for professional outdoor installations always place lanterns at three distinct heights rather than on a single level surface — some on the ground, some elevated on steps or low surfaces, and some suspended from branches or hooks — because light projected from multiple elevations simultaneously creates overlapping shadow patterns that cover a significantly larger area of surrounding surface and interact with each other in ways that a single-level arrangement never produces. A cluster of eight lanterns distributed across three heights transforms a patio corner into an immersive light environment; the same eight lanterns lined up on a fence rail at uniform height produce a pleasant but fundamentally one-dimensional lighting effect. The height variation costs nothing to implement and is the single arrangement decision that most dramatically increases the visual impact of a punched lantern installation.