Make Dip-Dyed Ombré Terra Cotta Planters for $8
Diluted acrylic, a terra cotta pot, and one dip — the boutique planter technique that sells for $35 and takes ten minutes to make yourself
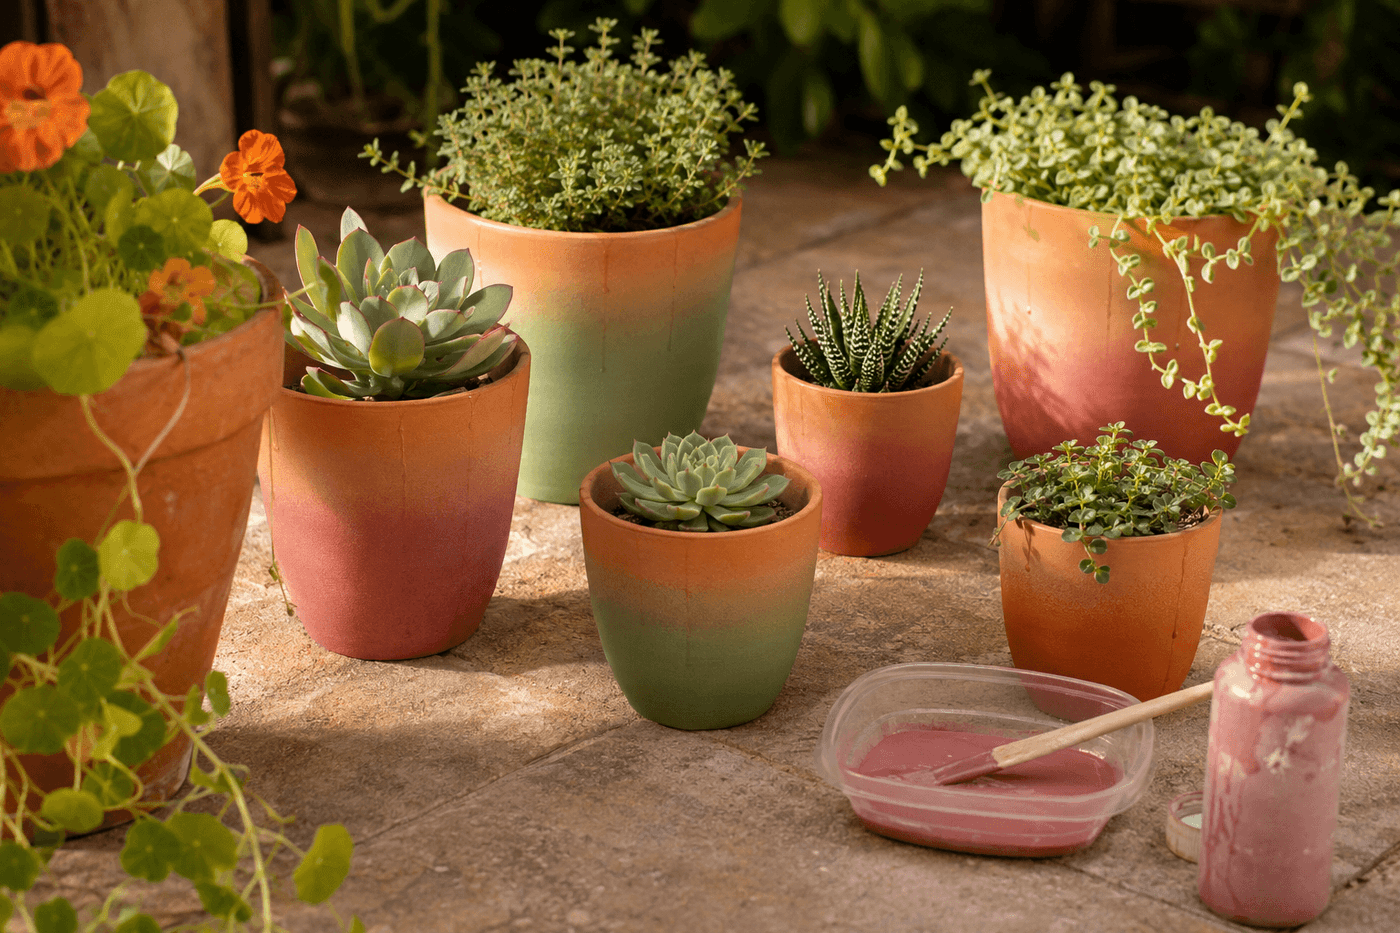
The dip-dyed ombré planter is one of those boutique garden shop items that inspires genuine admiration right up until the moment you understand how it is made — at which point the admiration transforms into immediate and slightly indignant creative energy directed at your own garage full of plain terra cotta pots. Diluted acrylic paint applied to the lower half of a dry terra cotta pot and allowed to drip and dry produces the translucent color gradient that reads as sophisticated and intentional on a patio table or garden shelf, and the porous surface of unglazed terra cotta absorbs the diluted pigment in a way that produces more natural-looking color variation than paint applied to any other surface. Six pots in an afternoon for $8 in paint, versus $35 each at the boutique — and the handmade version genuinely looks better because no two pots dip exactly the same way and the natural variation between them is precisely the quality that makes the grouping look collected rather than purchased off a shelf.
What You Need
- Terra cotta pots in varying sizes — unglazed terra cotta is essential; the porous surface absorbs diluted acrylic in a way that produces the beautiful, slightly uneven color saturation that makes the technique look artisanal rather than painted. Glazed or sealed pots repel the diluted paint and produce uneven, beaded results (~$1–3 each at garden centers or dollar stores)
- Acrylic craft paint in 2–3 colors — muted, sophisticated tones produce the most boutique-quality results; dusty rose, sage green, soft terracotta, slate blue, and warm cream all read beautifully against natural terra cotta. Avoid very dark colors for the first attempt as they show drip lines and brush marks more readily than lighter tones (~$1–2 per bottle, $4–6 total for a color selection)
- Water for diluting — the 1:1 paint-to-water ratio is the key to the translucent wash effect that distinguishes a dip-dyed planter from a simply painted one; undiluted acrylic produces opaque coverage that obscures the terra cotta texture and looks flat rather than graduated
- Wide, shallow containers for dipping — large plastic food containers, mixing bowls, or plastic storage bins wide enough to dip the pot base completely; the container needs to be wide enough for the largest pot you're dipping so the pot can be lowered straight down without touching the sides (~free from kitchen or dollar store)
- Dropcloth or newspaper — for setting pots upside down to drip-dry after dipping; the dip-dry phase produces the characteristic drip gradient and requires a protected surface beneath the inverted pots
- Exterior clear sealer, matte finish — one coat over the dried paint protects the color through regular outdoor watering and weather exposure; unsealed diluted acrylic on terra cotta fades more quickly than sealed paint, particularly on pots that receive direct sun and frequent watering (~$6–8 for a can that seals the full batch)
How to Make Them
- Ensure all pots are completely dry before dipping — terra cotta that still holds moisture from recent watering or rain produces a resist effect where the moisture in the clay repels the diluted paint rather than absorbing it, creating patchy, uneven color that doesn't improve with additional dipping passes. New pots from a garden center are typically dry enough to dip immediately; pots from an outdoor storage situation benefit from an hour in the sun before the session begins.
- Mix each paint color in its dipping container using a 1:1 ratio of paint to water — pour the paint in first, then add an equal volume of water and stir thoroughly until the mixture is completely uniform with no streaks of concentrated color visible. The consistency should be thin enough to flow off a stirring stick in a continuous drip rather than in thick drops; too thin and the color will be barely visible on the pot, too thick and the gradient will look painted rather than dipped.
- Hold each pot by the rim with both hands and lower it base-first into the diluted paint mixture in a single slow, steady motion — the speed of the dip determines how high the color travels up the pot wall. A slow, deliberate lowering gives you more control over the dip line height than a quick plunge; aim to submerge approximately the bottom half of the pot for the most balanced ombré proportion, with the color rich at the base and fading completely to natural terra cotta by the rim.
- Hold the pot submerged for three to five seconds to allow the terra cotta to absorb the diluted pigment rather than simply coating the surface — this absorption phase is what produces the characteristic matte, slightly uneven color saturation that distinguishes the dip-dye technique from surface painting. A pot lifted immediately after touching the paint surface carries a thinner, more uniform color layer that dries with less depth and texture than one allowed to absorb for a few seconds.
- Lift the pot straight out of the paint mixture in a single smooth upward motion and immediately invert it over the drop cloth to drip-dry — the inverted drying position allows the excess diluted paint to run from the submerged base toward the rim under gravity, which is what creates the gradient that deepens at the base and fades toward the top. A pot set right-side up to dry produces a flat, uniform color band rather than a graduated fade because the excess paint pools at the base rather than running toward the upper edge.
- Allow the first dip to dry completely — typically thirty to forty-five minutes for the thinner diluted mixture — before applying the second deepening coat to the lower quarter of the pot. The second dip is what creates the true ombré effect: dip only the bottom quarter into the same paint mixture, using the same slow lowering and brief soak technique, and invert to dry again. This second dip intensifies the color at the very base while leaving the first dip zone as the mid-range tone and the undipped upper portion as natural terra cotta, producing three distinct tonal zones that read as a seamless gradient.
- Vary the technique across the batch to create the natural collection quality that makes a grouping of dip-dyed pots look gathered rather than mass-produced — dip some pots slightly higher than others, allow some pots to have more visible drip lines by lifting them more slowly, and vary the number of deepening coats between pots in the same color. Two pots of the same color dipped to the same height but with different numbers of deepening coats will look like they belong together but were made at different times, which is exactly the quality that makes a handmade collection compelling.
- Seal all pots with one coat of matte exterior clear sealer once the final dip coat has dried for at least two hours — hold the spray can twelve inches from the pot surface and apply in slow, even passes that cover the full exterior including the natural terra cotta portion above the paint, which benefits from sealing as much as the painted section. A sealed pot weathers considerably better than an unsealed one and retains the color vibrancy through multiple seasons of outdoor planting, watering, and sun exposure that would fade unsealed diluted acrylic within a single summer.
Ceramic artists who work with terra cotta and acrylic washes always wet the pot exterior with clean water immediately before dipping into the diluted paint — a pot surface that is slightly damp rather than completely dry absorbs the diluted pigment more slowly and evenly, producing softer color gradients with less visible transition lines between the dipped and undipped zones. The technique, borrowed from watercolor painting's wet-on-wet method, allows the diluted acrylic to spread slightly into the damp clay surface before setting rather than stopping sharply at the waterline, which produces the feathered, organic dip line that distinguishes professional-quality dip-dyed ceramics from home attempts where the dip line reads as a harsh horizontal stripe. A quick wipe of the pot exterior with a damp cloth thirty seconds before dipping is all the preparation this technique requires.