
Make Decorative Frozen Fruit Ice Cubes for Almost Nothing
Berries, citrus slices, fresh herbs, and ten minutes — the ice cubes that make every summer drink look like a professional mixologist prepared it
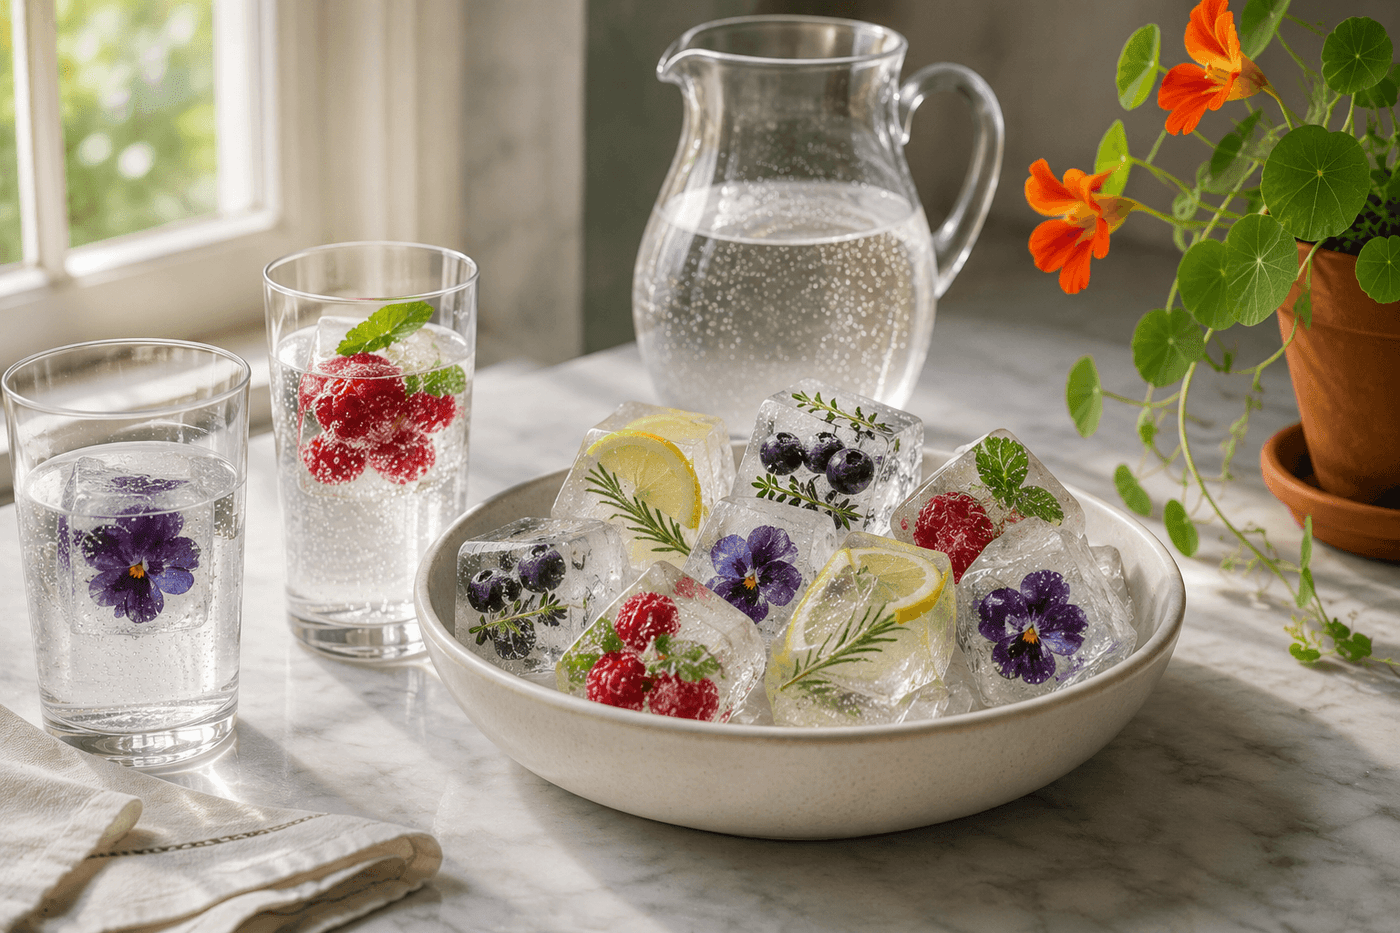
There is a category of small, beautiful thing that costs almost nothing and produces a disproportionate effect on how an occasion feels — and decorative fruit ice cubes are near the top of that category. A glass filled with sparkling water and a cube containing a raspberry cluster and a mint sprig looks like a drink someone made with intention and care, and the ten minutes and handful of fruit it actually required to produce that effect is the kind of gap between effort and impression that makes this project so consistently satisfying to share. Boiled and cooled water poured over fresh fruit and herbs in a silicone tray produces cubes clear enough to show every detail of the ingredients suspended inside; the fruit and herbs that go in can be whatever is on hand, whatever is going soft, or whatever is beautiful at the farmers market this week. Set a bowl of these beside a pitcher of sparkling water at any gathering and watch guests spend a genuinely embarrassing amount of time choosing which cube they want — it is the most low-effort hosting detail with the highest visible return of anything on a summer entertaining table.
What You Need
- Silicone ice cube tray with large compartments — 2-inch or larger square compartments give fruit and herbs room to be arranged attractively within the cube; standard small ice cube trays produce cubes too small to display fruit effectively (~$8–12 for a large-cube silicone tray if not already owned)
- Fresh fruit in small sizes or sliced thin — raspberries, blueberries, and blackberries fit naturally without cutting; strawberries halved, citrus slices folded or quartered, and melon cut into small shapes all work beautifully. Use fruit that is visually interesting — bright colors, interesting shapes, or contrasting combinations read best through clear ice
- Fresh herbs — mint sprigs, small basil leaves, rosemary sprigs, and thyme branches all freeze beautifully and add both visual interest and a subtle flavor release as the ice melts into the drink; choose herbs that complement the fruit pairings rather than competing with them
- Edible flowers, optional — violas, borage flowers, and nasturtium blooms freeze strikingly and produce the most visually dramatic ice cubes in the batch; available at specialty grocery stores and some farmers markets (~$3–5 for a small container that provides many cubes)
- Water, boiled and cooled — the single ingredient upgrade that produces clear ice rather than cloudy ice; boiling removes dissolved air that forms the white cloudy center in standard ice cubes, and cooling completely before pouring prevents the hot water from bruising delicate fruit or wilting fresh herbs before freezing begins
How to Make Them
- Boil a full kettle or pot of water and allow it to cool completely to room temperature before using it for ice cubes — this is the step that produces the crystal-clear ice that shows off the fruit and herb arrangement inside each cube. Cooling takes one to two hours at room temperature or can be accelerated by placing the boiled water in the refrigerator for thirty to forty-five minutes; water that is still warm when poured over delicate herbs and berries bruises the fruit and wilts the herbs before freezing begins, which produces a cloudy result that defeats the purpose of the technique.
- Choose your fruit and herb combinations before filling a single cube — the most visually striking combinations pair one bright color with one green element: raspberry and mint, blueberry and thyme, lemon slice and rosemary, strawberry and basil, or an edible flower alone. Combinations that are all one color or all one type of ingredient produce less interesting cubes than combinations with clear color and texture contrast; the arrangement that reads most beautifully through clear ice is one where each element is distinctly visible and identifiable.
- Place the fruit and herb arrangement in each cube compartment before adding any water — position the most visually interesting elements face-down in the compartment, because the bottom of each cube becomes the top face visible in a glass. A raspberry cluster placed with the prettiest berries facing down toward the tray base will display those berries prominently when the finished cube floats in a drink; the same cluster dropped in carelessly may present its least attractive side to view.
- Pour the cooled boiled water over the arranged fruit and herbs slowly and carefully — a slow pour disturbs the arrangement less than pouring directly from height, and filling the compartment only to the two-thirds level in the first pour allows the fruit to settle into its final position before the remaining water is added. Fill to the compartment rim on the second pour, which freezes over the arrangement completely and seals all elements within the cube.
- Freeze the filled tray on a completely level freezer shelf overnight — a tray that sits at even a slight angle during freezing produces cubes where the fruit has migrated to one side rather than appearing centered and intentional within the clear ice. Confirm the freezer shelf is level before placing the tray; most freezer shelves are level but some have a slight forward tilt that becomes significant when filling large-format cube trays with liquid.
- Unmold the frozen cubes by flexing the silicone tray gently from the base — the flexibility of silicone releases ice cubes without the cracking that rigid plastic trays produce, and the large format cubes release cleanly without the fruit tearing away from the ice that can happen when forcing a small rigid tray. If cubes resist release, run the base of the tray briefly under cool water for five seconds rather than warm water, which begins melting the cube surface and clouding the clarity you achieved with the boiling technique.
- Store unmolded cubes in a zip-lock freezer bag with the pieces separated by a sheet of parchment paper — cubes stored in direct contact with each other stick together within the first hour of frozen storage and require forcible separation that damages the fruit arrangement inside. A sheet of parchment between each cube layer keeps them individually accessible and preserves the clear, detailed appearance through several weeks of freezer storage.
- Serve by setting a bowl of the cubes beside a pitcher of sparkling or still water, lemonade, or iced tea — the self-serve bowl format is what produces the guest behavior that makes this detail so delightful to watch, because guests genuinely take their time selecting a cube based on which fruit combination appeals to them most, turning a completely incidental drink accompaniment into a small interactive moment of choice and pleasure that costs the host almost nothing to provide.
Mixologists and beverage stylists who prepare drinks for professional food photography always freeze fruit ice cubes in two stages rather than one — they pour cooled water to the halfway point of each compartment, freeze that layer solid, then arrange the fruit and herbs on the frozen base and add the remaining water for a second freeze. The two-stage method suspends the fruit and herbs in the absolute center of the finished cube rather than allowing them to float to the top of the liquid during the single-stage freeze, which produces a cube that displays the arrangement at center depth rather than immediately below the ice surface where it can appear flattened. The technique adds one additional overnight freeze to the process and produces cubes that look as though the fruit is genuinely floating in mid-air within the ice — the effect that makes fruit ice cubes look professionally made rather than beautifully attempted.














