
DIY Projects

Recent Content

Wooden Dish Rack: The Dowel Angle That Drains Right

Wooden Dish Rack: The Dowel Angle That Drains Right

Build a slatted wood dish rack for $18—the dowel tilt angle is what actually drains water into the tray instead of pooling on your counter.

Install a Fireplace Draft Stopper in 20 Minutes for $25

Install a Fireplace Draft Stopper in 20 Minutes for $25

Stop your chimney from sucking heat right out of the house—an inflatable draft stopper seals it in 20 minutes for about $25.

The Shower Rod Trick That Fakes a Walk-In Closet

The Shower Rod Trick That Fakes a Walk-In Closet

Steal spare closet space with a second shower-curtain rod—zero holes, zero fuss, and your full deposit stays safe.

Pool Noodle Knife Block: The Slice Depth That Stops Wobble

Pool Noodle Knife Block: The Slice Depth That Stops Wobble

Turn a $1 pool noodle into a safe knife block—the slice depth is what keeps blades from wobbling loose or slicing through the foam.

Build a Wooden Pie Carrier in 2 Hours for $25

Build a Wooden Pie Carrier in 2 Hours for $25

Never smash a pie in the car again! Build a snug wooden pie carrier in 2 hours for $25—perfect timing for fall potlucks.

logo
  • Home Improvement
  • DIY Projects
  • Interior Design
  • Gardening & Outdoor
  • Real Estate
  • Home Improvement
  • DIY Projects
  • Interior Design
  • Gardening & Outdoor
  • Real Estate
  • ​

Kumihimo Braiding: Same Motion, Growing Cord

The spiral pattern that makes a finished kumihimo cord look intricate isn't the result of a complicated technique — it's the same single move repeated in the same sequence, over and over, until the pattern builds itself.
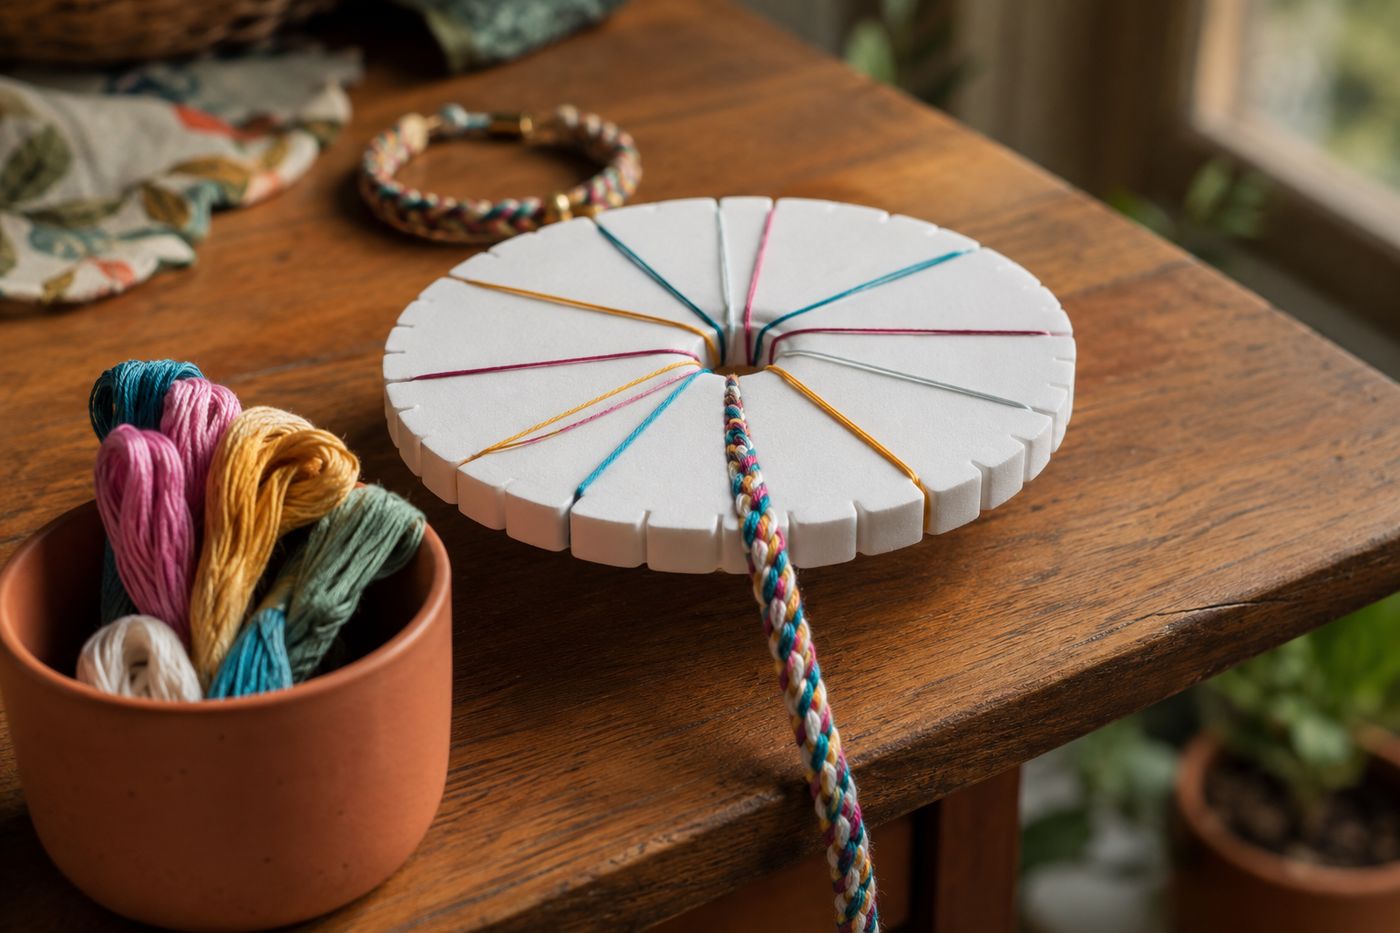
A foam kumihimo disk with colorful embroidery floss strands, showing a braided cord growing through the center hole
DIY Projects

A finished kumihimo cord looks intricate enough that it seems like it must require tracking a complex pattern, but the actual technique is a single repeating move — take a strand from one notch, cross it to a specific opposite position, rotate the disk slightly, repeat — and the spiral appearance emerges naturally just from that motion happening in the same order every time. That's the entire reason this craft works so well as a meditative practice rather than a stressful one: there's no counting, no pattern chart to follow, no decision-making at any point once you've learned the single move, which means your hands can settle into a rhythm while your mind actually gets to rest instead of staying alert to avoid a mistake. The consistency of the motion, not the complexity of the result, is what makes this soothing. Once you understand that the same simple move is doing all the work, a disk and floss cost under $10, and a bracelet-length cord takes about an hour of unhurried, repetitive braiding.

What You'll Need

  • Foam kumihimo disk, store-bought, or a sturdy cardboard circle you cut yourself — about $4, or free if made from cardboard
  • Embroidery floss, yarn, or cord, in colors that feel calming to you — about $6 for enough strands
  • Scissors
  • A hole punch or scissors, if making your own cardboard disk
  • A small weight or clip, to hang from the bottom of the growing cord and keep tension even (optional)

How to Do It

  1. Make your disk if not using a store-bought one — cut a sturdy cardboard circle, notch the edge evenly all the way around, and punch a hole through the center.
  2. Cut 7-8 strands of floss, yarn, or cord to your desired finished length plus extra for handling, in colors that feel soothing to you.
  3. Gather all the strands together and secure them through the center hole with a simple knot, letting the tail hang below the disk.
  4. Distribute the strands evenly into the notches around the disk's edge, spacing them so no notch is left empty.
  5. Learn the single repeating move by watching a quick reference the first time — take a strand from one position, cross it to the specified opposite position, and let go — since once this one motion is understood, the rest of the project is pure repetition with no new steps to learn.
  6. Repeat the same move around the disk in the same sequence, rotating slightly with each move, letting your hands settle into the rhythm rather than checking your work constantly.
  7. Watch the braid grow through the center hole below the disk as you continue, tugging gently on the tail every so often to keep tension even.
  8. Continue until the cord reaches your desired length, then tie off the end securely and trim any excess before using it for a bracelet, keychain, or decorative trim.
DESIGNER TIP

Fiber artists who teach kumihimo classes often have beginners use one distinctly different colored strand among the others specifically as a visual tracking point, rather than relying on counting or memorizing notch positions. Watching that single strand travel around the disk with each move makes the repeating pattern visually obvious without requiring any mental tracking at all, which keeps the practice calming rather than turning it into a counting exercise.


Related Content

DIY Projects

28 October 2026

Post

Wooden Dish Rack: The Dowel Angle That Drains Right

Build a slatted wood dish rack for $18—the dowel tilt angle is what actually drains water into the tray instead of pooling on your counter....

DIY Projects

27 October 2026

Post

Pool Noodle Knife Block: The Slice Depth That Stops Wobble

Turn a $1 pool noodle into a safe knife block—the slice depth is what keeps blades from wobbling loose or slicing through the foam....

DIY Projects

27 October 2026

Post

Build a Wooden Pie Carrier in 2 Hours for $25

Never smash a pie in the car again! Build a snug wooden pie carrier in 2 hours for $25—perfect timing for fall potlucks....

DIY Projects

26 October 2026

Post

Make Herb-Infused Honey in 30 Minutes for $12

Turn raw honey into a cold-season secret weapon—infuse it with thyme and ginger in 30 minutes for about $12, no fancy gear needed....

DIY Projects

25 October 2026

Post

Make Homemade Fire Cider in 20 Minutes for $15

Steep this spicy apple cider vinegar tonic now so it's ready to fight off fall colds in 4 weeks—20 minutes, $15, zero cooking skills....

DIY Projects

23 October 2026

Post

Build a Freestanding Coat Rack in 2 Hours for $35

Sick of coats piled on chairs? Build a sturdy freestanding coat rack in 2 hours for $35 — no wall drilling, just solid joinery....

DIY Projects

22 October 2026

Post

Window Frame to Pet Gate: The Hinge Set That Holds

Turn an old wooden window frame into a swinging pet gate for $22 — the hinge mortise depth is what keeps it from sagging open over time....

DIY Projects

22 October 2026

Post

Make Spiced Homemade Applesauce in 1 Hour for $12

Turn a bag of fall apples into silky spiced applesauce in an hour for $12 — no peeling required if you've got the right tool....

DIY Projects

21 October 2026

Post

Floating Nightstand: The Bracket Depth That Holds Weight

Build a wall-mounted wooden nightstand for $25 — the bracket depth inside the wood is what stops it from sagging under a lamp and books....

DIY Projects

20 October 2026

Post

Foam Letter Wall Art: The Spacing Trick for $6

Turn dollar-store foam letters into custom nursery wall art for $6 — the spacing template is what keeps names looking store-bought, not crooked....

DIY Projects

19 October 2026

Post

Build a Tabletop Fire Bowl in 90 Minutes for $35

Turn a $35 metal bowl and lava rock into a tabletop fire feature perfect for crisp fall evenings and s'mores nights....

DIY Projects

16 October 2026

Post

Build a Pet Food Storage Bin in 1 Hour for $30

Stop losing the war against stale kibble and pantry moths—build an airtight pet food bin in an hour for $30....

DIY Projects

15 October 2026

Post

Whittling a Wooden Spoon

Try meditative spoon whittling for under $15—cutting with the grain (not against it) is the one rule that keeps your blank from splitting mid-carve....

DIY Projects

14 October 2026

Post

Wooden Pet Ramp: The Cleat Spacing That Stops Slips

Build a wooden pet ramp for $20 — the traction cleat spacing is what keeps your dog's paws from sliding on the incline....

DIY Projects

13 October 2026

Post

Build a Compost Sifter Box in 1 Hour for $18

Turn chunky compost into fine garden gold! Build a simple hardware-cloth sifter box in an hour for $18—no more rock-and-stick surprises....
Terms and ConditionsDo Not Sell or Share My Personal InformationPrivacy PolicyPrivacy NoticeAccessibility NoticeUnsubscribe
Copyright © 2026 DIY HomeBoost












