Hose Guide Stakes: Garden Protectors for $4
A length of 2x2 cedar, a wooden ball finial, and 30 minutes of woodworking — and the hose that has been trampling your garden bed corners finally has somewhere to go that isn't your plants.
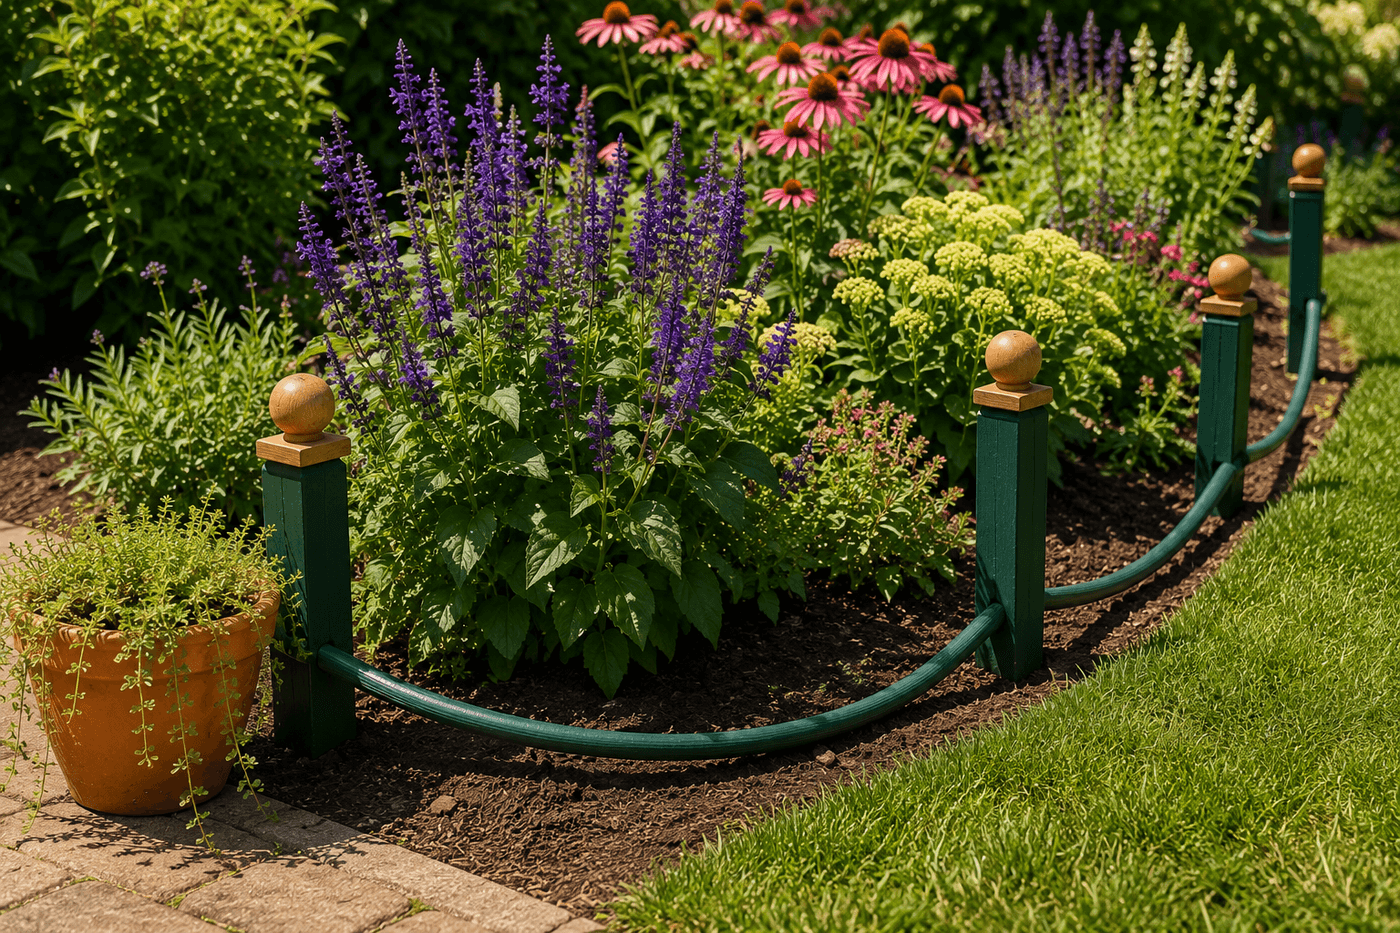
Every gardener who uses a hose knows the specific frustration of dragging it around a garden bed corner and watching it cut directly through whatever is planted at that edge — the stem crushed, the plant flattened, the mental note to do something about this at some point that never quite becomes an action. Hose guide stakes are that action, and the handmade wooden version is both more attractive and more functional than the wire or plastic commercial versions that cost the same amount and look like they belong in a utility context rather than a garden. A cedar or hardwood stake with a smooth rounded post and a decorative ball finial at the top positioned at every corner and along every straight section where the hose tends to cut in redirects the hose around the bed edge rather than across the planted surface — the hose slides against the smooth post and follows the guided path rather than taking the shortcut through the delphinium. A set of six to eight guides protects a full garden bed perimeter for $24–32 in materials and a Saturday morning of cutting, sanding, and finishing, and the decorative finials make them a genuine garden feature rather than purely functional infrastructure.
What You'll Need
- 2x2 cedar or hardwood lumber, 8 feet — one 8-foot board yields four 18–20-inch stakes with minimal waste; cedar is the correct choice for ground-contact stakes that will spend years partially in garden soil; hardwood alternatives like oak provide a smoother post surface for hose sliding but require more aggressive weatherproofing than cedar (~$4–6 per 8-foot board)
- Wooden ball finials, 1½–2 inch diameter — available at craft stores and online; pre-drilled finials with a centered shank hole accept a wood screw from below with no additional prep; undrilled finials require a pilot hole before attachment; the finial size should be visually proportional to the stake diameter — a 2-inch finial on a 1½-inch post reads as balanced, while a smaller finial reads as undersized and a larger one as top-heavy (~$1–2 each)
- Exterior wood screws, 1½" — for attaching finials to stake tops; drive from below through the stake top into the finial shank hole; countersink the screw head below the stake top surface so it does not prevent the finial from sitting flush
- Exterior wood stain or paint — for weatherproofing and decorative finish; earth tones (deep brown, forest green, aged copper) read as intentional garden features; bright accent colors (cobalt, coral) provide visual markers that make the guides easy to spot and avoid during garden work (~$5–8 for a small can covering a full set)
- Exterior polyurethane topcoat — two coats over the finished stain or paint on the above-ground stake portion and finial; the portion of the stake that will be driven into the ground should receive an extra third coat specifically on the pointed end and the first 6 inches of the stake where ground moisture contact is most sustained (~$8–10 for a small can)
- Sandpaper, 80- and 220-grit — for smoothing the stake body and the point cut; the post surface that contacts the hose must be completely smooth with no raised grain or rough spots that snag the hose cover during sliding; 220-grit final pass on all surfaces produces the hose-friendly surface texture
- Circular saw or miter saw — for the two angled cuts that form the stake point; consistent angle on both cuts produces a symmetrical point that drives into soil straight rather than deflecting to one side during installation
- Router with roundover bit — optional; routing a ⅛-inch roundover on all four edges of the stake above the ground line eliminates sharp corners that snag the hose and produces a more refined stake profile that reads as crafted rather than cut
- Rubber mallet — for driving the pointed stake into garden bed soil without splitting the stake top or damaging the finial; a standard hammer concentrates impact on a small area that dents and eventually splits the top of a 2x2 stake
How to Build Them
- Cut all stakes to length from the 2x2 lumber before cutting any points — mark each stake at 18–20 inches and crosscut cleanly, producing consistent lengths across the full set. A set of hose guides where stakes are cut to slightly different lengths looks visually inconsistent when installed around a bed perimeter, and the height variation means some stakes hold the hose at a different height than others, reducing the smooth redirecting function that consistent height provides.
- Cut the pointed end on each stake with two symmetrical angled cuts — a 45-degree bevel on each of the two wide faces of the 2x2 produces a symmetrical chisel point that drives into soil cleanly without splitting the stake along the grain. Mark both angle cuts on all stakes before cutting any to maintain consistency across the set, and cut with the miter saw set to 45 degrees rather than cutting freehand, which produces a consistent and reproducible angle across every stake in the set.
- Route a ⅛-inch roundover on all four long edges of each stake from the top down to the point transition, if a router is available — this step is the single finishing detail that most elevates the appearance of the finished guides from utilitarian cut lumber to a crafted garden feature. The rounded edge also provides a smoother hose contact surface than a sharp 90-degree corner, which can catch and resist rather than allowing the hose to slide freely around the post.
- Sand all surfaces through 80- and 220-grit before any finishing — the 80-grit pass removes mill marks, rough spots, and any grain raised by the saw cuts, while the 220-grit produces the smooth post surface that allows the hose to slide freely without resistance or snagging. Pay particular attention to the point cuts where the saw may have left tool marks that create a rough surface on the section of the stake that first contacts the soil during installation; rough point surfaces are more likely to deflect during driving than smooth ones.
- Attach finials to the stake tops before applying any finish — drive a 1½-inch exterior screw up through the stake top into the finial shank hole from below, countersinking the screw head slightly below the stake top surface. Confirm the finial is centered on the stake top and sits flush without any gap before tightening fully; a finial that is slightly off-center is visible from every angle once the stake is installed in the garden and is difficult to correct without removing the screw and repositioning.
- Apply exterior stain or paint to all surfaces — stake body, point, and finial — in two thin coats with full drying time between coats. Apply an extra third coat of sealer specifically to the pointed end and the first 6 inches of the stake body that will be in ground contact, because sustained soil moisture at the ground line is the primary cause of wood rot failure in garden stakes and this zone warrants additional protection beyond the standard two-coat exterior finish application.
- Plan stake placement before driving any into the garden — walk the full perimeter of the bed with the hose in hand and pull it around each corner as you normally would during watering, observing exactly where the hose cuts into the bed rather than where you expect it to. Place a marker at each corner and each straight-section point where the hose contacts the planted area; these are the installation positions, and they are almost always different from the positions that seem logical when planning without the hose in hand.
- Drive each stake at the planned position using a rubber mallet — position the stake at the bed edge just inside the planted area rather than at the bed boundary, which places the smooth post surface on the garden side of the hose's natural path and produces effective redirection without requiring the hose to travel further than its natural route. Drive to the depth where the stake is stable under lateral pressure from a dragged hose — typically 6–8 inches of stake depth in established garden bed soil — and confirm the finished height above ground presents the post surface at the height where the hose naturally rides during dragging rather than above or below it.
Landscape designers and garden installation specialists who specify hose guides for residential garden designs use one installation principle that most DIY gardeners overlook and that makes the difference between a guide system that eliminates hose damage and one that reduces it: install guides not only at the corners of the bed but also at every point along the straight sides where the hose would otherwise cut across a planted section rather than following the bed edge. A hose dragged across a garden from one side to the other does not only cut corners — it also deflects inward at mid-span on any straight side that is longer than about 8 feet, which is enough to crush a plant in the middle of a border without ever touching the corners at all. Landscape designers who install hose guide systems for clients place stakes at 6–8 foot intervals along straight sections in addition to corner stakes, which keeps the hose consistently at the bed edge for the full perimeter rather than only at the corner positions that are most obvious to a first-time installer. The additional stakes cost the same per unit as the corner stakes and require the same 30-second installation, and they are the specific addition that converts a hose guide system from something that helps somewhat to something that eliminates the problem entirely.