
Filing Cabinet Ice Chest: Cooler Build for $35
A $5 garage sale filing cabinet, foam insulation board, waterproof sealant, and a drain fitting — and you have the most talked-about drink station at every party you host.
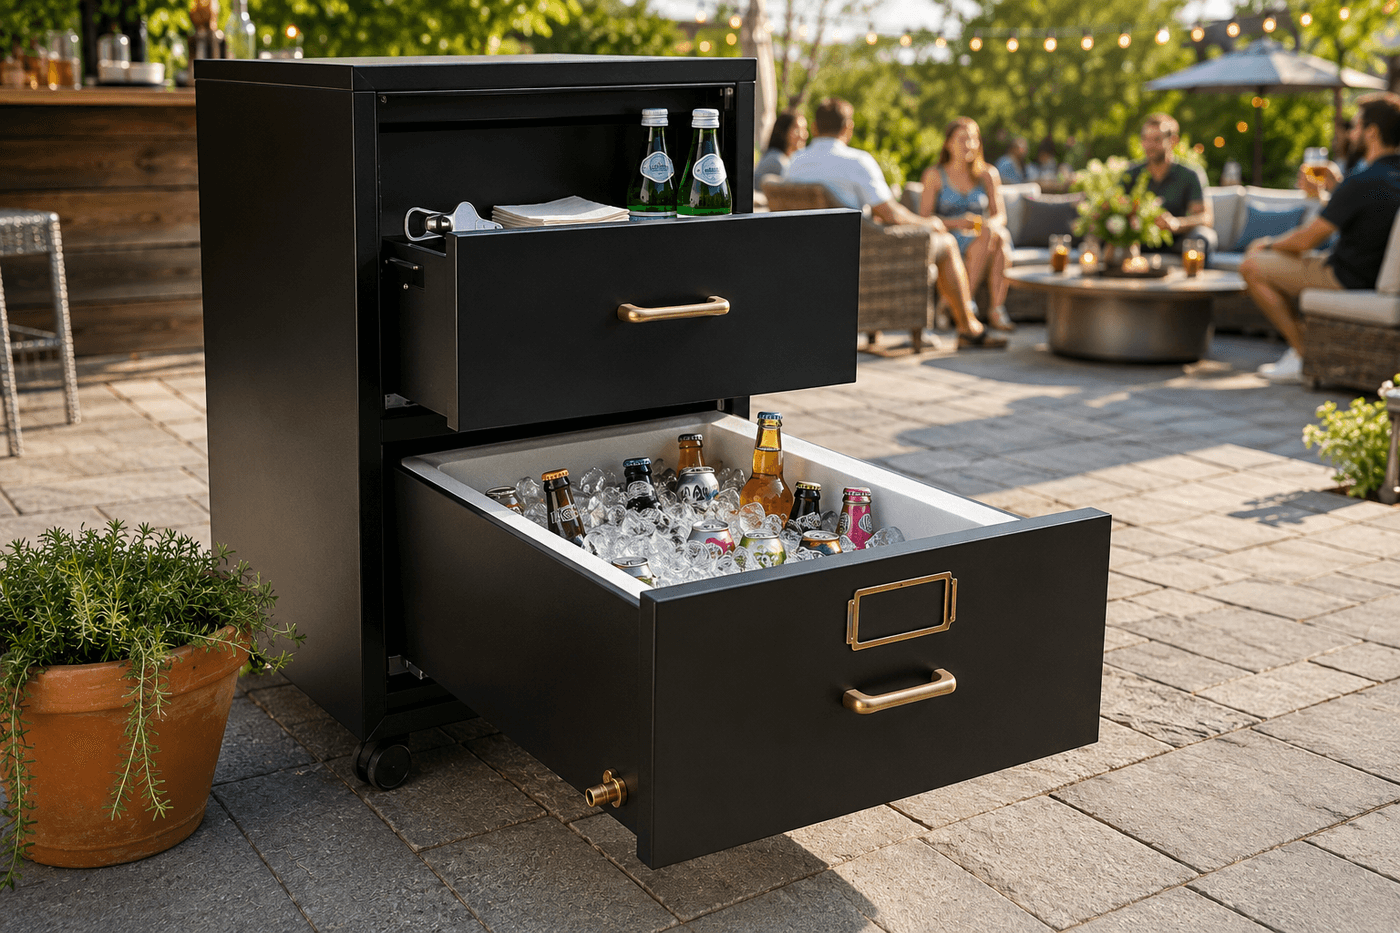
The filing cabinet ice chest exists at the intersection of two things that are independently satisfying — a genuinely clever upcycle and a genuinely practical party tool — and the combination of those two qualities is why it generates the specific kind of reaction at parties where people take photographs of an object and then ask the host to explain it. A two-drawer metal filing cabinet from a garage sale or thrift store already has everything the conversion needs: metal construction that holds cold, a rolling base that makes it repositionable for any party configuration, and drawers that open horizontally to display beverages at a perfect reaching height. The conversion adds foam insulation board cut to line every drawer interior surface, waterproof sealant on every seam and surface, and a brass drain fitting at the lowest point of the ice drawer that allows draining in place rather than tipping and lifting a heavy ice-filled drawer. Spray painted in matte black with an intentional label on the drawer front, the finished piece reads as designed and deliberate rather than repurposed — and the story of what it actually is, told once to the first guest who asks, spreads through every party it attends for the rest of the summer.
What You'll Need
- Two-drawer metal filing cabinet with casters — look for a cabinet that already has casters installed; adding casters to a cabinet without them requires drilling into the base and is a worthwhile but additional step; two drawers provide the ideal configuration of one ice drawer and one supply or dry storage drawer; confirm the drawers open and close smoothly and the cabinet stands level (~$0–10 at garage sales, thrift stores, or curbside finds)
- Rigid foam insulation board, 1-inch thickness — pink or blue extruded polystyrene foam (XPS) rather than white expanded polystyrene (EPS beadboard); XPS is moisture-resistant and structurally consistent, while EPS absorbs water and degrades in a wet ice environment; one 2x8 foot sheet cuts to line both drawers with material to spare (~$8–12 at hardware stores)
- Waterproof construction adhesive — Loctite PL Premium or similar; for bonding foam insulation panels to metal drawer walls; standard wood glue does not bond foam to metal effectively and releases when wet (~$5–7 per tube)
- Waterproof sealant or silicone caulk — clear or white 100% silicone; for sealing every seam between foam panels and between foam and metal surfaces; the complete waterproof seal is what prevents meltwater from reaching the metal drawer body and eventually rusting it from the inside (~$4–6 per tube)
- Brass drain fitting, ½-inch — a standard ½-inch brass drain plug fitting from the plumbing section; installs in a drilled hole at the lowest point of the bottom drawer for gravity drainage when the party is over; brass resists corrosion better than steel fittings in an ice water environment (~$5–8)
- Drill with step bit or ½-inch metal bit — for drilling the drain hole through the metal drawer bottom; a step bit produces a cleaner hole in thin sheet metal than a standard twist bit
- Spray paint — matte finish exterior formula — Rust-Oleum 2X in matte black, charcoal, or deep navy for the industrial-chic aesthetic; matte finish reads as more intentional and designed than glossy on a repurposed metal cabinet (~$6–8 per can, one can covers a two-drawer cabinet)
- Label holder and printed or hand-lettered label — standard metal label holder screwed to the drawer front with a printed BEVERAGES or ICE label; the label is the finishing detail that converts the piece from a repurposed cabinet to a designed drink station (~$2–3 for a pack of label holders)
- Utility knife and straightedge — for cutting foam insulation board to precise panel dimensions; a fresh utility knife blade cuts foam cleanly; dull blades compress and tear foam edges rather than slicing them
- Sandpaper, 120-grit — for scuffing the cabinet exterior before spray painting to improve paint adhesion on the existing cabinet finish
How to Build It
- Remove all file rail hardware, hanging folder frames, and any internal dividers from both drawers — these components are secured with screws or clips and should come out completely to leave a clean, flat-walled interior that accepts foam panel lining without gaps or interference. Save the hardware in case a future owner wants to return the cabinet to filing use, though that outcome grows increasingly unlikely once the conversion is complete.
- Clean the interior of both drawers thoroughly with a degreaser and allow to dry completely before any adhesive or foam installation — metal filing cabinet interiors accumulate dust, paper fiber, and residual lubricant from the drawer slides that prevent construction adhesive from bonding to the metal surface. Wipe with rubbing alcohol as a final cleaning step to remove any oil residue the degreaser missed.
- Measure all six interior surfaces of the bottom drawer — bottom, front wall, back wall, and both side walls — and cut foam insulation panels to fit each surface precisely using a utility knife and straightedge. Precise cuts that fit snugly against each other at the corners produce fewer seams to caulk and a more complete insulation barrier; gaps between panels that require large caulk fills are both aesthetically less clean and structurally weaker than tight-fitting foam joints.
- Drill the drain hole before installing any foam — mark the lowest point of the bottom drawer interior (accounting for any slight slope in the drawer floor) and drill a clean ½-inch hole through the metal drawer bottom with a step bit. The drain hole position determines whether the drawer drains completely when the plug is removed or leaves a shallow pool of water that must be mopped out; position it at the absolute lowest point of the drawer floor and confirm with a level before drilling.
- Install the drain fitting through the drilled hole from below — thread the fitting body up through the hole from the drawer exterior, apply a ring of silicone sealant around the fitting flange where it contacts the metal drawer bottom, and thread the nut and washer from the inside to compress the sealant into a watertight seal. Allow the sealant to cure for the full time specified on the package before the foam bottom panel is installed over the fitting.
- Bond the foam panels to the drawer walls using waterproof construction adhesive applied in S-curves across the back of each panel — press each panel firmly against its corresponding drawer wall and hold for 60 seconds to allow initial tack to develop before releasing. Install the bottom panel last, cutting a hole in the foam to align with the drain fitting below. Allow the adhesive to cure for the minimum time specified on the product label before applying sealant — typically 1–2 hours for initial handling strength.
- Seal every seam between foam panels and every joint where foam meets metal with 100% silicone caulk — apply a continuous bead along every seam, tool it smooth with a wet finger, and inspect for any gaps or voids that need additional sealant. The sealant layer is what makes the difference between an ice chest that stays watertight through a full party and one that allows meltwater to reach the metal drawer body and begin a corrosion cycle; complete seam coverage is the quality control step that cannot be rushed or abbreviated.
- Allow a full 24-hour cure before any water or ice contact — silicone sealant and construction adhesive both reach full waterproof performance only after complete cure, and testing with ice before full cure risks water infiltration into partially cured seams that appear sealed but have not yet developed full adhesion. Use the cure time to complete the exterior painting and labeling so the cabinet is fully finished and ready to roll to its party position when the ice test confirms watertight performance.
- Paint the cabinet exterior by first scuffing the existing finish with 120-grit sandpaper to improve adhesion, wiping with a tack cloth, and applying two to three light coats of matte exterior spray paint with full drying time between coats. Mask the drawer pulls and label holder mounting area before painting if a contrasting hardware finish is desired; matte black cabinet with brass or brushed nickel hardware produces the most sophisticated industrial aesthetic and photographs best at the parties where the cabinet inevitably becomes a subject.
Event designers and prop stylists who create bar and beverage stations for high-end outdoor events use one configuration detail for two-drawer ice chest builds that significantly improves both ice efficiency and party function: use the top drawer as a dry display zone for bottled beverages, garnishes, and bar tools rather than as a second ice compartment. Ice in the bottom drawer keeps the bottom drawer contents cold through conduction and the natural cold air that settles downward, while the top drawer — which stays cooler than ambient air from the cold rising from below — remains accessible without releasing the cold air from the ice compartment every time a guest reaches for a drink. Event designers who use this two-zone configuration report ice lasting 30–40% longer than a two-compartment ice build where the full cabinet is filled with ice and opened repeatedly throughout the event, because the single sealed ice compartment is opened only when a guest is accessing a cold drink rather than every time anyone wants anything from the station. The dry top drawer also provides display space for bottle openers, napkins, and garnishes that would otherwise need a separate side table, making the filing cabinet ice chest a genuinely complete self-contained drink station rather than simply an unusual cooler.














