Entryway Vignette: The Height Layer Trick
A console table with everything sitting at the same height reads as cluttered no matter how nice each object is — the fix isn't better decor, it's arranging what you have across three distinct levels.
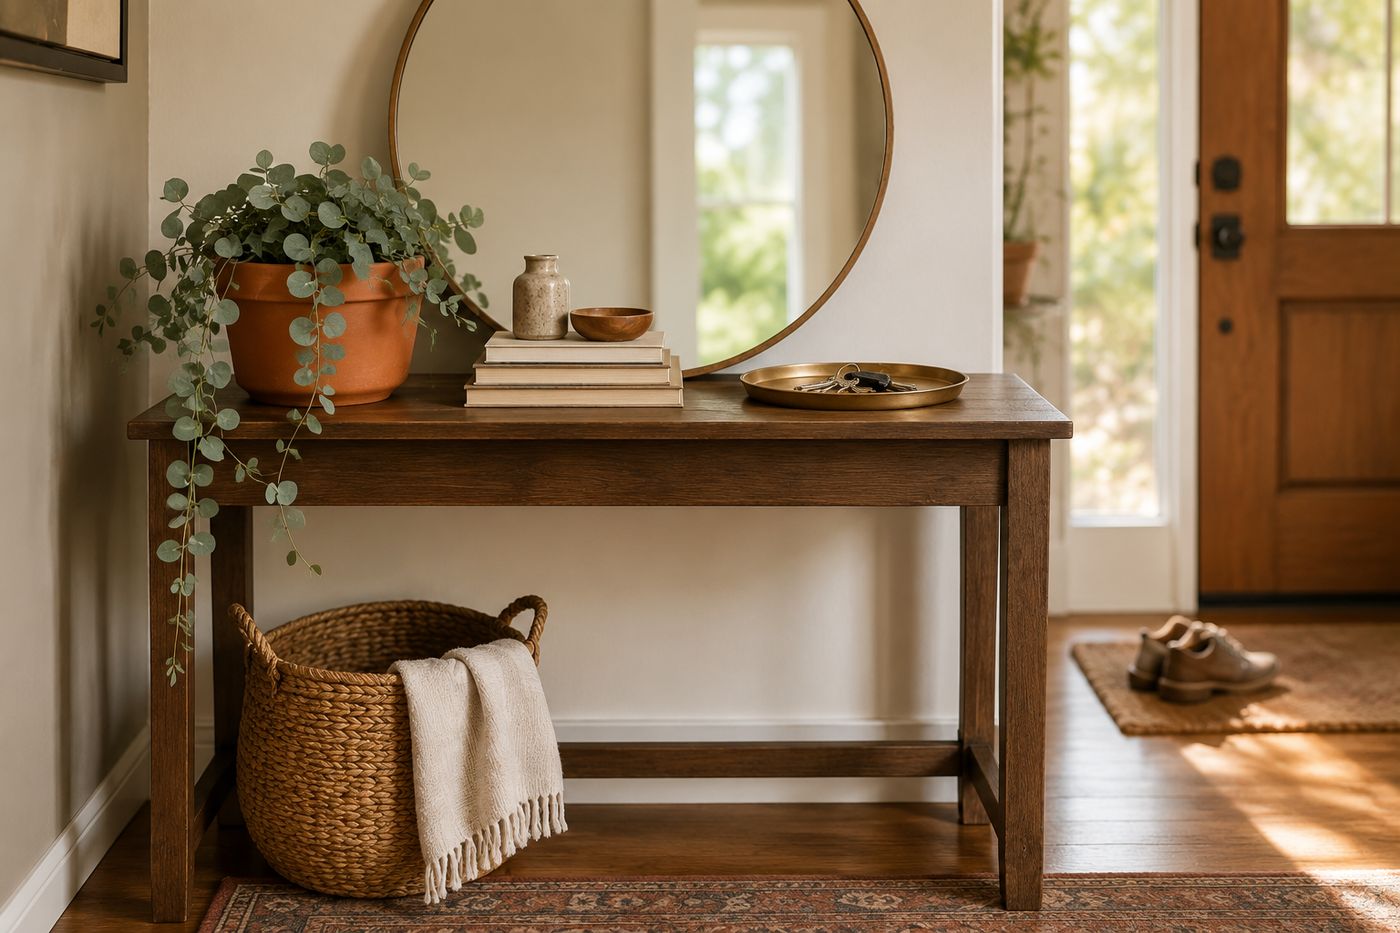
A lamp, a bowl, and a tray sitting side by side on a console table are all working at the exact same height, which is why a table full of perfectly nice objects can still read as flat and forgettable instead of styled. The distinction between a vignette that looks designed and one that looks like a surface where things landed comes down to arranging in three deliberate levels: something tall at the back to draw the eye upward, a mid-height cluster with varied heights in the center, and something low and textural at the front or floor to ground the whole composition with depth. Skip that vertical variation and even beautiful individual pieces just compete for the same visual plane. The second detail that makes the difference between a vignette that looks good for one afternoon and one that survives daily use is a designated catch-all — a tray specifically, placed where keys and mail land automatically instead of drifting into the composition and undoing the styling within a week. A few new pieces layered with what you already own runs about $35 and takes roughly an hour of arranging.
What You'll Need
- Round or leaning mirror, for the tall back layer — about $20, or use one you already own
- Small potted trailing plant (eucalyptus, pothos, or similar) — about $10
- Woven basket, for the low floor-level texture layer — about $12
- Simple brass or metal tray, to corral keys and mail — about $13
- A small stack of books, for mid-height texture — already owned
- Any existing entryway items (lamp, dish, small sculpture) to layer in among the new pieces
How to Do It
- Clear the console table completely so you're styling from a blank surface rather than working around whatever's already sitting there.
- Place your tallest piece — a leaning mirror works especially well — against the wall at the back of the table, since this is what draws the eye upward and gives the whole vignette its sense of height.
- Build a mid-height cluster in front of the mirror using a stack of books topped with a small plant or object, varying the heights within the cluster rather than lining pieces up at the same level.
- Add your existing lamp to one side of the table if the table needs to serve a lighting function, positioning it so it doesn't compete directly with the mirror for visual weight.
- Set the woven basket on the floor beside a table leg rather than on the tabletop itself — this is the low, textural anchor that grounds the whole composition and adds a third distinct height level.
- Position the brass tray in the most accessible spot on the table surface, ideally near the entry side where hands naturally land first when walking in the door.
- Step back and assess the full arrangement from a few feet away, adjusting any piece that feels like it's competing with another at the same height.
- Commit to using the tray for keys and mail from day one — its job is functional, not decorative, and that's exactly what keeps the whole vignette from sliding back into visual chaos within a week.
Interior stylists who style entryways for real, lived-in homes almost always choose a tray finish that shows fingerprints and dust less readily, like a matte or aged brass rather than a bright polished one, because an entryway tray gets touched daily and a high-shine finish shows that wear within days. It's a small material choice that keeps the vignette looking intentional on day thirty the same way it did on day one.