Interior Design

Recent Content

Wooden Dish Rack: The Dowel Angle That Drains Right

Wooden Dish Rack: The Dowel Angle That Drains Right

Build a slatted wood dish rack for $18—the dowel tilt angle is what actually drains water into the tray instead of pooling on your counter.

Install a Fireplace Draft Stopper in 20 Minutes for $25

Install a Fireplace Draft Stopper in 20 Minutes for $25

Stop your chimney from sucking heat right out of the house—an inflatable draft stopper seals it in 20 minutes for about $25.

The Shower Rod Trick That Fakes a Walk-In Closet

The Shower Rod Trick That Fakes a Walk-In Closet

Steal spare closet space with a second shower-curtain rod—zero holes, zero fuss, and your full deposit stays safe.

Pool Noodle Knife Block: The Slice Depth That Stops Wobble

Pool Noodle Knife Block: The Slice Depth That Stops Wobble

Turn a $1 pool noodle into a safe knife block—the slice depth is what keeps blades from wobbling loose or slicing through the foam.

Build a Wooden Pie Carrier in 2 Hours for $25

Build a Wooden Pie Carrier in 2 Hours for $25

Never smash a pie in the car again! Build a snug wooden pie carrier in 2 hours for $25—perfect timing for fall potlucks.

logo
  • Home Improvement
  • DIY Projects
  • Interior Design
  • Gardening & Outdoor
  • Real Estate
  • Home Improvement
  • DIY Projects
  • Interior Design
  • Gardening & Outdoor
  • Real Estate
  • ​

Entryway Closet Fix: One Zone Per Kid Ends the Chaos

A shared closet means every kid digs through everyone else's stuff to find their own — the fix isn't more bins, it's giving each person a zone they can actually use without asking for help.
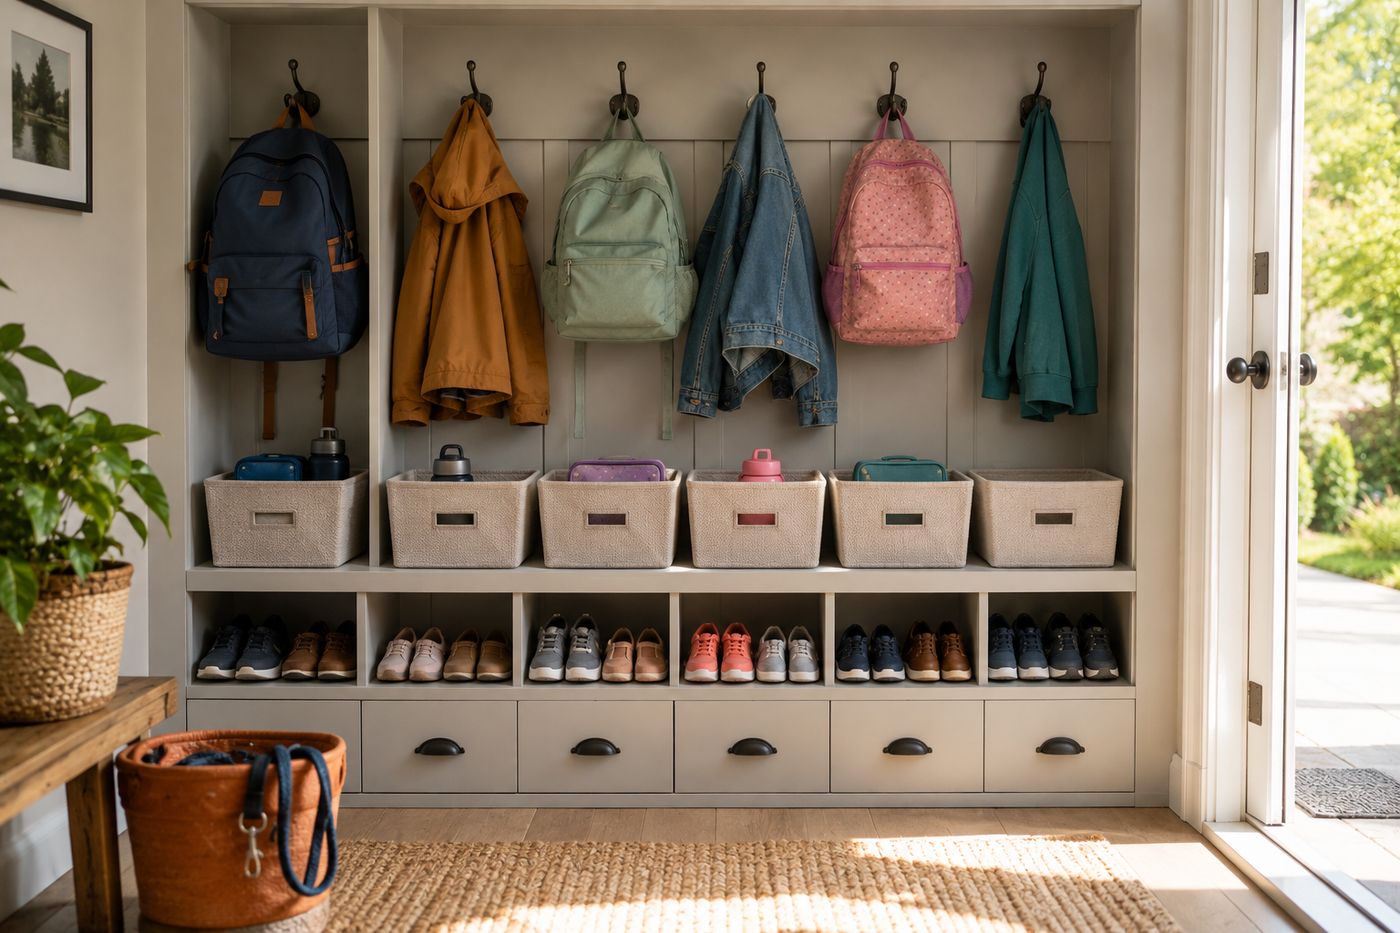
Organized entryway closet with individual hooks, labeled bins, and a shoe rack sorted into designated zones for each family member
Interior Design

A closet organized by category — all backpacks here, all shoes there — still requires every kid to search through a shared pile to find their own specific items, which is functionally no faster than the chaos it replaced. The actual fix isn't better categories, it's dedicated zones: one hook, one bin, and one shoe rack slot assigned to each individual person rather than to a type of object. That single shift means a child can walk up to their own hook at their own height and know exactly where their things live without asking an adult or digging through a shared bin first. It's the difference between a system that requires you to manage it every morning and one that runs itself because everyone already knows their own spot. The whole setup costs about $35 in hooks, bins, and a shoe rack, and takes roughly two hours including the sorting and donating that usually happens first.

What You'll Need

  • Wall hooks, two per child (one for backpack, one for jacket) plus one extra for the adult bag/keys spot — about $12
  • Labeled bins, one per child for gear, plus one shallow bin for seasonal items — about $15
  • Small shoe rack, sized to fit the closet — about $8
  • A basket, for pet leash and outdoor gear (optional)
  • Labels or masking tape and marker
  • Screwdriver or drill, for mounting hooks
  • Donation box, for anything outgrown

How to Do It

  1. Empty the entryway closet completely, sorting everything into keep, donate, or relocate as you go, and set aside anything outgrown before it goes back in.
  2. Assign each child their own zone before installing anything — decide exactly which hook, bin, and shoe rack slot belongs to which person, since this decision determines where all the hardware actually gets mounted.
  3. Mount each child's backpack hook at their individual height so they can reach and use it independently, rather than a single generic height for everyone.
  4. Add a jacket hook directly above each backpack hook, keeping each child's full set of items in one consistent vertical column.
  5. Place each child's labeled gear bin on a shelf or the floor near their hooks, so their entire zone is contained in one visual area rather than spread across the closet.
  6. Install the shoe rack and designate specific rows or sections to each family member, labeling if it helps reinforce the system in the early weeks.
  7. Add your own hook for bag and keys on the inside of the closet door, and a shallow bin on the top shelf for seasonal items that don't need daily access.
  8. Walk each child through their own zone once everything is set up, showing them exactly where their things live so the system starts working from day one without your ongoing involvement.
DESIGNER TIP

Professional organizers who set up family entryway systems often color-code each child's zone rather than relying only on text labels, assigning one color to each person's hook, bin, and shoe rack section, because young kids recognize color faster than they read labels, and the color-coding lets the system work independently even before a child's reading skills catch up.


Related Content

Interior Design

26 October 2026

Post

Fish Tank Terrarium: The Drainage Layer That Saves It

Turn a leaky old fish tank into a stunning terrarium—the gravel drainage layer is what stops root rot before your plants ever get a chance....

Interior Design

24 October 2026

Post

Tie-Dye Shower Curtain: The Fold That Makes Spirals

Turn a plain $8 shower curtain into a wild tie-dye spiral—the fold-and-twist technique is what makes the pattern radiate instead of blotch....

Interior Design

21 October 2026

Post

Peel-and-Stick Wallpaper Accent Wall in 3 Hours for $60

Turn one blank wall into a showstopper with peel-and-stick wallpaper—no wet paste, no mess, just a sharp accent wall by dinnertime....

Interior Design

19 October 2026

Post

Necktie Wall Organizer: The Knot Spacing That Holds

Turn old neckties into a boho wall organizer for keys and mail—even knot spacing is what keeps the pockets from sagging open. Under $10....

Interior Design

17 October 2026

Post

Neon Ombré File Cabinet: The Tape Order That Prevents Bleed

Turn a beige metal file cabinet into a neon ombré showstopper—the tape-layering order is what keeps colors crisp instead of muddy. Under $25....

Interior Design

15 October 2026

Post

Style a Cozy Fall Guest Bathroom Refresh in 2 Hours for $35

Turn a sterile guest bath into a warm fall retreat with layered textiles and scent—2 hours, $35, zero renovation required....

Interior Design

13 October 2026

Post

Whisk Jewelry Holder: The Bend That Stops Sagging

Turn a $1 dollar-store whisk into a boutique earring holder—the wire bend angle is what stops it from drooping under real jewelry weight....

Interior Design

12 October 2026

Post

Shutter Towel Rack: The Anchor Screw That Won't Rip Out

Turn a salvaged wood shutter into a bathroom towel rack—the stud anchor is what stops it ripping out under soaked towels....

Interior Design

11 October 2026

Post

Style a Cozy Window Seat Nook in 2 Hours for $45

Turn a bare window seat into a cozy fall reading nook with the right cushion layering trick—2 hours, $45, instant curl-up energy....

Interior Design

10 October 2026

Post

Sunburst Mirror: The Ray Overlap That Hides Gaps

Paint a bold rainbow sunburst mirror for $25—overlapping each ray's base is the trick that hides gaps and makes it look store-bought....

Interior Design

07 October 2026

Post

Style a Cozy Fall Bedroom Refresh in 2 Hours for $50

Layer flannel, wool, and warm light the right way and your bedroom finally feels like fall — 2 hours, $50, zero renovation....

Interior Design

03 October 2026

Post

Style a Fall Bookshelf Refresh in 2 Hours for $40

Turn a cluttered bookshelf into a magazine-worthy fall vignette using the triangle rule and warm accents—2 hours, $40, zero carpentry....

Interior Design

03 October 2026

Post

Gold Leaf Frame: The Size Overlap That Prevents Cracks

Turn a plain thrift mirror into a bold gold-leaf statement piece—overlapping each sheet correctly is what stops the finish from cracking and flaking later....

Interior Design

29 September 2026

Post

Style a Fall Coffee Table Tray Vignette for $30

Turn a plain coffee table into a cozy fall focal point with a layered tray vignette—45 minutes, $30, zero design degree required....

Interior Design

28 September 2026

Post

Tennis Racket Mirror: The Backing Trick That Locks It Flat

Turn a thrifted tennis racket into a quirky wall mirror—the plywood backing is what keeps the round mirror from popping loose over time....
Terms and ConditionsDo Not Sell or Share My Personal InformationPrivacy PolicyPrivacy NoticeAccessibility NoticeUnsubscribe
Copyright © 2026 DIY HomeBoost