
Electrolyte Popsicles: 8 Hydration Pops for $6
Coconut water, fruit juice, a pinch of salt, and fresh fruit — and the hydration argument with every child in your house ends permanently.
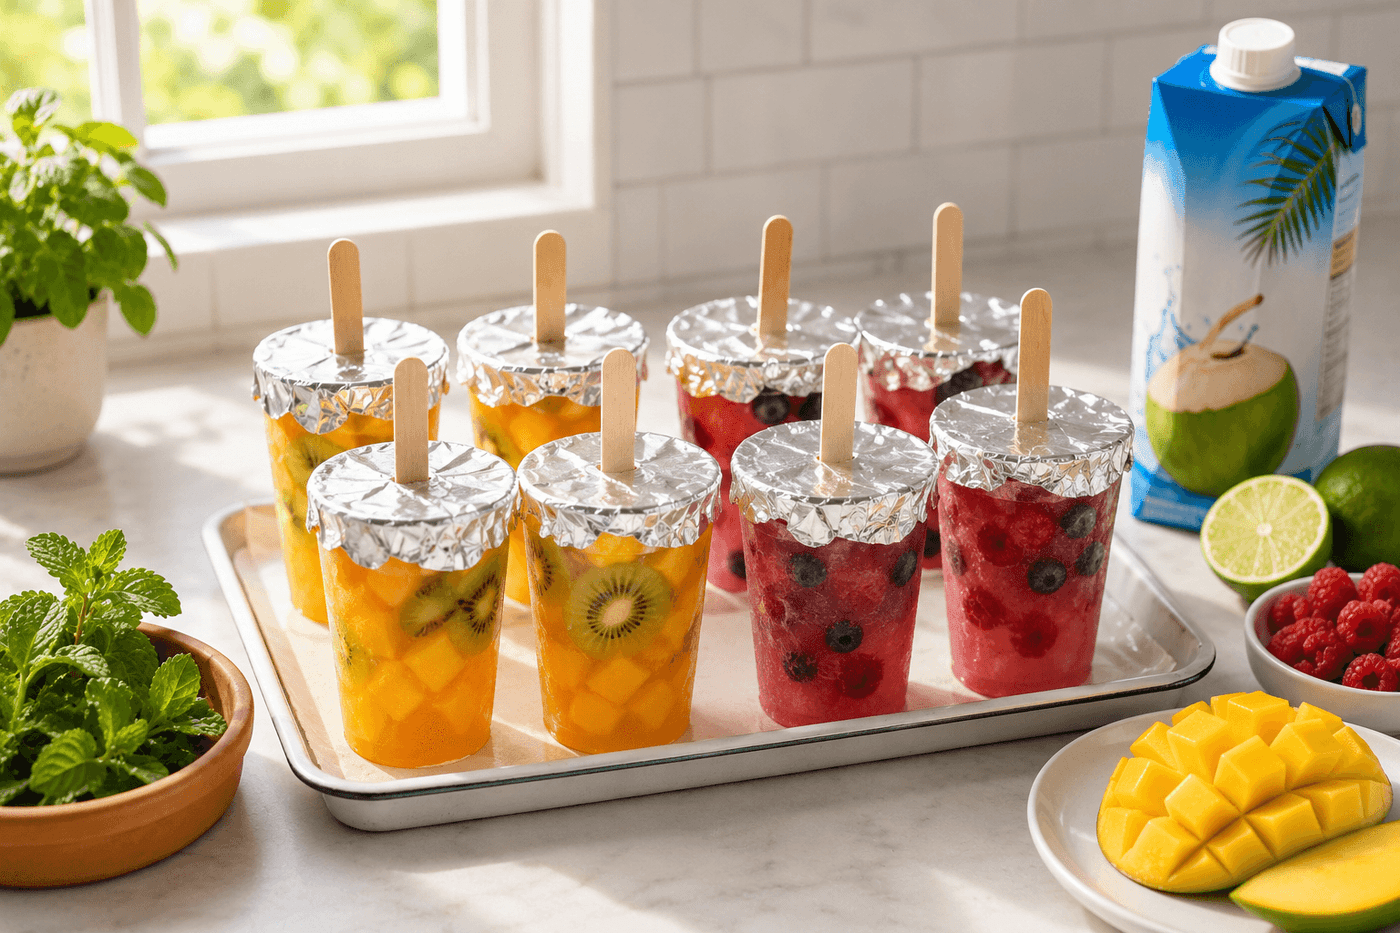
Getting children to replace the electrolytes they lose during hot-weather outdoor play is one of those parenting challenges where the solution turns out to be so obvious in retrospect that the months of nagging before discovering it feel genuinely unnecessary. Children who will ignore a water bottle, argue about a sports drink, and claim they are not thirsty while visibly wilting in the afternoon heat will sprint across the yard for a homemade popsicle — and a popsicle made from coconut water, fruit juice, and a pinch of salt is a genuinely functional electrolyte replacement that delivers natural potassium, magnesium, and sodium in a form that produces zero resistance from anyone under twelve. The recipe takes ten minutes to assemble, costs about $6 for eight pops, and the two flavor combinations that earn the most consistent enthusiasm — tropical pineapple-mango and berry lemonade — both come together from ingredients that are either in the kitchen already or at the bottom of the grocery list. Knowing exactly what is in every pop that disappears into the backyard on a hot July afternoon, versus the ingredient list on a commercial sports drink, is a quality-of-life improvement that is difficult to fully articulate until you have it.
What You'll Need
- Coconut water, 16 oz — the electrolyte base; provides natural potassium (470mg per cup) and magnesium that plain water lacks; choose 100% coconut water with no added sugar — the fruit juice adds all the sweetness needed (~$2–3 for a 16 oz carton)
- 100% fruit juice, ¼ cup per batch — for flavor and natural sugar that makes the pops appealing to children; choose juice that complements the fresh fruit additions:
- Tropical version: 100% pineapple juice + mango chunks + kiwi slices
- Berry lemonade version: lemonade (not lemon juice) + fresh blueberries + raspberries
- Watermelon mint version: watermelon juice + fresh mint leaves + lime juice
- Fine sea salt, ⅛ teaspoon per batch — completes the electrolyte profile by adding sodium; this amount distributes across eight pops as approximately 15mg sodium per pop — enough to be physiologically meaningful for electrolyte replacement without any detectable saltiness in the finished frozen pop
- Honey or maple syrup, 1–2 teaspoons — optional; adds a small amount of natural sugar that improves flavor and also provides quick-absorbing carbohydrates that support electrolyte uptake; taste the liquid mixture before freezing and add sweetener only if the fruit juice alone is not sweet enough for your children's preference
- Fresh fruit for freezing inside — raspberries, blueberries, mango chunks, kiwi slices, or watermelon cubes; press 2–3 pieces into each cup after filling so they are visible through the frozen pop; fruit frozen inside a pop provides visual appeal that increases children's enthusiasm for the finished product significantly over plain frozen liquid
- Small paper cups, 3–5 oz — the paper cup popsicle mold method; a sleeve of 100 costs $1–2 at dollar stores and grocery stores; peel the cup away cleanly after freezing rather than wrestling with silicone molds
- Wooden craft sticks — a box of 150 costs $1–2; cover each filled cup with a small square of aluminum foil and push the stick through the center to hold it upright during freezing
- Baking sheet — for holding cups upright and level in the freezer during the 4-hour freeze; cups without a tray tip easily before the liquid sets
How to Make Them
- Mix the coconut water, fruit juice, salt, and any optional sweetener in a measuring cup with a pour spout — stir until the salt is completely dissolved, which takes about 30 seconds of stirring; undissolved salt settles to the bottom of the cups during freezing and produces pops with a noticeably salty last inch rather than even, mild electrolyte flavor throughout. Taste the mixture at this stage and adjust sweetness if needed — the frozen version will taste approximately 20% less sweet than the liquid mixture due to the way cold temperatures suppress sweetness perception.
- Arrange paper cups on the baking sheet before filling — setting up the tray first means both hands are free for pouring and dropping fruit without managing tipping cups. Fill each cup to approximately three-quarters full rather than to the rim, leaving headspace for the liquid to expand slightly during freezing and for the fruit pieces that will be pressed in after filling.
- Drop two to three pieces of fresh fruit into each cup immediately after filling, pressing them gently below the liquid surface so they are submerged rather than floating — fruit that floats to the surface during freezing ends up at the stick end of the finished pop rather than distributed through it, and the visual appeal of fruit visible through a translucent frozen pop is one of the details that most increases children's enthusiasm for the finished product.
- Cover each cup with a small square of aluminum foil pressed snugly over the rim and down the sides — the foil grip on the cup sides is what holds the craft stick perfectly vertical during freezing rather than leaning against the cup wall. A loose foil cover that sits flat rather than gripping the cup sides produces pops with angled sticks that are uncomfortable to hold and difficult to peel the cup from cleanly after freezing.
- Insert a craft stick through the center of each foil square, pushing straight down until the stick is approximately halfway into the cup — deep enough to be fully anchored in the frozen pop but not touching the cup bottom, which prevents comfortable holding once the cup is peeled away. The foil holds the stick perfectly vertical without any further attention, which is the specific advantage of the paper cup method over dedicated popsicle molds where the stick slot never quite maintains vertical alignment.
- Freeze the full tray flat and undisturbed for a minimum of four hours — six hours produces a completely solid pop with no soft center; four hours produces a slightly softer center that children often prefer to the rock-hard consistency of an overnight freeze. Do not attempt to speed the process by placing the tray in the coldest part of the freezer or against the freezer wall, which freezes the exterior rapidly while leaving a liquid core that collapses inward when the cup is peeled.
- Unmold by peeling the paper cup away from the outside of the frozen pop starting at the rim and tearing downward in strips — the cup peels cleanly away from the frozen electrolyte pop in seconds with no warm water bath, no twisting, and no broken pops. This ease of unmolding is the reason the paper cup method consistently outperforms silicone molds for high-volume summer pop production; a batch of eight unmolds in under two minutes rather than the extended warm-water-and-waiting process that silicone requires.
- Store unmolded pops individually wrapped in plastic wrap or small zip-lock bags in the freezer — unwrapped pops stored together fuse at contact points within hours and break when separated rather than releasing cleanly. Label each bag with the flavor if making multiple varieties in the same batch, and note the date; coconut water pops maintain optimal flavor for up to two weeks in the freezer before the coconut water taste begins to mute and the fruit pieces begin to develop freezer texture.
Sports dietitians and pediatric nutritionists who develop hydration protocols for youth athletic programs consistently recommend one electrolyte ratio adjustment that makes homemade popsicles meaningfully more effective for active children than the standard coconut-water-and-juice base: add one teaspoon of fresh lemon or lime juice per batch in addition to the fruit juice base. The citrate in fresh citrus juice acts as an electrolyte co-transporter — it facilitates the absorption of sodium, potassium, and magnesium across the intestinal wall more efficiently than the same minerals consumed without citrate present. Commercial sports drinks use citric acid specifically for this absorption-enhancing function; the fresh lemon or lime juice in a homemade electrolyte pop provides the same co-transport mechanism from a whole food source rather than an additive. Sports dietitians who specify this addition for youth athlete hydration programs describe the practical difference as noticeable in recovery speed and sustained energy during the second half of practice sessions — which for backyard summer play translates to children who can stay active longer in afternoon heat without the energy crash that inadequate electrolyte replacement produces.














