Dresser to Vanity: Vessel Sink Makeover, $175
A thrift store dresser, a bowl sink, and a weekend — and your bathroom has a custom vanity that looks like it cost ten times what it did.
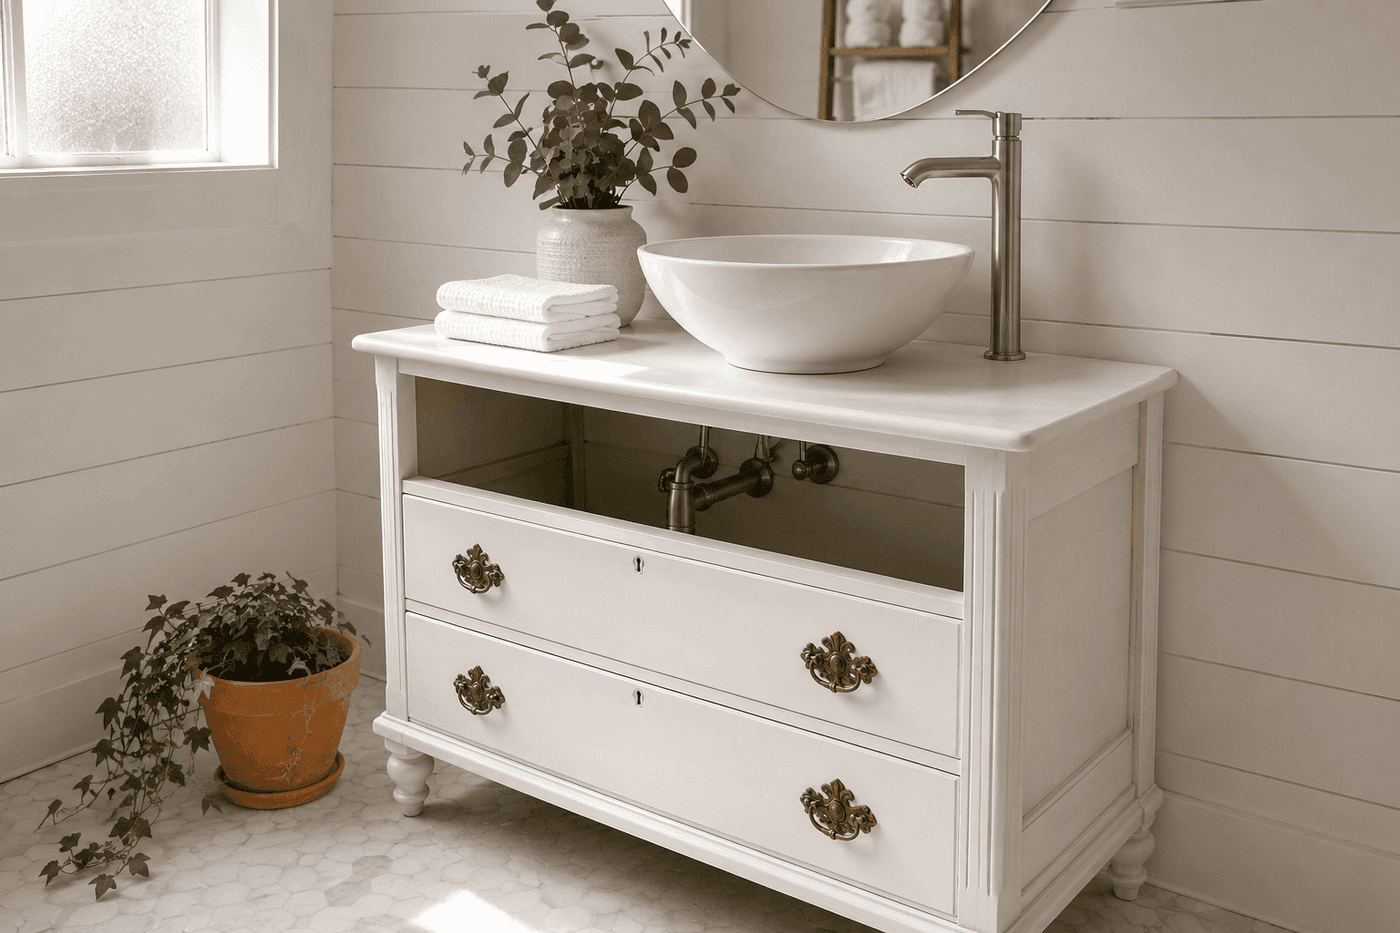
Custom bathroom vanities from furniture showrooms start at several hundred dollars for the most basic options and climb quickly from there — and almost none of them have the character, the storage, or the visual interest of a well-chosen vintage dresser converted with a vessel sink. The conversion is more achievable than it sounds: the dresser top gets a precisely cut hole for the drain, a thorough waterproofing treatment, and a ceramic bowl sink set on top, while the faucet mounts through a second hole and connects to existing supply lines underneath. The drawer storage stays intact, the vintage hardware and patina become features rather than flaws, and the finished vanity reads as the kind of considered, one-of-a-kind design choice that interior designers charge considerably more than $175 to produce. This is a two-day project — Day 1 for prep, modification, and waterproofing; Day 2 for plumbing connections and finishing — and the result is the single most transformative upgrade a bathroom can receive without touching the walls or the floor.
What You'll Need
- Solid wood dresser — thrift stores, Facebook Marketplace, and estate sales; look for solid wood construction rather than particle board, which swells and fails when exposed to bathroom moisture; depth of at least 18" to accommodate plumbing (~$20–40)
- Vessel sink — ceramic bowl style sits on top of the dresser surface; white ceramic is the most versatile and widely available (~$40–60 on Amazon or at big box stores)
- Vessel faucet — tall-necked style designed specifically for vessel sinks so the spout clears the bowl rim; brushed nickel or matte black finish (~$30–50)
- Vessel sink drain — pop-up or click-clack drain sized for vessel sinks; standard p-trap connects below (~$10–15)
- Flexible supply lines — braided stainless, 12–18" length to connect shut-off valves to faucet (~$8–12 for a pair)
- P-trap and drain extension pipe — connects sink drain to existing wall drain stub-out; measure the distance before purchasing (~$10–15)
- Jigsaw with wood-cutting blade — for cutting the drain hole and faucet hole in the dresser top
- Hole saw bit, 1¾" — for the faucet hole; most vessel faucets require a 1³⁄₈"–1¾" hole
- 100% silicone caulk, clear — for sealing around the drain base and any gaps between sink and dresser top
- Polyurethane or epoxy waterproofing sealer — for sealing the dresser top, cut edges, and interior cabinet space against moisture (~$15–20)
- Sandpaper, 120- and 220-grit — for smoothing cut edges before waterproofing
- Paint or stain — optional, for refinishing the dresser exterior before installation (~$10–15)
- Adjustable wrench and basin wrench — for tightening supply line connections and faucet mounting nut from inside the cabinet
- Plumber's putty — for sealing the drain flange to the sink base
How to Build It
- Select your dresser carefully before any other step — the single most important criterion is solid wood construction throughout, particularly the top surface and the back panel. Press firmly on the top to check for flex, inspect the back for cardboard or thin hardboard that will not support plumbing weight, and confirm the interior cabinet depth is sufficient to accommodate a p-trap and supply lines without forcing the back panel out. A dresser that checks these boxes at a thrift store for $25 is worth far more to this project than a better-looking one built from particle board.
- Remove the top two drawers permanently — these become the plumbing access cabinet and cannot function as drawers once supply lines and drain plumbing occupy the space. Lower drawers typically remain fully functional and become the primary storage feature of the finished vanity. Remove drawer slides from the top two openings and set the drawers aside for another project or donation.
- Mark the drain hole position on the dresser top by centering the vessel sink on the surface and tracing the drain opening onto the wood below — the drain hole should be centered within the sink footprint and sized to the drain assembly diameter specified in your vessel sink instructions, typically 1½–1¾ inches. Mark the faucet hole position 6–8 inches behind and to one side of the drain center, confirmed against your faucet's reach measurement so water lands inside the bowl.
- Cut the drain hole with a jigsaw and the faucet hole with a hole saw, drilling a starter hole inside the drain outline before inserting the jigsaw blade. Cut slowly and support the dresser top from below if possible to prevent tearout on the underside — the underside cut quality matters because it is visible from inside the cabinet during every plumbing connection. Sand all cut edges thoroughly with 120- then 220-grit before any waterproofing.
- Waterproof the entire dresser top surface, all cut edges, and the interior cabinet walls with two coats of polyurethane or epoxy waterproofing sealer — this is the most consequential step in the entire build, and the one most commonly underestimated. Bathroom moisture is relentless and cumulative; bare or inadequately sealed wood in a vanity application begins swelling and delaminating within months. Apply the first coat, allow full cure per product instructions (typically 24 hours), sand lightly with 220-grit, and apply the second coat before doing anything else. Do not proceed to plumbing until the sealer has cured completely.
- Refinish the dresser exterior while the waterproofing cures if you are painting or staining — this is the ideal moment since the piece is not yet installed and can be worked on all sides easily. Sand, prime if painting, apply two coats of your chosen finish, and allow to cure fully before moving the dresser into the bathroom. A painted dresser in a semi-gloss or satin finish resists bathroom humidity better than flat paint, which absorbs moisture and shows water marks.
- Position the dresser in the bathroom and cut a hole in the back panel aligned with the existing wall drain stub-out and supply valve locations — measure carefully from the inside of the cabinet to the wall drain center before cutting, as this hole placement determines whether your p-trap runs cleanly or requires awkward angled fittings. Most bathroom walls have the drain stub-out at 16–18 inches above the floor; confirm your measurement before cutting.
- Install the faucet through the drilled faucet hole from above, threading the mounting hardware from below inside the cabinet and tightening the mounting nut with a basin wrench — a regular wrench cannot reach the nut in the confined cabinet space, and a basin wrench is the tool that makes this connection achievable without frustration. Connect braided supply lines to the faucet shanks finger-tight first, then snug with a wrench; overtightening supply line connections cracks the plastic fittings inside and causes slow leaks that damage the cabinet over time.
- Set the vessel sink on the dresser top centered over the drain hole, apply a bead of clear silicone caulk around the drain hole perimeter where the sink base will contact the wood, and press the sink into position. Insert the drain assembly through the sink drain opening and through the dresser top hole, thread the drain body from below, and tighten to compress the drain gasket firmly against the sink base — this compression seal is what prevents water from migrating between the drain and the sink during use.
- Connect the p-trap to the drain tailpiece and to the wall drain stub-out, adjusting the trap arm length as needed with a hacksaw to achieve a slight downward slope from trap to wall — water drains by gravity, and a p-trap that runs level or uphill toward the wall holds standing water, produces odor, and drains sluggishly. Turn on the water supply valves slowly and check every connection point for drips before considering the installation complete, pressing a dry paper towel against each joint to detect moisture that visual inspection might miss.
Interior designers and bathroom renovation specialists who work with furniture-converted vanities consistently address one long-term moisture management detail that most DIY tutorials overlook entirely: install a small, low-profile dehumidifier rod or a rechargeable moisture absorber inside the lower cabinet drawer space. Even with a perfectly waterproofed top and sealed plumbing connections, the interior of a bathroom vanity cabinet accumulates ambient moisture from the bathroom environment over time — particularly in smaller bathrooms without strong ventilation — and this slow moisture accumulation is what eventually warps drawer bottoms, swells cabinet walls, and produces the musty smell that signals wood damage in progress. Eva-Dry and similar compact rechargeable absorbers cost under $20, sit unobtrusively in the back corner of the lower cabinet, and protect the wood structure of a converted furniture piece far more effectively than any amount of exterior sealing alone. Designers who specify furniture vanities for client bathrooms consider this protection standard practice rather than an optional upgrade.