Create a Gravel Meditation Garden for $90
Pea gravel, two accent boulders, a cedar bench, and one Saturday — the difficult corner of your yard becomes the most intentional space on your entire property
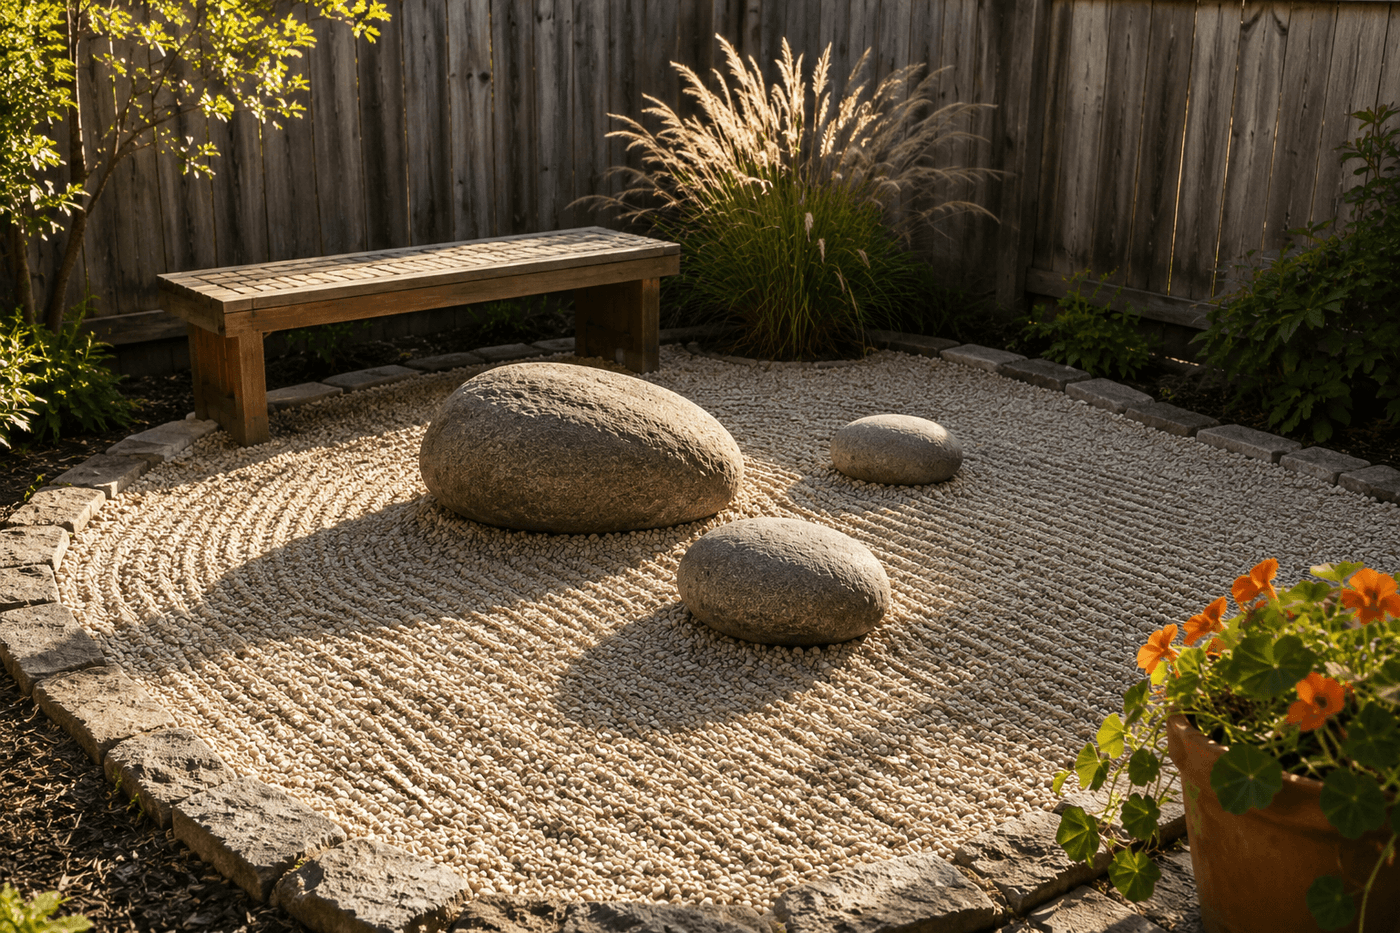
A meditation garden works on a principle that is almost the opposite of conventional garden design — instead of filling space with plants, color, and abundance, it works through subtraction, simplicity, and deliberate emptiness. Pea gravel raked into gentle patterns, two or three smooth boulders positioned with the asymmetric intentionality of traditional Japanese karesansui design, a single plant chosen for movement and sound rather than flower color, and a place to sit that faces the whole composition: this is the garden that stops the mind rather than stimulating it, and it requires less maintenance than any planted bed you have ever tended. The $90 investment in materials and one Saturday afternoon of installation produces a space that changes how your entire property feels — not just the corner where it lives, but the quality of every day that begins with fifteen minutes sitting in it before the rest of the house is awake.
What You Need
- Pea gravel, 50 lb bags, qty 4–6 — light gray or buff-tone pea gravel rakes most cleanly and reads as most serene in a meditative space; darker gravels absorb heat and can make a sun-exposed meditation garden uncomfortable; the amount needed depends on your space size, targeting a 2–3 inch gravel depth across the full area (~$5–8 per bag, ~$20–30 total)
- Landscape fabric, enough to cover the full area — weed barrier fabric laid before the gravel suppresses growth without herbicides and keeps the gravel layer clean and defined through multiple seasons; pin the edges down with landscape staples before spreading gravel (~$8–12 for a roll)
- Accent boulders, qty 2–3 — smooth river boulders or fieldstone in varying sizes from a landscaping supply yard; odd-numbered groupings of boulders are the fundamental rule of Japanese garden stone placement — one large anchor stone, one medium companion stone, and one small accent stone create the classic triangular grouping (~$15–25 for the set)
- Simple cedar bench or garden seat — a straightforward slatted cedar bench without arms, sized to fit the space with room to sit comfortably with feet in the gravel; build your own from the Woodworking Wednesday plan in this series for about $42, or purchase a basic cedar bench (~$40–60 purchased)
- Bamboo rake — the hand tool for creating the raked gravel patterns that are both aesthetically defining and meditative to draw; a traditional Japanese garden rake with widely spaced tines is specifically designed for raking gravel into patterns (~$10–15)
- Single ornamental grass or bamboo plant — for movement, sound, and a living element that animates the otherwise still composition; fountain grass, feather reed grass, or a clumping bamboo all provide the gentle rustling sound and visible movement in the breeze that distinguishes a living meditation garden from a static stone installation (~$8–15)
- Edging material — metal landscape edging, cedar border boards, or natural stone edging to define the meditation garden perimeter and contain the gravel cleanly against the surrounding lawn or planting areas (~$8–15)
How to Create It
- Define the garden boundary before removing any grass or soil — mark the perimeter with a garden hose or marking paint and spend time standing inside the marked area assessing whether the proportions feel right before committing to any excavation. A meditation garden that is too small feels cramped rather than intimate; one that is too large becomes difficult to maintain the raked gravel pattern across its full surface. The minimum useful size for a sitting-and-viewing meditation garden is approximately 8×8 feet, with the bench positioned against one edge and the boulder-and-gravel composition occupying the remaining space in front of the seated viewer.
- Clear the area completely by removing existing grass, weeds, and any shallow roots, then grade the soil surface as level as possible — pea gravel spreads to find the lowest point of its container, and a surface with significant low spots produces a gravel layer of uneven depth that rakes unevenly and looks less considered than the same gravel spread over a graded base. Use the back of a rake to smooth any high spots and fill any depressions before laying landscape fabric.
- Install the perimeter edging first — metal landscape edging, cedar border boards, or a single course of natural stone at the garden boundary creates the clean, defined edge that contains the gravel and establishes the garden as a deliberately bounded space rather than a gravel patch that happened to form in that corner. The edging height should be at least 2 inches above the finished gravel surface to contain the gravel when it is raked and prevent it from migrating into the surrounding lawn.
- Lay landscape fabric across the full cleared and graded area, cutting it to fit within the edging perimeter and overlapping any seam joins by at least 12 inches to prevent weeds from finding the gap between fabric sections. Secure the fabric edges with landscape staples every 12 to 18 inches around the full perimeter — fabric edges that aren't secured lift at the perimeter during raking and eventually work out from under the gravel, allowing weed growth at the garden edges where it is most visible.
- Position the accent boulders before spreading any gravel — place them directly on the landscape fabric in their intended positions so the gravel surrounds them when spread rather than requiring the boulders to be moved through the gravel after it is in place. Follow the traditional odd-number grouping principle: position the largest boulder slightly off-center in the composition, the medium boulder at a distance of approximately two boulder-widths away and slightly forward of the large one, and the smallest boulder closer to the bench side of the garden at a different distance again — the asymmetric triangular relationship between three stones is what creates the visual tension and repose that makes a stone grouping meditative rather than merely decorative.
- Spread the pea gravel evenly across the full fabric surface to a depth of 2 to 3 inches, working around the positioned boulders and into the corners of the garden perimeter. A gravel depth less than 2 inches allows the landscape fabric to show through after raking and produces rake lines that don't have enough material to hold their shape; a depth greater than 3 inches requires excessive effort to rake and produces patterns that collapse quickly under foot traffic to and from the bench.
- Position the cedar bench against the fence or back edge of the garden with its front legs just touching or just inside the gravel surface — the seated viewer's feet should rest in the gravel, which creates the physical connection to the garden composition that sitting on the outside of the gravel looking in does not. Confirm the bench position allows a clear, unobstructed sight line to the boulder grouping from a seated position before it is permanently placed.
- Plant the single ornamental grass in the corner at the fence junction beside the bench — dig through the landscape fabric to the soil below, plant the grass at its original soil depth, and replace the fabric around the stem base. The grass provides scale reference for the composition, introduces the one living, moving element into the otherwise still garden, and frames the seated viewer's peripheral view in a way that makes the gravel and stone composition feel enclosed and complete rather than open and unfinished at its edges. Rake the gravel into your first pattern using the bamboo rake, sit on the bench, and let the garden begin its work.
Landscape designers who specialize in contemplative garden spaces always orient the seated position so the viewer faces east or northeast rather than south or west — a south or west-facing bench means sitting into direct afternoon sun during the hours most people use a meditation garden, which makes extended sitting physically uncomfortable and defeats the restful purpose of the space regardless of how beautifully designed the composition in front of you is. An east or northeast-facing bench receives gentle morning light from behind the seated viewer and casts the garden composition in warm, raking morning light that emphasizes the texture of the raked gravel and the dimensional quality of the boulders in a way that flat overhead midday light never achieves. If the garden corner doesn't allow an east-facing orientation, a simple shade structure or mature tree positioned to provide afternoon shade over the bench location resolves the orientation problem without requiring the space to be redesigned.