
Cedar Planter with Trellis: Climbing Display for $50
A cedar box, a lattice panel, two vertical posts, and a climbing plant — and a blank deck railing becomes a lush green backdrop by midsummer without touching a single wall or fence.
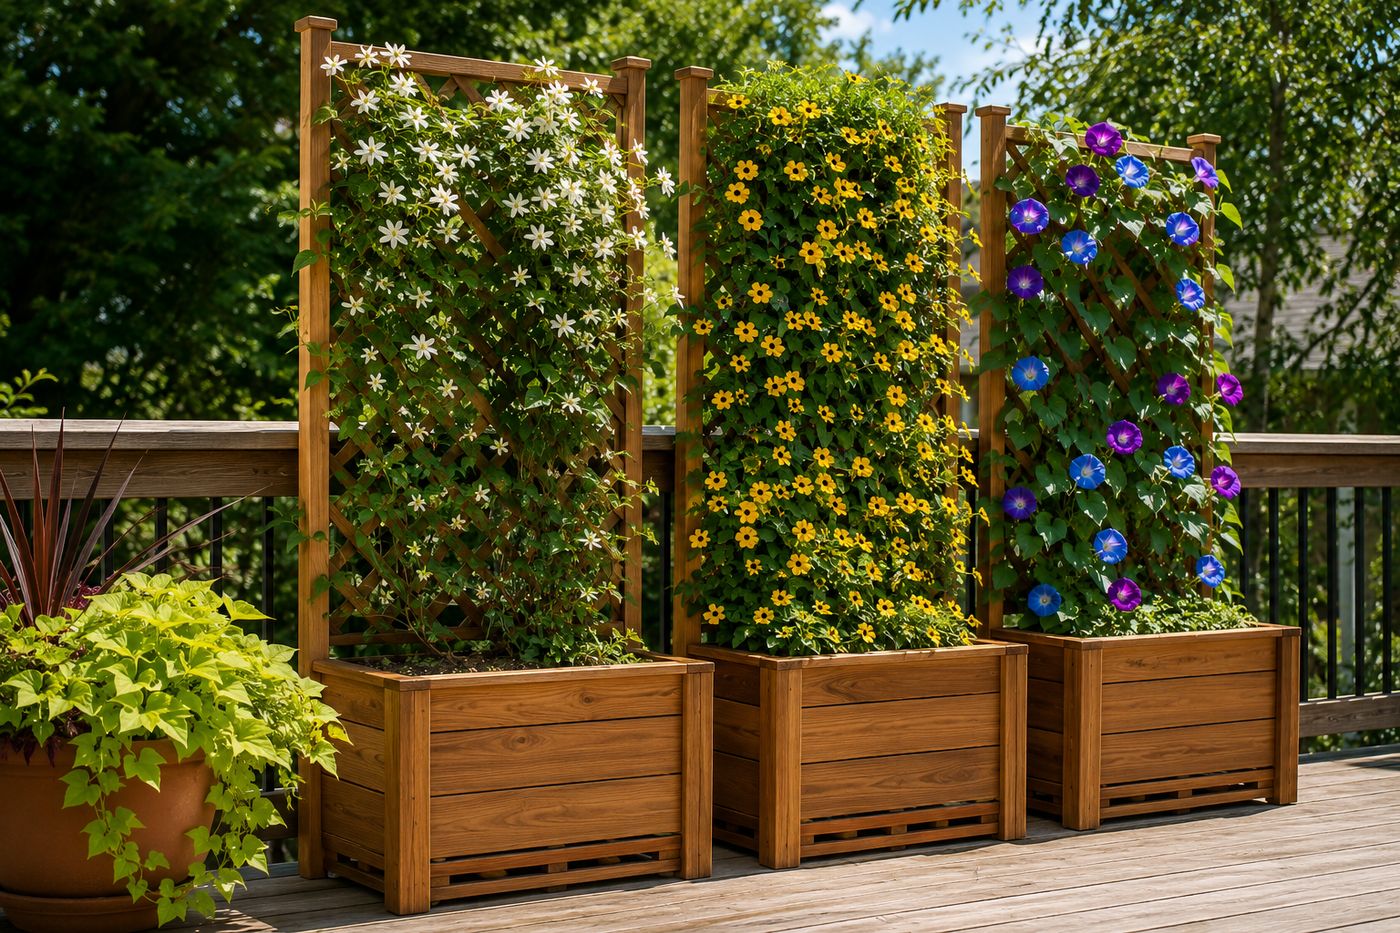
Climbing plants on a patio or deck present a specific design problem that most solutions resolve poorly: the climber needs a structure, the structure needs to be anchored, and anchoring anything to a rental wall, a shared fence, or a finished deck surface requires either permission or irreversible commitment that most gardeners are not ready to make. A cedar planter box with an integrated trellis back solves this completely — the trellis is anchored to the planter rather than the wall, the planter sits anywhere on the deck surface without fastening, and the entire unit moves as a single self-contained piece whenever the layout needs changing. The construction is two straightforward builds joined at the back: a four-sided cedar box with a slatted drainage bottom, and a rectangular lattice frame attached to two vertical posts that rise from the box's back corners to four feet above the planting surface. By midsummer, a clematis, a black-eyed Susan vine, or a morning glory planted at the base of each trellis covers the full frame from soil to top in bloom, creating the kind of vertical garden display that transforms a plain deck into something genuinely lush and private. Three of these lined across a deck railing accomplish what a full garden wall does in a traditional garden — at a fraction of the commitment and with the flexibility to change everything next season.
What You'll Need
- 1x8 cedar boards, 8 feet — two boards yield the four sides of the planter box; cut two front and back panels at 24 inches and two side panels at 14 inches for a finished planter with a 24-inch front face and 14-inch depth; this depth accommodates the root volume of most annual and perennial climbers in their first and second seasons (~$9–11 each, two boards needed)
- 1x4 cedar boards, 8 feet — one board yields the slatted drainage bottom pieces; cut to 14-inch lengths and space with ¼-inch gaps across the box bottom for drainage; cedar bottom slats resist rot in the sustained moisture contact of a planted container (~$5–6 per board)
- 2x2 cedar posts, 8 feet — two posts yield the four vertical trellis support posts; cut two posts at 18 inches for the below-box anchor posts that are secured inside the planter box corners, and two posts at 48 inches for the above-box trellis uprights that support the lattice frame; the anchor posts buried in the potting mix inside the box provide the structural base that keeps the trellis stable under the weight of a fully grown climbing plant in wind (~$4–5 each, two boards needed)
- Lattice panel, 2x4 feet — cedar or vinyl lattice in the 2x4-foot size provides the climbing surface that fills the trellis frame; cedar lattice weathers consistently with the planter box; vinyl lattice is more durable and requires no finishing but reads as slightly less natural in a garden context; most home improvement stores sell lattice in larger sheets that can be cut to the 2x4-foot panel needed (~$8–12 for a cut panel)
- 1x2 cedar boards for trellis frame, 8 feet — two boards yield the horizontal top and bottom frame pieces and the two vertical frame sides that contain the lattice panel; the 1x2 frame surrounds the lattice edge and is what attaches to the vertical 2x2 trellis posts (~$3–4 each, two boards needed)
- Exterior structural screws, 1¼" and 2½" — 2½-inch for box corner assembly and post installation; 1¼-inch for lattice frame assembly and bottom slat attachment; stainless or coated exterior screws prevent rust streaking on cedar (~$6–8 per box of each size)
- Exterior wood glue — applied at all box corner joints before screwing; Titebond II or similar water-resistant formula
- Teak oil or danish oil — two coats on all surfaces before assembly; penetrating oil finishes protect cedar from the sustained moisture contact of a planted container without the peeling or cracking that film-forming finishes eventually produce (~$8–10 per quart)
- Landscape fabric — cut to line the box interior before adding potting mix; prevents fine soil from washing through the drainage gaps while maintaining drainage function
How to Build It
- Cut all lumber before any finishing or assembly — the two front and back panels at 24 inches, the two side panels at 14 inches, the bottom slats at 14 inches, the four 2x2 post sections (two at 18 inches for the below-box anchors, two at 48 inches for the above-box trellis uprights), and the 1x2 frame pieces for the lattice surround. Cutting all pieces in a single session before assembly is more efficient than returning to the saw between build phases and allows all pieces to be sanded and finished simultaneously before any joins are made.
- Sand all pieces through 80- and 220-grit and apply two coats of teak oil to all six faces of every piece before assembly — the oil coat on the interior faces of the box panels and the inside surfaces of the corner joints is the specific application that most builders skip and that most determines long-term durability; these surfaces are in the most sustained moisture contact of any part of the build and benefit most from thorough oil penetration before they are joined and become inaccessible.
- Assemble the box by gluing and screwing the front and back panels between the two side panels — apply exterior glue to the side panel end faces, position the front panel between the side panels with top edges flush, confirm square with diagonal measurements, and drive two 2½-inch screws through each side panel into the front panel ends. Repeat for the back panel, then install the bottom slats across the box bottom with ¼-inch spacing using a scrap piece of ¼-inch plywood as a consistent spacer between each slat.
- Install the below-box anchor posts inside the back two corners of the assembled box — position the 18-inch 2x2 posts vertically in the back corners with their tops flush with the box top edge, and drive two 2½-inch screws through the box back panel and through the adjacent side panel into each post face. These anchor posts are what the 48-inch above-box trellis uprights will attach to, and their secure installation inside the box is what transfers the wind load of a fully grown climbing plant down through the planter rather than leveraging it against the box joinery.
- Attach the 48-inch trellis uprights to the tops of the anchor posts — position each upright directly on top of its corresponding anchor post with the faces aligned, and drive two 2½-inch screws through the upright into the anchor post top in a staggered pattern that does not split the post end grain. The connection between the above-box upright and the below-box anchor post is the most structurally critical joint in the full build; reinforce with a metal post cap connector over the joint for maximum rigidity in the wind loads that a fully planted trellis experiences.
- Build the lattice frame by assembling the 1x2 cedar pieces into a rectangle that matches the lattice panel dimensions — 24 inches wide by 48 inches tall — using exterior glue and 1¼-inch screws at each corner, then pressing the lattice panel into the frame and securing with 1¼-inch screws driven through the frame face into the lattice edge at 6-inch intervals around the full perimeter. The frame provides the structural rigidity that a lattice panel alone cannot maintain under the sustained attachment and wind pressure of a climbing plant through multiple seasons.
- Attach the framed lattice panel to the two trellis uprights by driving 1¼-inch screws through the lattice frame into the upright faces at the top, middle, and bottom of each upright — three attachment points per upright produce a rigid connection that resists the racking load of wind against a plant-covered trellis more effectively than the top-and-bottom-only attachment that most trellis builds use. Confirm the lattice panel is plumb on both axes before driving any screws; a lattice that is out of plumb reads as visually tilted from every angle and cannot be corrected without removing and repositioning all attachment screws.
- Line the box interior with landscape fabric, fill with quality potting mix formulated for containers to within 2 inches of the box top, and plant one climbing plant at the base of each trellis post — positioning the root ball between the two trellis posts rather than centered in the box gives the plant immediate access to both upright surfaces for attachment and produces faster, more even coverage of the full trellis width than a center planting that must grow laterally before climbing vertically. Water thoroughly, begin training the first emerging stems onto the lower lattice sections immediately, and position the finished unit in its intended display location before the plant becomes too established to move without root disturbance.
Container garden designers and landscape architects who specify planter-and-trellis combinations for residential patio installations use one plant selection principle that produces a trellis that looks spectacular through the full season rather than peaking in midsummer and declining for the last six weeks before frost: plant one fast-growing annual climber at the base of each trellis for immediate coverage and visual impact, and plant one slower-growing perennial climber in the same container to establish its root system during the first season and provide increasingly impressive coverage in subsequent years. Morning glory or black-eyed Susan vine fills the trellis rapidly in the first season while a clematis or climbing rose establishes itself quietly below; by the second and third season the perennial climber takes the primary trellis role and the annual can be replaced with a complementary variety or left out entirely. Container designers who use this annual-perennial layering approach describe the trellis planter as a garden feature that improves every season rather than resetting to zero each spring — which is the specific quality that makes a moveable trellis planter feel as satisfying and established as a permanent garden installation within two to three growing seasons.














