Build a Sandbox with Hinged Lid Bench Seats for $65
Cedar lumber, exterior hinges, and one Saturday — the sandbox that keeps cats out, drains properly, and turns into bench seating when open
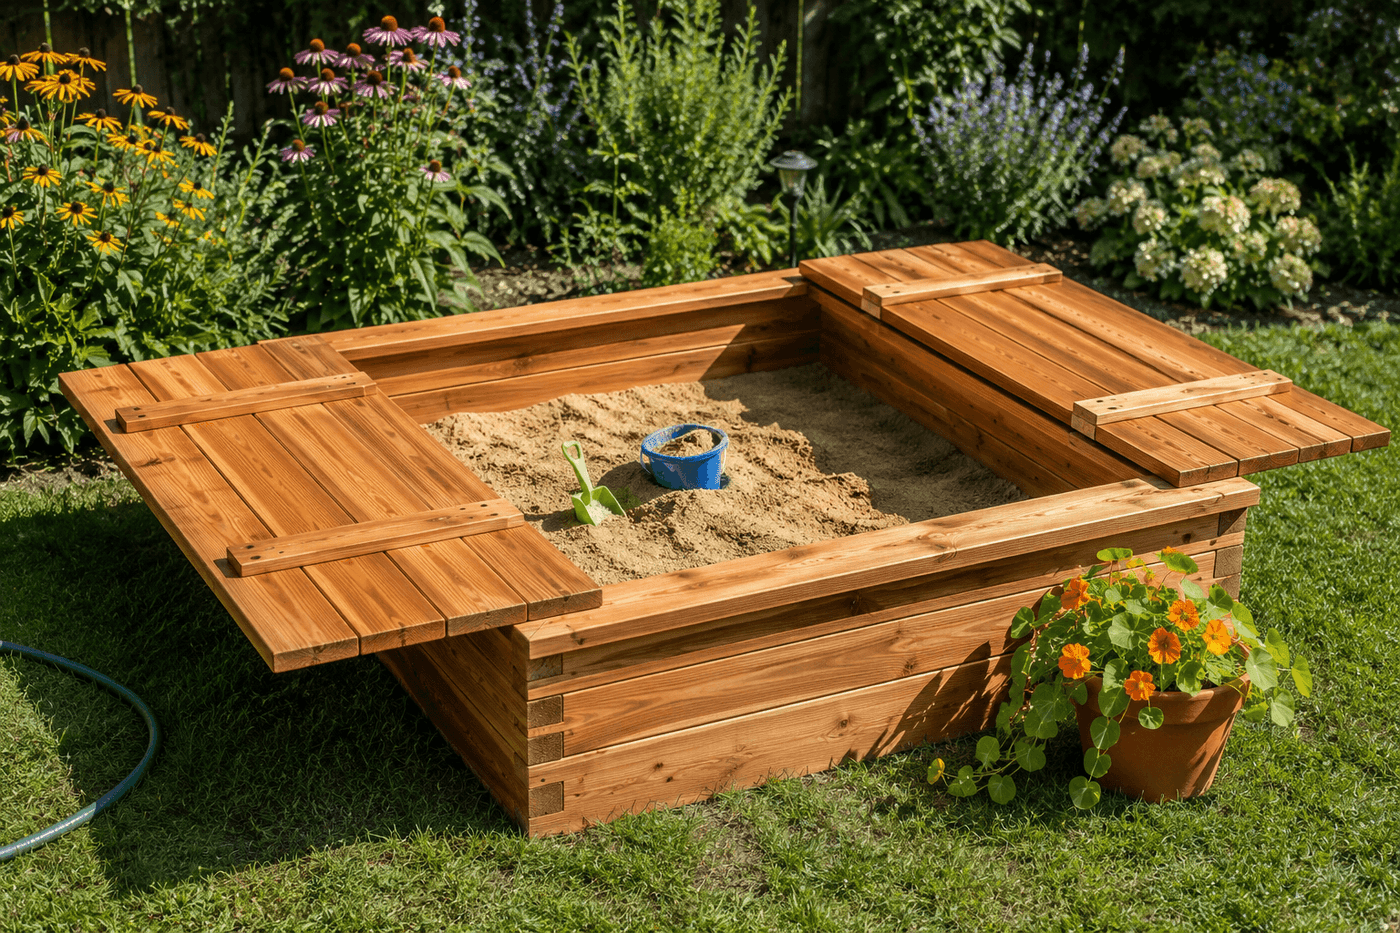
A sandbox that simply holds sand is a sandbox. A sandbox whose lid folds outward into two bench seats is a piece of backyard furniture that happens to contain sand — and that distinction is what makes this particular build so consistently impressive to every parent who encounters it for the first time. The lid-to-bench conversion means the structure is useful in every configuration: closed, it protects the sand from cats, rain, and leaves; open, it provides seating exactly where parents want it, right at the edge of the play space without dragging any additional furniture over. Cedar construction lasts through seasons that would rot and splinter a lesser wood, the landscape fabric base keeps the sand clean and the drainage free, and the whole thing costs $65 in materials and a Saturday of genuinely satisfying woodworking to produce. Pre-built sandboxes at this quality level don't exist at retail; the ones that cost less are flimsy plastic, and the ones that are solidly built cost two to three times as much. Building your own is the only way to get this sandbox at this price.
What You Need
- Cedar 2×6 lumber, 8-foot lengths, qty 8 — for the four-sided sandbox frame built two boards high on each side; cedar resists soil contact decay naturally without any treatment, making it the correct lumber choice for a structure that will sit directly on the ground through multiple seasons (~$6–8 each, ~$48–64 total)
- Cedar 1×6 lumber, 8-foot lengths, qty 4 — for the two lid sections that hinge outward to become bench seats; 1×6 boards laid side by side across each lid half produce a flat, sturdy sitting surface at the correct width (~$4–5 each, ~$16–20 total)
- Exterior hinges, 3" size, qty 4 — two hinges per lid section, mounted at the outer edge of each lid where it connects to the sandbox frame top rail; heavy-duty exterior hinges rated for outdoor use handle the repeated open-close cycle and the weight of adults sitting on the open lids (~$3–5 per pair)
- Exterior screws, 2½" and 1⅝" — for all frame assembly and lid construction; stainless or exterior-coated screws resist the rust staining that standard screws leave on cedar within the first wet season (~$6–8 for a combination pack)
- Landscape fabric, 5×5 foot piece — for lining the sandbox base before sand is added; allows water drainage through the bottom while preventing weed growth upward and burrowing animals from digging into the sandbox from below (~$5–8 for a small roll)
- Exterior wood sealant — one coat over all cedar surfaces after assembly; extends the natural rot resistance of cedar significantly and keeps the wood looking fresh rather than weathering to gray in the first season (~$10–12 for a quart that covers the full sandbox)
- Play sand, 200–300 lbs — specifically labeled play sand or washed sand rather than construction sand, which contains fine dust particles that become airborne and cause respiratory irritation (~$5–8 per 50 lb bag, ~$20–30 total)
- Miter saw, drill, measuring tape, speed square, and clamps — standard build tools
How to Build It
- Cut all frame pieces before any assembly begins — four side boards at 48 inches each for the lower frame course, four more at 48 inches for the upper course, and the corner post pieces if your design uses internal corner blocks rather than overlapping board joints. A 4×4 foot interior dimension produces the most usable sandbox for one to two children; a 4×6 foot interior accommodates three or four children comfortably and requires proportionally more sand but uses the same construction technique throughout.
- Assemble the lower frame course by joining four 2×6 side boards into a rectangle using two exterior screws driven through each corner, pre-drilling every fastener location to prevent splitting at the board ends. Cedar end grain splits readily under direct screw pressure without pilot holes, and a split corner joint on a structure that will carry the weight of children leaning against it is a structural failure rather than a cosmetic one.
- Stack the upper frame course on top of the lower, offsetting the corner joints by half a board length so the upper course corners fall at the middle of the lower course side boards rather than directly above the lower corner joints — this staggered joint pattern creates a frame significantly more rigid than one with corners stacked directly above each other, and it is the construction detail that makes the sandbox wall feel solid rather than flex when children lean against it.
- Add corner blocking inside the frame at each corner — short sections of 2×4 or 2×6 screwed into both intersecting boards at each interior corner add the triangular bracing that prevents the rectangular frame from racking out of square over seasons of ground movement and wet-dry cycling. A sandbox frame without corner blocking gradually becomes a parallelogram rather than a rectangle over two to three seasons, which causes the lid sections to gap and not close properly.
- Line the completed frame base with landscape fabric before adding any sand — cut the fabric to overlap the frame interior walls by several inches on all sides and staple it to the interior face of the lower frame course boards. The fabric must extend up the walls rather than simply covering the ground inside the frame; a fabric that doesn't extend up the walls allows sand to migrate under the bottom edge over time and gradually deposits it in the surrounding soil.
- Build the two lid sections by laying 1×6 cedar boards side by side across a width that matches the exterior dimension of the sandbox, then screwing two horizontal cleats across the boards' undersides — one cleat near each long edge of the lid section — to hold the individual boards together as a single rigid panel. The cleats on the lid underside must be positioned far enough from the outer edge of the lid that they clear the sandbox frame top rail when the lid is closed; a cleat that contacts the frame rail prevents the lid from lying flat.
- Mount the hinges by attaching one leaf of each hinge to the outer edge of each lid section first, then positioning the lid on the sandbox frame with its outer edge aligned with the outer face of the frame and its hinge barrels centered on the frame top rail, before driving the second hinge leaf screws into the frame. Mount both hinges on a lid section before closing and testing — a lid with only one hinge installed will rack and bind during the open-close motion and can split the wood at the single hinge point under the stress.
- Seal the entire assembled sandbox with exterior wood sealant, applying one generous coat to all surfaces including the underside of the lid sections and the interior sandbox walls that will be in contact with damp sand — these are the surfaces that deteriorate fastest and the ones most difficult to reseal once the sandbox is filled and in regular use. Allow full curing time before adding sand, and add 200 to 300 pounds of play sand to a depth of 8 to 10 inches for the most engaging play experience.
Landscape designers who specify built-in play elements for residential gardens always position sandboxes in partial shade rather than full sun — a sandbox in full afternoon sun heats the sand to temperatures that can burn young children's hands and feet within minutes of peak summer sun exposure, while a sandbox in dappled shade or with afternoon shade from a tree or structure maintains comfortable play temperatures through the hottest parts of summer days. They also recommend positioning the sandbox so the open lid bench seats face toward the house or primary seating area rather than away from it, because the supervision sight line from the bench to the house interior and the house to the sandbox is what allows parents to actually use the bench seats rather than constantly relocating to maintain visual contact with children at play.