
Beaded Wind Chimes: Dollar Store Craft, $5
A metal ring, colorful beads, small bells, and fishing line — and your porch gets a personalized chime that cost $5 and sounds better than most store-bought versions.
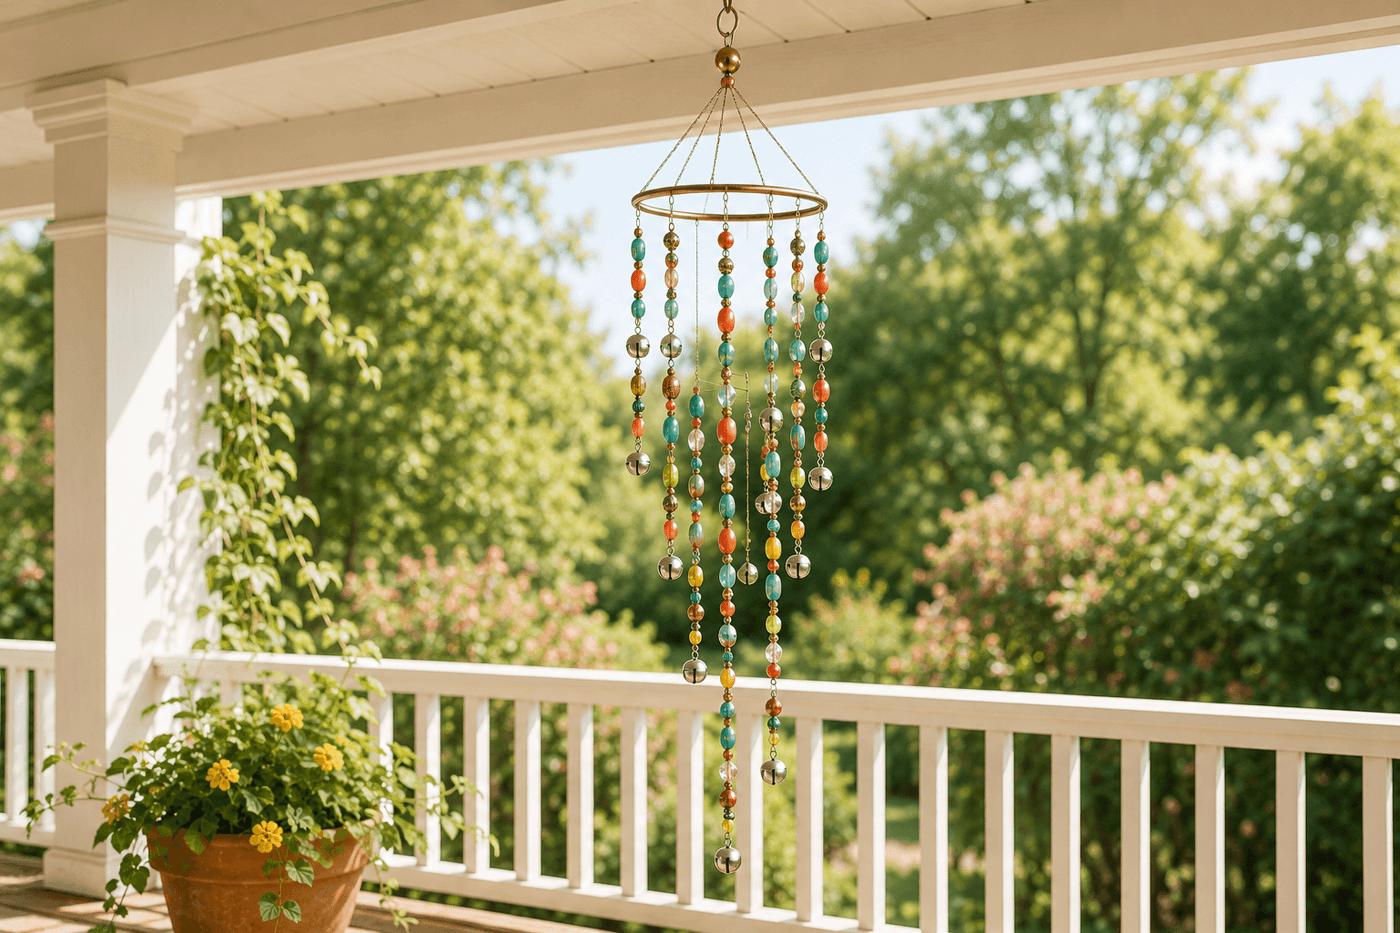
Store-bought wind chimes cost $15–30 for something mass-produced in colors that may or may not work with your porch and at a sound profile you had no input on — and a dollar store beaded version costs $5, takes about an hour to make, and is customized in every detail to the colors, bead pattern, strand length, and sound character that appeals specifically to you. The sound of a handmade beaded chime — small bells interspersed with metal washers or spoons that catch the breeze and strike each other and the neighboring strands at different moments — is gentler and more musical than most commercial versions, which tend toward either tinny clinking or overpowering clanging. The bead pattern along each strand adds both visual color and weight distribution that determines how each strand moves in the wind; longer strands swing more slowly and produce lower-frequency sound events while shorter strands move quickly and produce the rapid overlapping chiming that carries most musically across a porch or garden. An hour of threading and knotting produces a finished chime that hangs beautifully, sounds genuinely lovely, and makes the exact color statement you wanted for your outdoor space rather than the one that was available in the store.
What You'll Need
- Ring or hoop base — choose one:
- Metal ring, 6–8 inch diameter — craft store macramé rings or key rings; metal rings handle outdoor weather better than wooden hoops which absorb moisture and warp (~$1–2)
- Wooden embroidery hoop, outer ring only — available at dollar stores; paint with outdoor acrylic before use to weatherproof; provides a wider attachment surface for more strands
- Repurposed items — a large key ring, a wire wreath form cut to size, or the metal rim from a canning jar lid all work as no-cost ring alternatives
- Colorful beads — assorted sizes — dollar store bead packs typically include a mix of sizes and colors; choose a palette of two to three colors that coordinate with your porch décor for a cohesive look rather than using every color in the pack (~$1–2 per pack)
- Small bells — craft section of dollar stores; jingle bells in silver or gold; one to three bells per strand at intervals produces the chiming sound; bells at the strand bottom produce the loudest ring as they swing and strike each other (~$1 for a pack of 20–30)
- Sound elements — choose one or combine:
- Metal washers — hardware store; add weight and produce a softer, lower tone than bells when strands strike each other
- Small spoons or keys — thrift store or kitchen drawer; produce a bright, clear tone; drill a small hole in the handle for threading if needed
- Sea glass or shell pieces — drill a small hole for threading; produce a soft, muted clinking that works beautifully for a coastal aesthetic
- Fishing line or nylon thread, 20–30 lb test — strong enough to hold bead weight through outdoor conditions without breaking; clear monofilament makes the beads appear to float without visible line; colored thread adds another design element (~$1–2 for a small spool)
- Scissors and a beading needle — beading needle makes threading small-hole beads significantly faster than threading by hand; a standard sewing needle works for larger bead holes
- Clear waterproof adhesive or nail polish — for sealing the knots at each bead and bell attachment point so they do not slip or unravel in outdoor conditions; standard fishing knots without sealing work initially but loosen through repeated wind movement and wet-dry cycling
How to Make Them
- Plan the strand layout before cutting any line — decide on the number of strands (six to eight produces a full-looking chime without overcrowding the ring), the graduated length sequence (ranging from 12 to 24 inches creates the visual cascade that makes beaded chimes so appealing), and the bead color pattern for each strand. Laying out the planned strand lengths on a flat surface before cutting confirms the visual balance of the graduated lengths and the color distribution across the full chime before any threading begins.
- Cut all fishing line strands to length before threading any beads — cut each strand 4 inches longer than the intended finished length to account for the knots at the ring attachment and at the bottom stop bead, which consume approximately 2 inches of line each. Label each cut strand with a small piece of tape indicating its finished length if the graduated sequence is complex enough to lose track of which strand is which during threading.
- Thread a stop bead at the bottom of each strand first — tie a double overhand knot at the strand end, thread a single bead, and tie another double knot above it so the bead cannot slide off the bottom. This bottom stop bead is the foundation that prevents all the subsequent beads from sliding off during threading and use; seal the knot with a drop of clear nail polish and allow to dry completely before adding additional beads above it.
- Thread beads onto each strand in the planned color pattern, adding bells and metal sound elements at intervals — a bell every 3–4 inches along the strand produces frequent sound opportunities without clustering all the sound elements at one height. Thread each bell by passing the line through the bell loop and securing with a double knot above and below to prevent the bell from sliding to a different position during wind movement; seal each bell knot with nail polish before continuing to thread beads above it.
- Finish each strand with one to three bells or a heavier metal element at the very bottom — the bottom elements are what strike each other and neighboring strands most frequently and produce the majority of the chime's sound. A heavier bottom element swings further in the wind and strikes with more force than a light bead, producing a louder and clearer tone; balance the desired sound volume against the porch location's typical wind level when choosing bottom element weight.
- Attach strands to the ring at evenly spaced intervals by tying each strand end to the ring with two half-hitch knots pulled firmly against the ring surface — seal each ring attachment knot with waterproof adhesive or nail polish and allow to cure before hanging. Even spacing between strand attachment points is what produces the balanced, symmetrical appearance of the finished chime; measure the ring circumference and divide by the number of strands to determine the correct spacing interval rather than estimating by eye.
- Create the hanging system by cutting three equal lengths of fishing line approximately 8 inches each, attaching each to the ring at evenly spaced points between the strand attachments, and gathering all three at the top with a series of overhand knots that form a secure gathering point. Thread a large decorative bead over all three gathered lines above the knot for a finished appearance at the top, then tie a final loop above it for the hanging hook.
- Test the balance by hanging the completed chime from a temporary hook and observing whether it hangs level or tilts — a tilting chime has uneven weight distribution that can be corrected by sliding strands slightly around the ring until the weight balances, which is possible to adjust before the ring knots are sealed but not after. Hang outdoors in a location that receives a gentle breeze rather than a wind tunnel — strong sustained wind tangles beaded strands permanently while intermittent gentle breeze produces the overlapping chime movement the design is built for.
Sound artists and craft designers who create wind chimes for acoustic and decorative garden installations use one strand length principle that produces the most musically pleasing chime sound from a beaded design: make the length difference between adjacent strands consistent rather than random, using a progression of 2-inch increments from shortest to longest. A chime with strands at 12", 14", 16", 18", 20", 22", and 24" produces a graduated visual cascade and — more importantly — strands that swing at meaningfully different frequencies from each other, which means they rarely reach the bottom of their swing at the same moment and produce a continuous overlapping chime rather than a simultaneous clatter when the wind moves them all at once. Chime designers call this "swing frequency diversity," and it is the acoustic principle behind why professionally designed wind chimes with carefully graduated tube or strand lengths sound musical while randomly assorted ones sound like noise. The visual benefit is equally significant: the graduated cascade from short to long strands reads as intentionally designed rather than randomly assembled, and the dimensional depth of the hanging chime has visual complexity that flat equal-length designs cannot achieve.














