Add Holographic Vinyl Accents to Furniture for $15
A sheet of holographic vinyl, a squeegee, and thirty minutes — the side table that was invisible becomes the thing everyone photographs
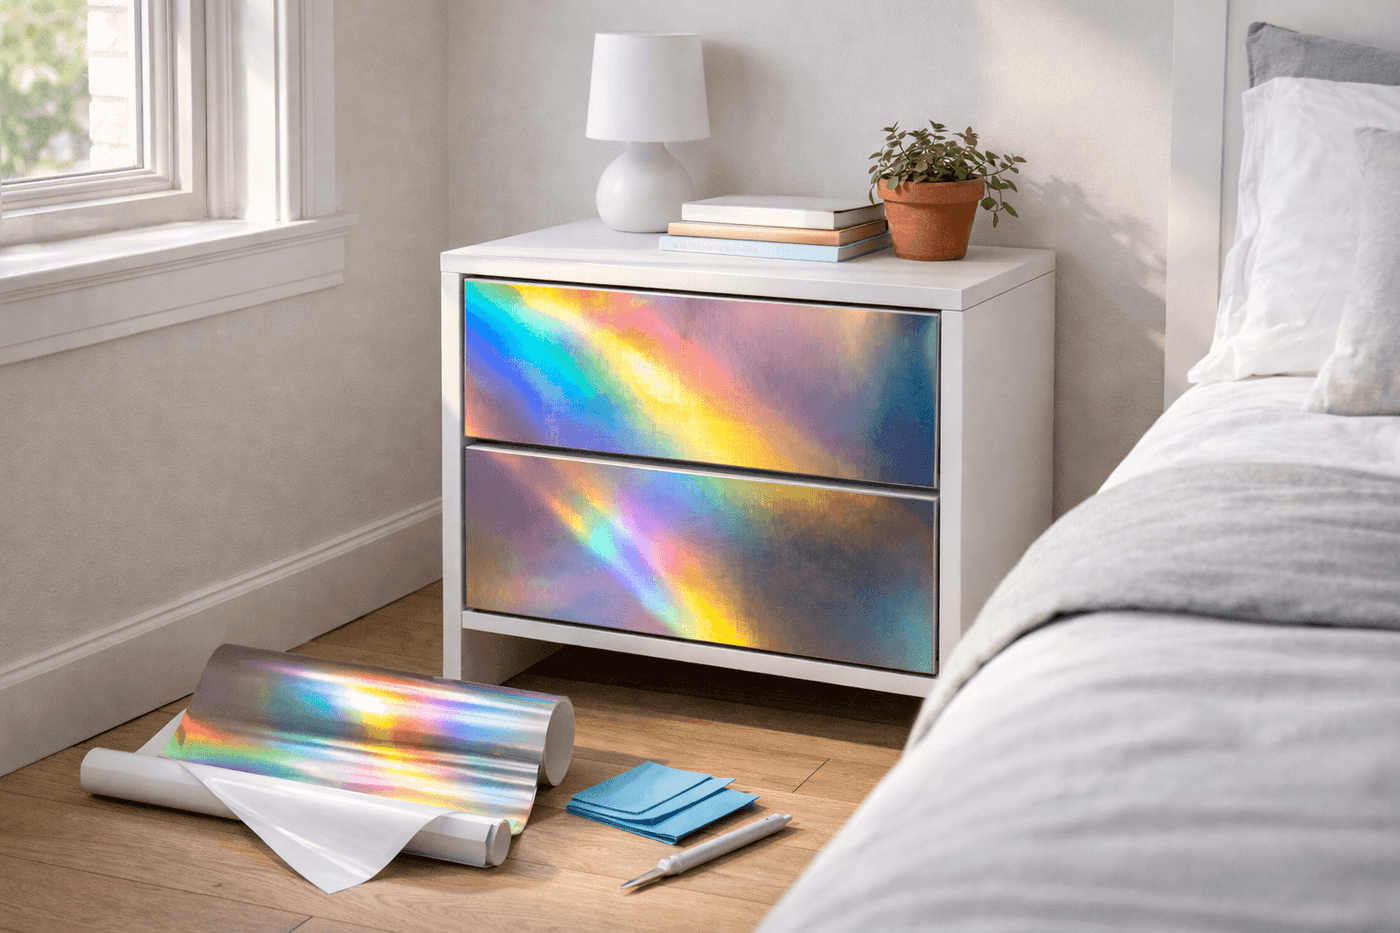
There is a category of interior upgrade that costs almost nothing, takes thirty minutes, and produces the kind of visual impact that stops people in the doorway of a room and makes them immediately ask what you did differently — and holographic vinyl applied to furniture surfaces is squarely in that category. A rainbow-shifting or oil-slick finish vinyl sheet applied in diagonal stripes across dresser drawer fronts, wrapped around a side table top, or cut into geometric accents on cabinet doors catches and refracts light in a way that changes the entire energy of a piece of furniture and, by extension, the room it lives in. The application process is the same squeegee technique used for car wraps and window decals, the vinyl is completely removable if you change your mind, and the whole project costs between $10 and $20 in material for a result that looks like a design decision from a furniture photographer's styling kit. This is interior design for people who believe that bold and unexpected is almost always better than safe and forgettable — and who are done apologizing for it.
What You Need
- Holographic or oil-slick vinyl sheets or rolls — look for cast vinyl rather than calendered vinyl for furniture applications; cast vinyl is thinner, conforms better to surface contours, and lasts significantly longer before the edges begin to lift (~$10–20 for a 12×24-inch sheet or a 5-foot roll, available on Amazon or at craft stores)
- Squeegee or old credit card — the essential application tool for working air bubbles outward from the center of the vinyl during application; a purpose-made vinyl squeegee wrapped in a microfiber cloth prevents scratching on holographic finishes that show tool marks more readily than matte vinyl (~$3–5 for a plastic squeegee)
- Rubbing alcohol and clean cloth — for cleaning the application surface thoroughly before vinyl contact; any dust, oil, or residue between the vinyl adhesive and the surface creates a bubble that cannot be squeegeed out after the vinyl has been pressed down
- Sharp craft knife or scissors — for cutting vinyl to precise measurements; a craft knife with a fresh blade produces significantly cleaner cut edges than scissors on holographic vinyl, which has a tendency to compress and distort slightly along the cut line under scissor pressure
- Metal ruler and cutting mat — for straight-line cuts that produce the geometric precision the most striking vinyl applications require
- Heat gun or hair dryer — for gently warming the vinyl during application on curved surfaces or corners, which makes the material more pliable and allows it to conform without creasing (~$12–15 if you don't own one)
- Transfer tape — optional, for moving cut vinyl shapes from the cutting mat to the application surface without disturbing their position or the cut edges (~$4–6 for a roll)
How to Apply It
- Choose your furniture piece and application pattern before cutting a single inch of vinyl — sketch the design on paper first and hold the sketch against the furniture to assess the proportions from the distance at which the piece will actually be viewed. A diagonal stripe that looks bold and graphic in a sketch sometimes reads as too narrow or too wide on an actual drawer front, and identifying that before cutting expensive holographic vinyl costs nothing while discovering it after application costs the material and the time.
- Clean every surface that will receive vinyl with rubbing alcohol on a clean cloth, wiping in one direction rather than circular motions to avoid redistributing oils across the surface rather than removing them. Allow the surface to dry completely — at least five minutes in a warm room — before bringing vinyl anywhere near it. The bond between vinyl adhesive and a clean surface is dramatically stronger than the bond to a surface that appears clean but still carries invisible oils from regular handling.
- Measure and mark your cut lines on the vinyl backing paper rather than the vinyl face — marking directly on the holographic surface with a pen leaves marks that may be visible through the finish, while marks on the paper backing are removed with the backing during application. Use a metal ruler and craft knife for all straight cuts, making each cut in a single confident stroke rather than multiple passes that leave slightly ragged edges on holographic film.
- Cut test pieces from a corner of your vinyl sheet before cutting the full application pieces — apply the test piece to an inconspicuous area of the furniture to confirm the vinyl adhesive bonds well to that specific surface material and that the holographic finish reads the way you expected at the scale of the actual piece. Certain painted surfaces, laminate finishes, and waxed wood surfaces do not bond reliably with pressure-sensitive vinyl adhesive, and discovering this on a test piece costs a small corner of material rather than a full sheet.
- Apply each vinyl piece using the hinge method for large sections — peel the backing about two inches from one edge, position the exposed adhesive edge precisely at the starting point of your design, and press it down firmly before slowly peeling the remaining backing away while simultaneously smoothing the vinyl flat with the squeegee moving from the adhered edge outward. Working from one edge progressively across the piece prevents the air trapping that occurs when vinyl is pressed down from the center outward, which pushes air toward the edges where it cannot escape.
- Squeegee firmly and continuously from the center of each vinyl section toward the nearest edge with overlapping strokes, maintaining consistent pressure across the full squeegee width. The holographic surface shows every application mark during and immediately after application — gentle, even squeegee pressure produces a smooth final surface, while uneven pressure or lifting and repositioning the squeegee mid-stroke creates visible pressure lines that are permanent in the finished application.
- Address any remaining air bubbles after initial application by heating them gently with a hair dryer on medium heat for ten to fifteen seconds — the warmth softens the vinyl adhesive and allows the bubble to be squeegeed flat without the resistance that causes tearing when cold vinyl is overworked. For bubbles smaller than a quarter inch, a single pin prick at the bubble edge followed by firm finger pressure is faster and more precise than the heat method for small isolated areas.
- Trim any vinyl that extends beyond the intended design boundary using the craft knife and ruler, cutting against the furniture surface in a single clean stroke rather than sawing back and forth across the edge. A clean-cut vinyl edge that terminates precisely at a surface seam, drawer edge, or design boundary reads as intentional and precise; a roughly trimmed edge that wanders slightly from the intended line is the detail that separates a result that looks professionally applied from one that looks carefully attempted.
Set designers who work with holographic and metallic vinyl for film and commercial photography always orient holographic vinyl so the color-shift axis runs perpendicular to the primary light source in the room rather than parallel to it — a holographic stripe that runs left to right in a room where light falls from a window on the left produces a static, single-color appearance because the viewing angle to the holographic pattern stays constant from any position in the room. The same stripe oriented top to bottom shifts through its full color spectrum as a viewer moves across the room from left to right, which is the dynamic, light-reactive quality that makes holographic vinyl worth using in the first place. Thirty seconds of considering the light source direction before marking cut lines is what determines whether your holographic accent looks alive and extraordinary or merely shiny.