
Vertical Pot Tower: 5-Tier Garden for $12
A threaded rod, graduating terra cotta pots, and an hour of assembly — and one square foot of patio holds more plants than six times that area in standard containers.
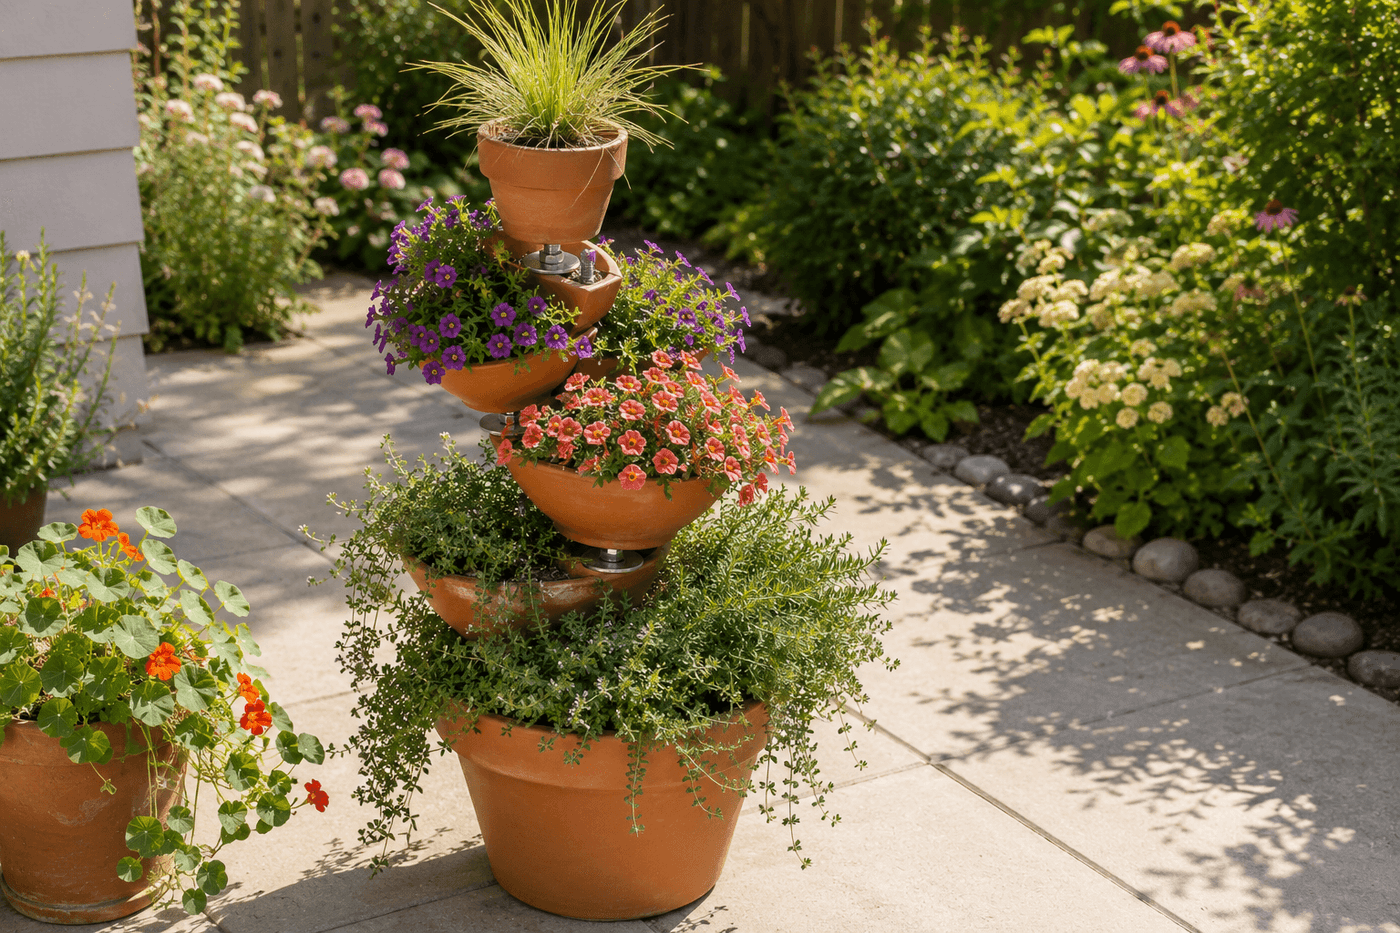
The small patio gardener's fundamental problem is horizontal space — there is never enough of it, and every additional pot placed on the ground displaces either furniture, foot traffic, or the visual breathing room that makes an outdoor space feel like a place to relax rather than a plant storage facility. A vertical tower of stacked terra cotta pots on a threaded metal rod solves this completely: five tiers of plants in graduating pot sizes occupies one square foot of patio surface while displaying as much growing space as six to eight ground-level containers, and the spiral offset rotation that produces the architectural beauty of the finished tower is not a styling technique but a structural one — each pot rotated 30–45 degrees from the one below it distributes weight evenly around the rod and allows every tier to receive light and airflow rather than shading the pot directly below it. The $12 hardware cost is the complete investment if the pots are already owned, and the assembly is genuinely achievable in an hour for anyone who has handled basic hardware before. This is the patio project that makes a crowded outdoor space feel curated and designed rather than accumulated, and that produces a vertical focal point interesting enough to anchor the entire space.
What You'll Need
- Terra cotta pots in graduating sizes — five pots in descending size from bottom to top; a typical graduating set runs 14", 12", 10", 8", and 6" — each pot's drainage hole must be large enough for the threaded rod to pass through; standard terra cotta drainage holes typically accommodate ½" rod without modification
- Threaded metal rod, ½" diameter — length equals the total stacked height of all five pots plus 6 inches for the base anchor nut below the bottom pot and the top cap above the top pot; a 36-inch rod accommodates most five-tier configurations (~$4–6 at any hardware store)
- Nuts and washers, ½" to fit the rod — two nuts and two washers per pot (one above, one below) plus two for the base anchor; purchase 12–15 of each to have extras (~$3–4 for an assorted pack)
- Decorative end cap or finial for rod top — a ½" acorn nut or decorative cap threads onto the rod end above the top pot and completes the tower with a finished look rather than a raw threaded rod end (~$1–2)
- Two wrenches or pliers — for tightening the double-nut locking system at each tier; one wrench holds the lower nut stationary while the other tightens the upper nut against it to lock each pot's position on the rod
- Drill with masonry bit, ½" — only needed if any pot's drainage hole is smaller than the rod diameter; drill slowly with light pressure and the pot supported flat on a scrap board to prevent cracking
- Quality potting mix — not garden soil; each tier needs independently draining potting mix that will not compact under the overhead watering that drains through all tiers from the top (~$8–12 for a bag covering all five tiers)
- Plants — chosen by tier size and position:
- Bottom two tiers (largest pots): trailing herbs — thyme, oregano, trailing rosemary, or creeping nasturtium that cascade attractively over the pot rim
- Middle tiers: compact flowering annuals — million bells, lobelia, or diascia in complementary colors
- Top tier (smallest pot): a single upright specimen — a small ornamental grass, compact geranium, or succulent rosette that crowns the tower
How to Build It
- Select the tower's final location before any assembly — a fully planted five-tier terra cotta tower is extremely heavy and should not be moved after completion. Choose a spot that receives the sunlight appropriate to your chosen plants, is accessible for watering from above, and has a stable, level surface beneath it; a tower assembled on a slightly uneven surface will lean visibly and the lean amplifies as each tier is added.
- Thread a nut and washer onto the bottom of the rod and position them approximately 4 inches from the rod end — this base anchor assembly sits beneath the bottom pot and is what prevents the entire tower from sliding down the rod. Tighten a second nut against the first using the double-nut locking method (one wrench holding the lower nut, a second tightening the upper nut firmly against it) so the assembly cannot rotate loose under the weight of a fully planted tower.
- Set the largest pot over the rod end, lowering it until the drainage hole rests on the base anchor washer — the pot should sit level and stable on the washer without rocking. Add a washer and single nut above the pot rim on the rod, tightened snugly to sandwich the pot between the lower and upper hardware and prevent it from lifting when the rod is moved, but not so tightly that the nut cracks the pot rim under pressure.
- Fill the bottom pot with potting mix to within one inch of the rim and plant your chosen trailing variety — fill and plant each tier before adding the next pot above it, which is far easier than trying to fill around a rod with another pot already sitting inches above. Press plants firmly into the soil and water lightly to settle the mix before proceeding upward; a pot with loose, unwatered soil shifts and loses plants when the weight of the tier above compresses it during final assembly.
- Position the second pot on the rod above the first, rotating it 30–45 degrees from the first pot's orientation before setting it down — this offset rotation is the structural and aesthetic decision that defines the tower. Mark the first pot's front with a small piece of tape before stacking so each subsequent rotation is measured from a consistent reference point rather than eyeballed against the previous tier's final settled position, which produces an inconsistent spiral that looks random rather than architectural.
- Adjust the rod height at which the second pot rests by threading a washer and nut below it at the desired tier spacing — 3–4 inches of rod between pot rims produces the most visually balanced proportion between tiers; less than 3 inches crowds the planting space and prevents the trailing plants in the lower tier from cascading freely without being compressed by the pot above.
- Repeat the fill-plant-rotate-secure sequence for all five tiers, maintaining the consistent 30–45 degree rotation between each tier and confirming the tower remains vertical after each addition — the weight of freshly watered soil in each tier can cause slight rod flex on a long threaded rod, and catching a lean at tier three is far simpler than correcting it after the full tower is planted and weighs 40–60 pounds.
- Water the completed tower thoroughly from the top tier downward using a gentle stream that allows water to percolate through each soil layer rather than a forceful flow that displaces surface soil and washes it over the pot rim — the drainage from upper tiers supplements the water reaching lower tiers, which means lower tiers in a well-designed tower often need less supplemental watering than the top tier, which drains most freely. Observe the drainage pattern from the bottom tier during the first watering to confirm all tiers are receiving adequate moisture before establishing a regular watering schedule.
Container garden designers and patio landscape specialists who create vertical planting installations for small-space urban gardens use one planting composition principle for pot towers that produces lush, full coverage within four to six weeks rather than the sparse, just-planted look that persists for most of the season with single-plant-per-tier installations: plant three small plants per tier in the two largest bottom pots and two plants per tier in the middle tiers rather than one plant centered in each pot. A single trailing herb or flowering annual in a 14-inch pot establishes slowly and produces trailing coverage only at the center of the pot rim for the first several weeks; three plants spaced evenly around the pot interior establish simultaneously, cover the full pot rim in multiple directions, and produce the lush, overflowing cascade effect from the first month that a single plant requires a full season to achieve. Container designers who specify this three-plant approach for client installations consistently photograph completed towers at six weeks that look indistinguishable from full-season plantings — and the cost difference of two extra cell-pack plants per large tier is the investment that makes the tower look intentional and beautiful from the week it is assembled rather than the month before it is taken down for winter.














