Patriotic Jar Luminaries: Porch Glow for $16
Two colors of glass paint, a dozen mason jars, and 20 minutes — and your porch glows in jewel-toned red, white, and blue before the fireworks even start.
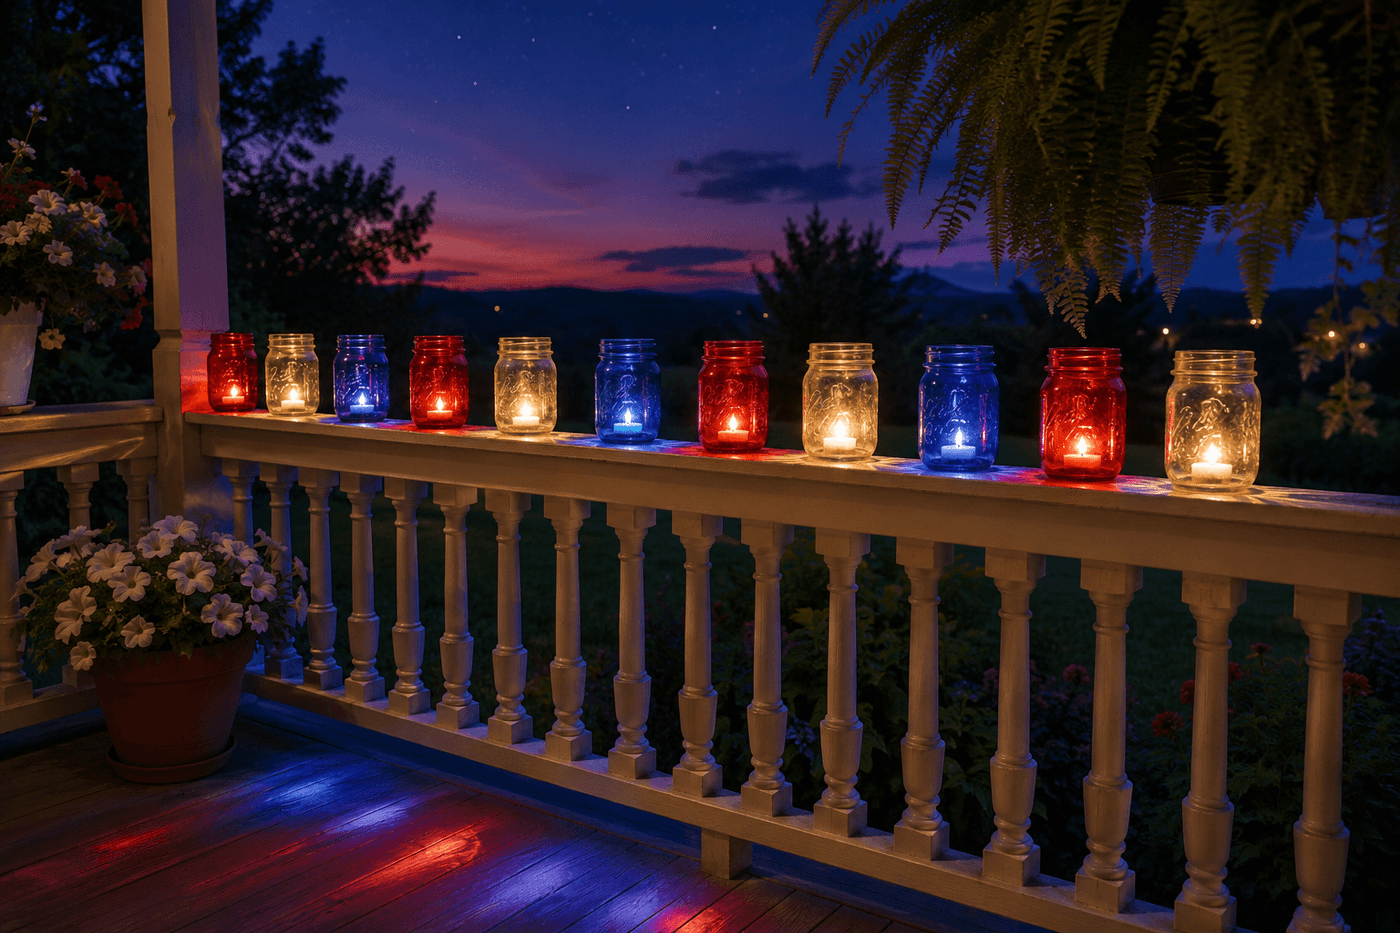
There is a specific moment at a Fourth of July party when the light changes — when the sky goes from blue to deep purple and the candles inside the luminaries suddenly matter — and having a porch lined with glowing red, white, and blue mason jars is the difference between a gathering that looks festive in daylight and one that looks genuinely magical at dusk. Translucent glass paint on mason jars is the technique that produces that effect: the paint allows candle glow to transmit through the glass in jewel-toned color that deepens and becomes more beautiful as the sky darkens, in a way that opaque paint completely blocks and store-bought colored glass rarely achieves at this price point. A dozen jars, two colors of glass paint, and a pack of tea lights runs about $16 total and takes 20 minutes of active painting time — then the jars dry while you do everything else, get lit at dusk, and produce the kind of porch moment that stops guests mid-sentence and starts a phone-out photo situation before anyone has said hello. The unpainted clear jars placed every third position in the sequence are the design detail that elevates the arrangement from a row of colored jars to something that looks deliberately composed — the warm bright clear glow between each pair of colored jars creates a rhythm that reads as intentional and designed from across the yard.
What You'll Need
- Mason jars — pint size (16 oz) is the most versatile; wide-mouth jars are easier to paint inside if desired and easier to place tea lights into; a 12-pack runs $10–12 and makes a full porch railing display or walkway installation
- Translucent glass paint in red — Folkart Transparent Glass Paint or Rust-Oleum Frosted Glass paint in red; translucent formula is essential — opaque paint blocks candle glow entirely rather than transmitting it in jewel-toned color (~$3–4 per bottle, one bottle paints four to six jars with two coats)
- Translucent glass paint in blue — same brand and formula as the red; cobalt or navy blue transmits the deepest, most dramatic candlelight color; royal blue reads as brighter and more vibrant in daylight (~$3–4 per bottle)
- Foam brushes, 1-inch — produce the smoothest, most streak-free glass paint application of any brush type; bristle brushes leave visible brush marks in translucent glass paint that show clearly when backlit by candlelight (~$1–2 for a pack of several)
- Tea lights — standard wax tea lights for real flame effect; battery-operated flickering LED tea lights for wind-proof outdoor use and for placement on wooden surfaces where open flame is a concern (~$3–5 for a pack of 50 standard or 12 LED)
- Rubbing alcohol and paper towels — for cleaning jar exteriors before painting; glass paint adheres poorly to jars with fingerprints, dust, or residue on the surface, and a 30-second wipe with alcohol is the prep step that determines whether the paint bonds cleanly or peels at the edges within days
- Painter's tape — optional, for creating crisp horizontal stripe effects or masking the jar rim and bottom for a clean paint boundary rather than a hand-painted edge
- Oven — optional for heat-setting; baking painted jars at 350°F for 30 minutes after the paint is fully dry cures the glass paint permanently and makes it significantly more resistant to moisture and handling than air-dried paint alone
How to Make Them
- Clean all jar exteriors thoroughly with rubbing alcohol on a paper towel, wiping the full outer surface including the bottom and the area just below the rim where fingerprints concentrate during handling — allow to dry completely before touching the cleaned surface or applying any paint. Glass paint applied over even a small fingerprint produces a visible adhesion failure that appears as a lifted, peeling patch in the finished paint within days, and the 30-second cleaning step is the entire difference between paint that stays bonded for years and paint that begins failing before the summer is over.
- Plan your color sequence before opening any paint — for a 12-jar installation, the red-clear-blue repeating sequence uses four jars of each across the full display, which produces a balanced patriotic rhythm with equal visual weight to each color. Alternatively, a red-red-clear-blue-blue-clear sequence produces bolder color blocks with more white space between them that reads as more graphic and modern; a red-clear-blue-clear repeating sequence produces the most white in the display and reads as the lightest and most delicate of the three options.
- Paint the exterior of each designated color jar with the foam brush, applying translucent glass paint in long, vertical strokes from rim to base in a single pass rather than back-and-forth scrubbing that lifts wet paint and creates uneven coverage. Work around the jar circumference in overlapping sections, maintaining a wet edge at all times so each new section blends into the previous one before it dries — dried edges that get painted over produce a visible ridge line in translucent paint that shows clearly when backlit.
- Allow the first coat to dry completely before applying the second — translucent glass paint dries to the touch in 15–20 minutes but applying a second coat over a first coat that is still slightly tacky produces streaking and lifting that ruins the smooth, even coverage that makes the backlit effect beautiful. A fully dry first coat accepts the second coat without disturbing it and the two coats together produce the saturated, jewel-toned color that a single coat cannot achieve on its own.
- Apply the second coat in the same vertical stroke direction as the first, which keeps any minimal brush texture consistent in direction so it reads as intentional rather than as cross-hatched marks from different stroke directions. Two coats of translucent glass paint produce the correct depth of color for candlelight transmission — enough pigment to color the light beautifully without so much opacity that the glow is blocked rather than tinted.
- Heat-set the painted jars in a home oven for significantly improved durability — place the fully dry painted jars on a baking sheet, put them in a cold oven, set to 350°F, and bake for 30 minutes after the oven reaches temperature. Turn the oven off and allow jars to cool completely inside the oven before removing — thermal shock from moving hot jars to a cool surface cracks glass. Heat-set glass paint becomes waterproof, chip-resistant, and hand-washable; air-dried glass paint can be scratched and water-damaged in outdoor conditions.
- Arrange the finished jars in your planned color sequence along the porch railing, front walkway, or table centerpiece position — spacing jars approximately 6–8 inches apart produces a connected, rhythmic display at railing scale; spacing them 12 inches apart along a walkway allows each jar's glow to be appreciated individually before blending with the next at viewing distance. Place the clear unpainted jars in their designated sequence positions; their brighter, warmer glow at dusk provides the visual punctuation that makes the colored jars read as richer and deeper by contrast.
- Light the tea lights and place one inside each jar as the sky begins to darken — the luminaries are functional in early evening but reach their full visual impact at dusk when the ambient light drops enough for the colored glow to become the dominant light source in the scene. For outdoor railing and walkway installations, battery-operated flickering LED tea lights eliminate fire risk on wooden surfaces and in breezy conditions while producing a light quality virtually indistinguishable from real flame through colored glass at normal viewing distance.
Event lighting designers and prop stylists who create large-scale luminary installations for outdoor celebrations use one glass paint technique that produces dramatically more vibrant color transmission than standard brush application: thin the translucent glass paint with a small amount of glass medium — approximately one part medium to four parts paint — before applying. The glass medium extends the paint's open time, reduces brush drag on the glass surface, and allows the pigment to flow more evenly into a thinner, more consistent film that transmits light more cleanly than a slightly thicker brush-applied coat. Event designers who use this technique describe the color quality as closer to stained glass than painted glass — the light transmission is more complete and the color more saturated at lower pigment density, which produces jars that glow rather than merely appearing colored. Glass medium is available at any craft store for $4–5 and improves every glass painting project regardless of the design — it is the single supply that professional glass painters consider essential and that most home crafters have never encountered.