
Concrete Hand Planters: Six for $8, Zero for $45
Fill a rubber glove with quick-setting concrete, position every finger, prop in sand, cure overnight — and the garden shop's $45 boutique object is yours for about $1.50 with every knuckle crease intact.
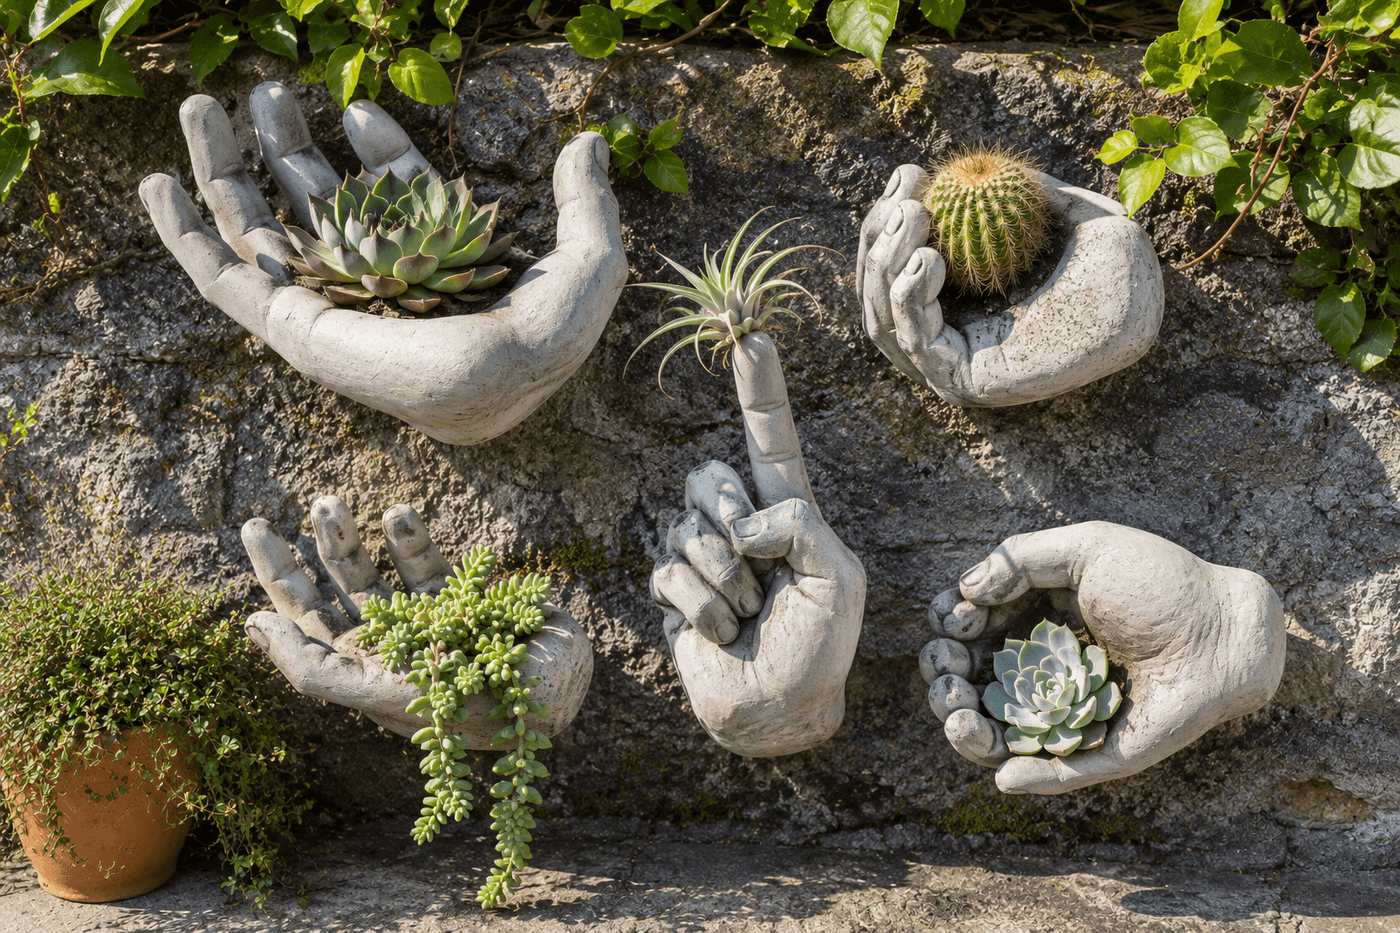
The concrete hand planter occupies a specific category of garden object where the concept is so immediately compelling — a realistic concrete hand holding a living plant — that the first one seen in person produces the exact response that good garden art should: a double-take, a closer look, and the specific pleasure of something that is simultaneously familiar and completely unexpected in a garden context. The boutique version costs $45 because of the labor involved in producing something that realistic; the DIY version costs $1.50 in concrete and a disposable rubber glove because the rubber glove does all the realism work automatically, transferring every knuckle crease, every finger wrinkle, and every fingerprint into the cured concrete surface in a level of detail that would be extraordinarily difficult to sculpt by hand. Six hands arranged across a garden wall, each holding a different succulent or air plant in a different finger position, cost $8 total and produce the kind of garden installation that stops visitors mid-sentence. The concrete work is as accessible as it gets — mix, fill, position, prop, wait 24 hours, peel, drill one drainage hole — and the result is the garden feature that everyone asks about first and every time.
What You'll Need
- Quick-setting concrete mix — Quikrete Quick-Setting Cement or similar; quick-setting rather than standard concrete is important for this application because the mix must be stiff enough to hold the finger positions during the shaping phase without slumping; standard concrete is too fluid for reliable finger position retention and has a much longer working time that does not benefit the hand planter process (~$7–9 for an 80 lb bag that makes 20–30 hands, or a smaller 10 lb bag for a first batch of six at ~$5–6)
- Disposable rubber or latex gloves, size large or extra-large — one glove per hand planter; larger gloves produce more dramatic, sculptural hands; smaller gloves produce more delicate, refined hands; nitrile exam gloves transfer knuckle detail most completely because the thin, close-fitting material conforms to every surface irregularity of the concrete fill; household rubber gloves produce a slightly smoother surface with less fine detail (~$4–6 for a box of 100 nitrile exam gloves, which covers many sessions)
- Sand, approximately 2 inches deep in a shallow bin — for propping and holding each filled glove in the intended position during the curing period; a standard plastic storage bin or a cardboard box filled with play sand or all-purpose sand allows each finger to be pressed individually into the sand surface to hold its position; the sand also supports the palm at the intended angle during the full 24-hour cure (~$4–5 for a small bag of play sand)
- Mixing container and stir stick — a dedicated mixing bucket or large disposable container; concrete bonds permanently to most containers and should be mixed in something that can be discarded or kept exclusively for concrete mixing
- Rubber gloves for mixing — worn over hands during the concrete mixing phase; concrete is highly alkaline and causes chemical burns with sustained skin contact; wear a pair of rubber or nitrile gloves while mixing and handling the concrete, separate from the gloves being filled as the mold
- Masonry drill bit, ¼-inch — for drilling drainage holes in the cured concrete palm after the glove is removed; one hole per hand at the lowest point of the palm allows excess water to drain away from plant roots; concrete can be drilled with a standard drill at slow speed using a masonry bit but a hammer drill produces a cleaner hole more quickly (~$5–8 for a single masonry bit if not already owned)
- Concrete sealer — one coat over the cured concrete surface after drilling and before planting; raw concrete is porous and weathers with surface spalling in cold climates through freeze-thaw cycling; a penetrating concrete sealer protects the surface detail — particularly the fine knuckle and fingerprint texture — from the freeze-thaw damage that erodes unsealed outdoor concrete over multiple seasons (~$6–8 for a small can)
- Plants for the finished hands:
- Succulents — the most practical planting for a palm-cupped hand; drought-tolerant, shallow-rooted, and visually dramatic against the gray concrete surface
- Air plants (Tillandsia) — for single-finger hands; require no soil, no drainage hole, and only occasional misting; sit perfectly in the curl of a single raised finger
- Trailing sedums or moss — for hands where the plant will spill over the fingers and down the wrist, adding the most dramatic garden art quality to the finished piece
How to Make Them
- Prepare the sand bed before mixing any concrete — fill the shallow bin with 2–3 inches of damp sand and use your own hand to press test positions into the surface, which reveals whether the sand depth and dampness is sufficient to hold individual finger positions without the impressions collapsing before concrete is pressed in. Damp sand holds impressions significantly better than dry sand; add water to the sand and mix until it holds a firm impression when pressed and released without crumbling. Prepare enough sand bed space for all the hands planned in the session before mixing concrete, since working time is limited once the concrete is mixed.
- Mix the concrete to a peanut butter consistency — slightly stiffer than standard concrete mixing instructions recommend, which produces a mix that holds finger positions when shaped rather than slumping back to level. Add water incrementally rather than all at once; the difference between concrete that holds finger positions and concrete that slumps is approximately one tablespoon of water per cup of mix, and the correct consistency is achieved more reliably by approaching it from the dry side than by trying to remove water from an overly wet mix.
- Fill the glove with the mixed concrete — hold the glove opening wide with one hand and spoon concrete in with the other, working in small amounts and pressing concrete into each finger individually before filling the palm. Each finger must be filled completely to the fingertip before the palm fill begins; concrete spooned into the palm first traps air in the fingers above and produces finger voids in the cured hand that must be filled after curing and are never as seamless as properly filled fingers. Shake and tap the filled glove gently between finger fills to settle the concrete and eliminate air pockets along the glove walls.
- Position the filled glove immediately in the sand bed — this is the most creative and most consequential step in the full process. Press each finger individually into the sand at the angle and position intended: fingers splayed wide and pressed flat for a palm-up receiving position; fingers curled inward in varying degrees for a cupped position; a single finger pressed upright with the remaining fingers folded under for the pointing hand. The sand holds whatever position each finger is pressed into, and the concrete inside the glove is still workable for 10–15 minutes after filling, during which time adjustments are easy; after that window, positions are fixed.
- Refine the wrist position and overall hand angle while the concrete is still workable — the wrist angle determines whether the finished hand appears to be reaching upward, lying flat, or tilting at an angle that suits the intended display position on the garden wall or surface. A hand intended to be displayed palm-up on a flat surface needs the wrist positioned so the palm face is horizontal; a hand intended to be mounted on a vertical wall needs the wrist angled so the palm faces outward from the wall rather than downward when the hand is in its display position.
- Cure the positioned glove undisturbed for a full 24 hours — quick-setting concrete achieves initial hardness within hours but requires the full cure time for the structural integrity needed to survive glove removal without cracking at the thin finger sections. Do not attempt to check progress by bending a finger before the full cure; a finger that appears firm at 6 hours may crack at the knuckle joint when flexed, while the same finger at 24 hours survives glove removal with no damage.
- Remove the glove by cutting rather than peeling when possible — a single cut down the back of the glove from wrist to fingertip with small scissors allows the glove to be peeled away from the concrete surface without applying the lateral stress to the finger sections that pulling a tight glove off produces. Peel the cut glove back slowly, supporting each finger section with the other hand as the glove releases from the concrete surface; the moment of reveal — when the first concrete knuckle appears — is the most satisfying moment in the entire project.
- Drill the drainage hole with a masonry bit at the lowest point of the palm — for hands positioned palm-up with a succulent planting, this is the center of the palm; for hands in other positions, identify the lowest point the water would pool and drill there. Apply gentle, consistent pressure with the drill at slow speed; excessive pressure or high speed on cured concrete produces cracking rather than a clean hole. Allow any concrete dust to clear before inspecting the hole depth; a ¼-inch hole drilled to full bit depth provides adequate drainage for a palm-sized succulent planting.
Concrete garden art instructors and prop designers who produce hand planters for garden shows, editorial shoots, and boutique retail consistently recommend one finishing technique that elevates the visual quality of a cast concrete hand from an impressive DIY project to something that reads as a professional garden sculpture: apply a diluted black or dark gray concrete stain or watered-down acrylic wash into the knuckle creases and fingerprint recesses after sealing, then wipe back from the raised surfaces before the wash fully dries. This antiquing wash technique — the same principle used in furniture distressing — darkens the recessed texture details while leaving the raised surfaces their natural concrete gray, which dramatically increases the three-dimensional quality of the hand's surface and makes the knuckle and fingerprint detail that the rubber glove transferred so faithfully visible from a distance rather than only when examined closely. The wash is applied with a soft brush worked into all the recessed areas, allowed to sit for 60–90 seconds, and then wiped back with a damp cloth using a gentle circular motion that removes wash from the raised surfaces while leaving it in the recesses. Concrete artists who use this technique on hand planters describe the before-and-after as the difference between a concrete object that is interesting and a concrete sculpture that is beautiful — and the technique takes five minutes and costs nothing beyond a small amount of diluted craft paint.














