
Bottle Garden Edging: Upcycled Border for Free
Collect green and amber bottles, soak the labels off, dig a narrow trench, nestle them in neck-down — and a garden bed border that catches the light like stained glass costs absolutely nothing.
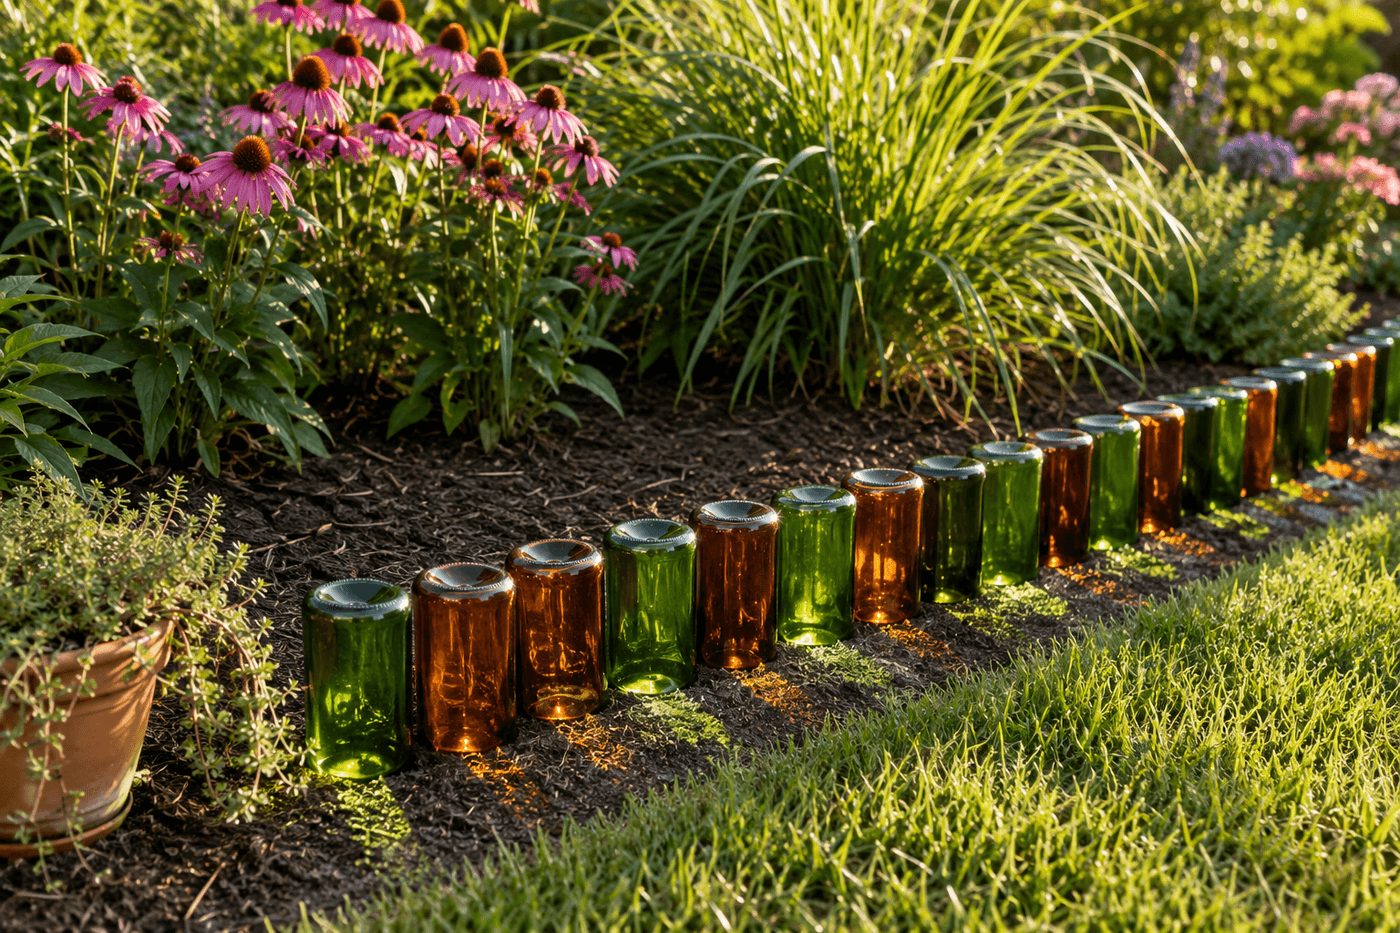
Garden bed edging made from upside-down glass bottles is one of those ideas that sounds whimsical in description and looks genuinely beautiful in execution — the scalloped silhouette of bottle bottoms at soil level, the way afternoon sunlight passes through green and amber glass and throws colored light onto the mulch and adjacent plants, the specific quality of permanence and intention that a glass bottle border gives a garden bed compared to the plastic edging that is the default alternative. The project costs nothing beyond the time to collect, clean, and install the bottles — wine, beer, and sparkling water bottles in coordinating green and amber tones create the stained glass effect that makes this edging so visually distinctive; all-clear bottles produce a more subtle sparkle; all-cobalt-blue bottles from water or spirits produce the most dramatic light effect available. Thirty to forty bottles edges a standard 10-foot garden bed section when placed neck-down and nestled tightly together; the installation is straightforward, the edging never needs replacing, and the garden bed that previously had a forgettable plastic border becomes a feature that every visitor notices and comments on.
What You'll Need
- Glass bottles in coordinating colors — collect over time:
- Green wine bottles — the most commonly available and the classic bottle edging color; burgundy and champagne bottles are the same green and mix invisibly
- Amber beer bottles — complement the green bottles with a warm secondary color that reads as intentional contrast rather than random mixing
- Cobalt blue bottles — spirits, some water brands, and specialty food bottles; produces the most dramatic light effect but requires deliberate collecting; use as accent pieces within a predominantly green border rather than as the primary color
- Clear glass bottles — sparkling water, clear spirits; mix with colored bottles for sparkle without color or use exclusively for a more subtle, frost-like border effect
- Calculate quantity needed: one standard wine bottle per 3 inches of border length; a 10-foot bed section needs approximately 40 bottles
- Large bucket or utility sink for label removal — fill with very hot water and a generous squeeze of dish soap; soak bottles for 20–30 minutes before scrubbing; most paper labels release completely in hot soapy water; adhesive residue remaining after label removal comes off cleanly with a cloth soaked in cooking oil or rubbing alcohol
- Scrub brush or steel wool pad — for removing labels and adhesive residue that does not release fully in the soak; steel wool on glass produces fine scratches that are invisible once the bottle is in the ground but that diffuse rather than transmit light if the bottle is in a visible above-ground position
- Narrow garden spade or flat-bladed edging tool — for cutting the installation trench along the garden bed edge; the trench needs to be exactly half the bottle height deep and only slightly wider than the bottle neck, which keeps the installation tight and prevents bottles from leaning
- Mallet or rubber hammer — for tapping bottles firmly into position in the trench without applying direct hand pressure to the bottle base, which risks breakage; a folded cloth between the mallet and the bottle base cushions the impact during final positioning
- String line and stakes — for maintaining a straight or consistently curved trench line along the garden bed edge before digging; a string line snapped before the first spade goes in produces a trench that follows the intended bed edge rather than the path of least digging resistance
- Gloves — for the full installation process; glass bottle edges and broken glass are the primary safety concern throughout; inspect every bottle for chips or cracks before installation and discard rather than install any damaged bottle
How to Install It
- Plan the color sequence before cleaning any bottles — decide whether the border will be a single color, an alternating two-color sequence, or a random mix within a coordinating palette. Alternating green and amber in a consistent pattern reads as most intentionally designed; a random mix within the same color family reads as collected and organic; all one color reads as graphic and modern. Having the color sequence planned before installation prevents the situation of running out of one color mid-border and needing to introduce a different color that disrupts the intended palette.
- Clean all bottles thoroughly — soak for 30 minutes in very hot soapy water, remove labels completely, scrub away all adhesive residue, rinse, and dry. A bottle with any adhesive residue remaining on the surface attracts soil and grime at the installation point and produces a dirty ring around the bottle at ground level that undermines the clean visual of the finished border. Inspect every cleaned bottle for chips, cracks, or structural weaknesses before setting it aside for installation; a cracked bottle installed in the border breaks further under soil pressure and frost heave and eventually leaves a sharp glass fragment at the garden edge.
- Mark the trench line with a string stretched between stakes along the intended garden bed edge — confirm the line follows the bed edge at the correct position before digging begins, since a trench cut in the wrong position cannot be moved without recompacting the disturbed soil and redigging. For curved bed edges, use a garden hose laid along the intended curve and marked with landscape spray paint before the string line is set; the hose defines the curve and the paint provides a guide line for digging that remains visible as the hose is moved during installation.
- Dig the trench to a depth of exactly half the bottle height — measure one bottle against the trench depth before continuing, since a trench that is too shallow leaves more than half the bottle exposed above ground (which looks top-heavy and tips easily) and one that is too deep buries too much of the bottle (which reduces the light effect and makes the scalloped border too low to contain mulch effectively). The trench width should be just wider than the bottle neck — tight enough that the installed bottles cannot lean without significant soil movement.
- Install the first bottle at one end of the trench by inserting it neck-down at a very slight inward lean toward the garden bed — approximately 5 degrees from vertical, not the dramatic diagonal that some bottle edging photos show. An almost-vertical installation keeps the bottle bottoms at a consistent height along the border and prevents the leaning that increases over time as soil settles around an overly angled installation. Use a mallet and cloth to tap the bottle firmly to the correct depth rather than pressing by hand, which applies uneven lateral pressure that can chip the bottle rim.
- Continue installing bottles in the planned color sequence, nestling each bottle against the previous one so their shoulders touch — the contact between adjacent bottles is what prevents individual bottles from leaning and what creates the continuous scalloped silhouette rather than a row of separated individual bottles with gaps between them. Check the alignment and height consistency every five bottles by stepping back 6 feet and assessing from the primary viewing distance rather than from directly above the installation.
- Backfill the trench firmly around each bottle after all bottles are positioned — press soil into the trench around the bottle necks with a gloved hand, tamping firmly to eliminate air pockets that allow movement after the installation is complete. Water the backfilled trench thoroughly immediately after tamping, which settles the soil around the bottle necks more effectively than tamping alone and reveals any remaining loose areas that need additional soil and firming before the installation is considered complete.
- Assess the finished installation from multiple distances and the primary viewing angle at the time of day when the light effect is most visible — typically late afternoon when low-angle sunlight passes through the bottle glass at an angle that produces the most dramatic colored light transmission. Correct any bottles that appear to lean or sit at a different height than their neighbors by pressing firmly on the high side of the bottle base to level it while the backfill soil is still loose from the installation watering.
Garden designers and landscape artists who create bottle edging installations for residential and community gardens use one installation detail that most first-time bottle edgers overlook and that dramatically affects how the border holds up through its first winter: install bottles with their necks angled slightly toward the interior of the garden bed rather than straight down, and pack a 2-inch layer of gravel into the trench bottom before inserting any bottles. The gravel layer under the bottle necks allows water to drain freely away from the glass during freeze-thaw cycles rather than pooling around the necked section of the bottle where freeze expansion puts maximum lateral pressure on the glass and causes cracking at the neck — the most common failure point in bottle edging that survives its first summer but cracks through its first winter. Garden designers who specify bottle edging for cold-climate installations report dramatically reduced winter breakage with the gravel drainage layer compared to bottles installed directly into compacted soil, which holds rather than drains the freeze water that damages the glass. The gravel also makes spring frost heave correction easier — bottles that have shifted can be pressed back to level with minimal effort in a gravel-bedded trench versus the clay-compacted trench that requires significant digging to correct.














