
Home Improvement

Recent Content

Shoe Bench Build: The Cubby Depth That Keeps Pairs Upright

Shoe Bench Build: The Cubby Depth That Keeps Pairs Upright

Build a wooden entryway shoe bench for $35—the cubby depth is what keeps boots standing instead of toppling into a pile every morning.

Style a Layered Nightstand Vignette in 1 Hour for $35

Style a Layered Nightstand Vignette in 1 Hour for $35

Turn a cluttered nightstand into a cozy styled vignette with the height-rule trick—1 hour, $35, instant bedroom upgrade.

The Cafe Rod Trick for a Fake Built-In Vanity

The Cafe Rod Trick for a Fake Built-In Vanity

Fake a built-in bathroom vanity shelf with a tiny cafe rod and basket—zero drilling, zero suction cups, full deposit intact.

Tension Rod Shelf: The Rod Width That Won't Slip

Tension Rod Shelf: The Rod Width That Won't Slip

Build a hidden double-decker shelf under your sink for $6—the rod tension width is what keeps it from crashing down on cleaning day.

Mulch Perennial Beds for Winter in 1 Hour for $25

Mulch Perennial Beds for Winter in 1 Hour for $25

Tuck your perennials in right! A 3-inch mulch blanket now saves roots from winter heave for about $25.

logo
  • Home Improvement
  • DIY Projects
  • Interior Design
  • Gardening & Outdoor
  • Real Estate
  • Home Improvement
  • DIY Projects
  • Interior Design
  • Gardening & Outdoor
  • Real Estate
  • ​

Step It Up: Transform Your Staircase with Paint

Add personality and visual interest to one of your home's most overlooked features
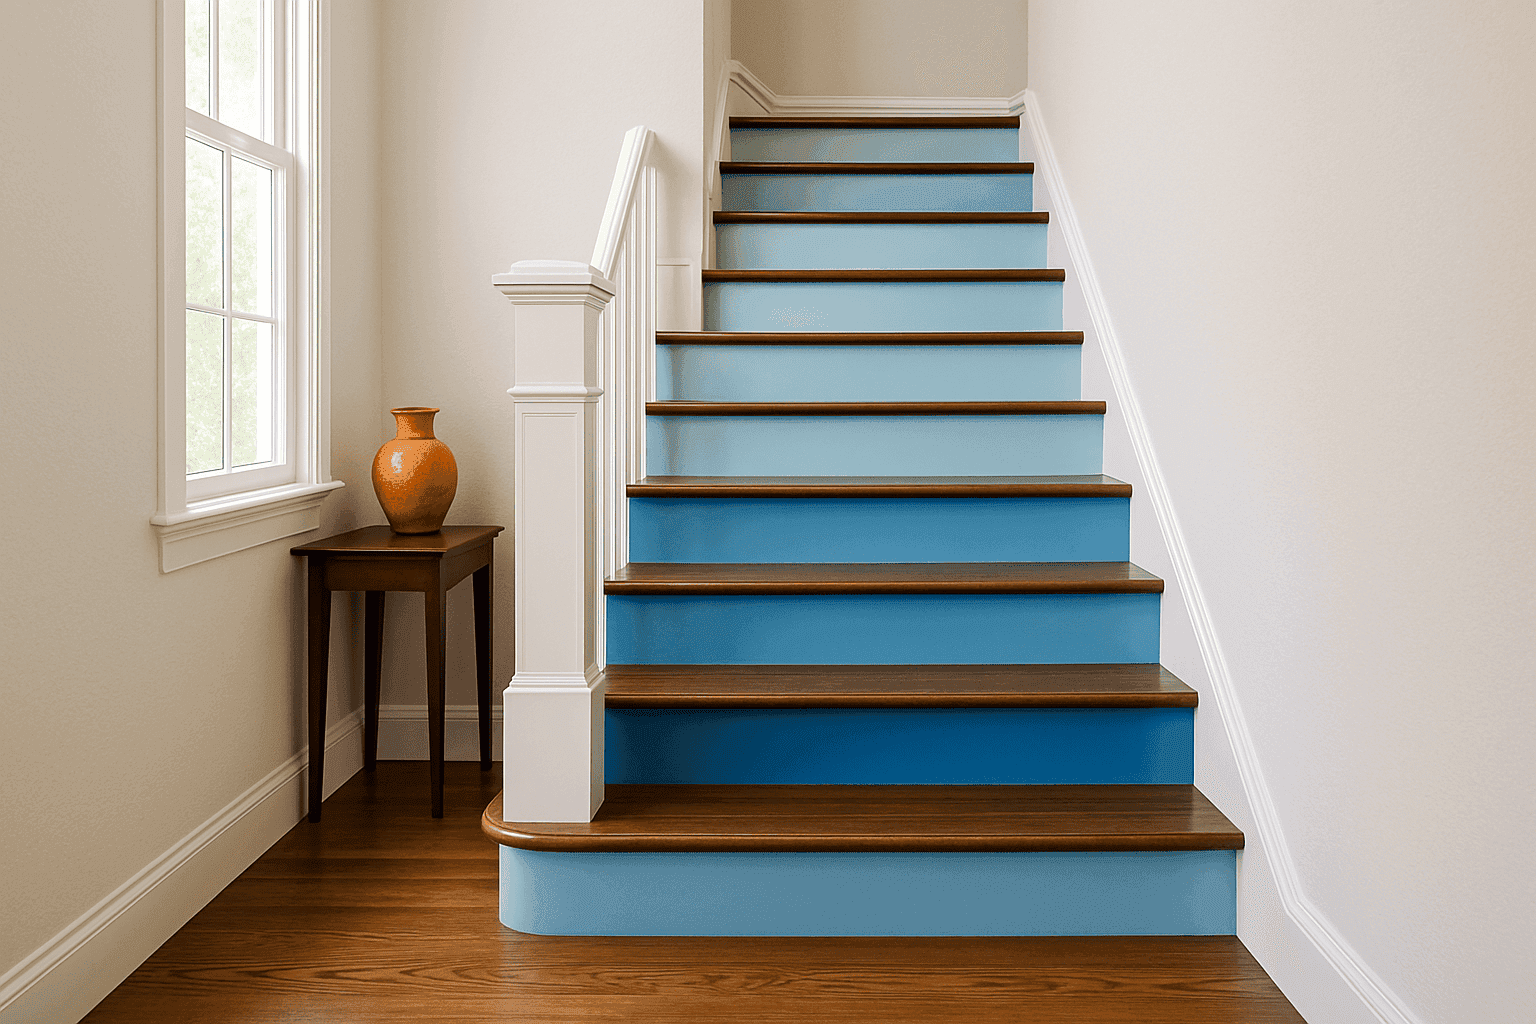
Beautifully painted staircase with colorful risers and refinished treads
HOME IMPROVEMENT

Your staircase doesn't have to be merely functional—it can be a stunning design feature that sets the tone for your entire home. With some paint and creativity, you can transform this high-traffic area into a visual focal point without the cost of a major renovation. From subtle two-tone treatments to bold geometric patterns, painted stairs offer endless possibilities for personalizing your space and adding unexpected color in a typically overlooked area.

Materials & Supplies

• Cleaning Supplies: TSP cleaner, sponges, rags
• Prep Materials: Sandpaper (120 & 220 grit), putty knife
• Repair Supplies: Wood filler, caulk for gaps
• Primers: Stain-blocking primer, bonding primer
• Paints: Floor/porch paint or enamel for treads
• For Risers: Interior paint in desired finish
• Tools: Quality brushes, small rollers, painter's tape
• Safety: Non-slip additive for tread paint
• Protective Finish: Clear polyurethane for high traffic

Painting Process

  1. Plan your design. Decide whether you'll paint just the risers, just the treads, or both. Consider patterns, color gradients, or stencil designs for risers. For a traditional look, paint treads dark and risers white or a light color.
  2. Prepare your workspace. Remove any carpet or coverings and thoroughly clean the stairs with TSP to remove grease and dirt. Plan for alternate access if possible, as stairs will be unusable during the project.
  3. Repair and prep surfaces. Fill holes or cracks with wood filler and sand smooth. For worn treads, consider more extensive repairs before painting. Sand all surfaces lightly for better paint adhesion.
  4. Apply painter's tape. Carefully tape off areas to create clean lines between risers and treads. For patterned designs, create templates or use painter's tape to mark patterns.
  5. Prime all surfaces. Apply a bonding primer to ensure paint adheres well to existing finishes. For previously stained wood, use a stain-blocking primer to prevent bleed-through.
  6. Paint strategically. Work from top to bottom, painting every other step to maintain access. Paint risers first, then allow ample drying time before painting treads. For treads, consider a floor or porch paint designed for durability.
  7. Add safety features. Mix a non-slip additive into the final coat of paint for treads to prevent slippery surfaces, especially important for homes with children or elderly residents.
  8. Apply protective finish. Once all paint is thoroughly dry (at least 24-48 hours), apply 2-3 coats of clear polyurethane to treads for extra durability and protection against scuffs and wear.
  9. Allow proper curing time. Though dry to the touch within hours, newly painted stairs need several days to fully cure. Wait at least 24 hours before light use, and avoid heavy traffic for 3-5 days.
DESIGNER TIP

For a subtly elegant approach that won't overwhelm your space, consider an ombré effect on your risers—transitioning gradually from dark at the bottom to light at the top, or coordinating with wall colors on different levels of your home. If you're hesitant to commit to a bold pattern, try painting just the outer edge of each tread in an accent color that complements your decor. This creates a custom look that's noticeable but not overwhelming. For maximum durability in high-traffic homes, remember that darker colors and satin or semi-gloss finishes hide scuffs better than lighter colors or matte finishes.


Related Content

Home Improvement

02 November 2026

Post

Insulate Hot Water Pipes in 45 Minutes for $20

Stop paying to reheat water that cools in bare pipes—wrap them in foam insulation in 45 minutes for $20 flat....

Home Improvement

01 November 2026

Post

Vanity Drawer Reset: The Tray Depth That Stops Tip-Over

Reset your messy bathroom vanity drawer in 20 minutes—the tray depth trick that stops bottles and brushes from tipping every time you open it....

Home Improvement

30 October 2026

Post

Attic Hatch Fix: The Weatherstrip Gap Draining Heat

Stop losing heat through your attic hatch—the weatherstrip gap is the real energy leak, not your insulation. Fixed in 30 minutes for under $15....

Home Improvement

28 October 2026

Post

Install a Fireplace Draft Stopper in 20 Minutes for $25

Stop your chimney from sucking heat right out of the house—an inflatable draft stopper seals it in 20 minutes for about $25....

Home Improvement

25 October 2026

Post

Toy Bin Reset: The Bin Depth That Stops Overflow

Reset chaotic toy bins in 25 minutes—the bin depth trick that stops overflow and actually gets kids to put things away....

Home Improvement

23 October 2026

Post

Garage Door Sensor Fix: The Alignment Mark Nobody Checks

Stop your garage door from reversing for no reason—the sensor alignment mark is the real fix, not the safety eye. Under 15 minutes, free....

Home Improvement

20 October 2026

Post

Insulate Your Garage Door Panels in 1 Hour for $30

Your garage is a giant uninsulated wall! Foam panel kits cut heat loss fast, cheap, and before winter really bites down....

Home Improvement

18 October 2026

Post

Silverware Drawer Reset: The Divider Depth That Stops Slide

Fix that sliding silverware drawer in 20 minutes—the divider depth trick that keeps forks and spoons from jumbling every time you open it....

Home Improvement

16 October 2026

Post

Leaky Garbage Disposal Fix: The Flange Seal Nobody Checks

Stop that mystery puddle under your sink—the sink flange seal is the real culprit, not the disposal unit itself. Fixed in under 30 minutes....

Home Improvement

14 October 2026

Post

Seal Crawl Space Vents in 1 Hour for $30

Your crawl space is bleeding heat through open vents! Foam vent covers seal it up in an hour for about $30 before the cold digs in....

Home Improvement

11 October 2026

Post

Coffee Station Reset: The Container Swap That Stops Stick

Reset your sticky coffee bar in 20 minutes — swapping bags for airtight containers is what actually stops the spills and ants, not just wiping counters....

Home Improvement

10 October 2026

Post

Weatherstrip Your Windows in 1 Hour for $20

Stop paying to heat the outdoors! Seal drafty window sashes with weatherstripping in an hour for about $20 before winter bites....

Home Improvement

09 October 2026

Post

Weak Bathroom Fan Fix: The Duct Kink That Blocks Airflow

Stop bathroom mold before it starts—the crushed duct bend is why your exhaust fan isn't actually venting moisture outside. Fixed in under an hour....

Home Improvement

06 October 2026

Post

Seal Basement Rim Joists in 2 Hours for $40

Your basement is leaking heat through gaps you can't even see—seal rim joists this weekend before the cold really moves in....

Home Improvement

04 October 2026

Post

Laundry Shelf Reset: The Label Placement That Sticks

Reset your chaotic laundry shelf in 20 minutes—the label placement trick that actually stops everyone from restocking it wrong....
Terms and ConditionsDo Not Sell or Share My Personal InformationPrivacy PolicyPrivacy NoticeAccessibility NoticeUnsubscribe
Copyright © 2026 DIY HomeBoost












