
DIY Projects

Recent Content

Wooden Dish Rack: The Dowel Angle That Drains Right

Wooden Dish Rack: The Dowel Angle That Drains Right

Build a slatted wood dish rack for $18—the dowel tilt angle is what actually drains water into the tray instead of pooling on your counter.

Install a Fireplace Draft Stopper in 20 Minutes for $25

Install a Fireplace Draft Stopper in 20 Minutes for $25

Stop your chimney from sucking heat right out of the house—an inflatable draft stopper seals it in 20 minutes for about $25.

The Shower Rod Trick That Fakes a Walk-In Closet

The Shower Rod Trick That Fakes a Walk-In Closet

Steal spare closet space with a second shower-curtain rod—zero holes, zero fuss, and your full deposit stays safe.

Pool Noodle Knife Block: The Slice Depth That Stops Wobble

Pool Noodle Knife Block: The Slice Depth That Stops Wobble

Turn a $1 pool noodle into a safe knife block—the slice depth is what keeps blades from wobbling loose or slicing through the foam.

Build a Wooden Pie Carrier in 2 Hours for $25

Build a Wooden Pie Carrier in 2 Hours for $25

Never smash a pie in the car again! Build a snug wooden pie carrier in 2 hours for $25—perfect timing for fall potlucks.

logo
  • Home Improvement
  • DIY Projects
  • Interior Design
  • Gardening & Outdoor
  • Real Estate
  • Home Improvement
  • DIY Projects
  • Interior Design
  • Gardening & Outdoor
  • Real Estate
  • ​

Scrap Happy: Transform Fabric Remnants Into Quilted Coasters

Use up fabric scraps while creating colorful functional coasters with simple quilting techniques
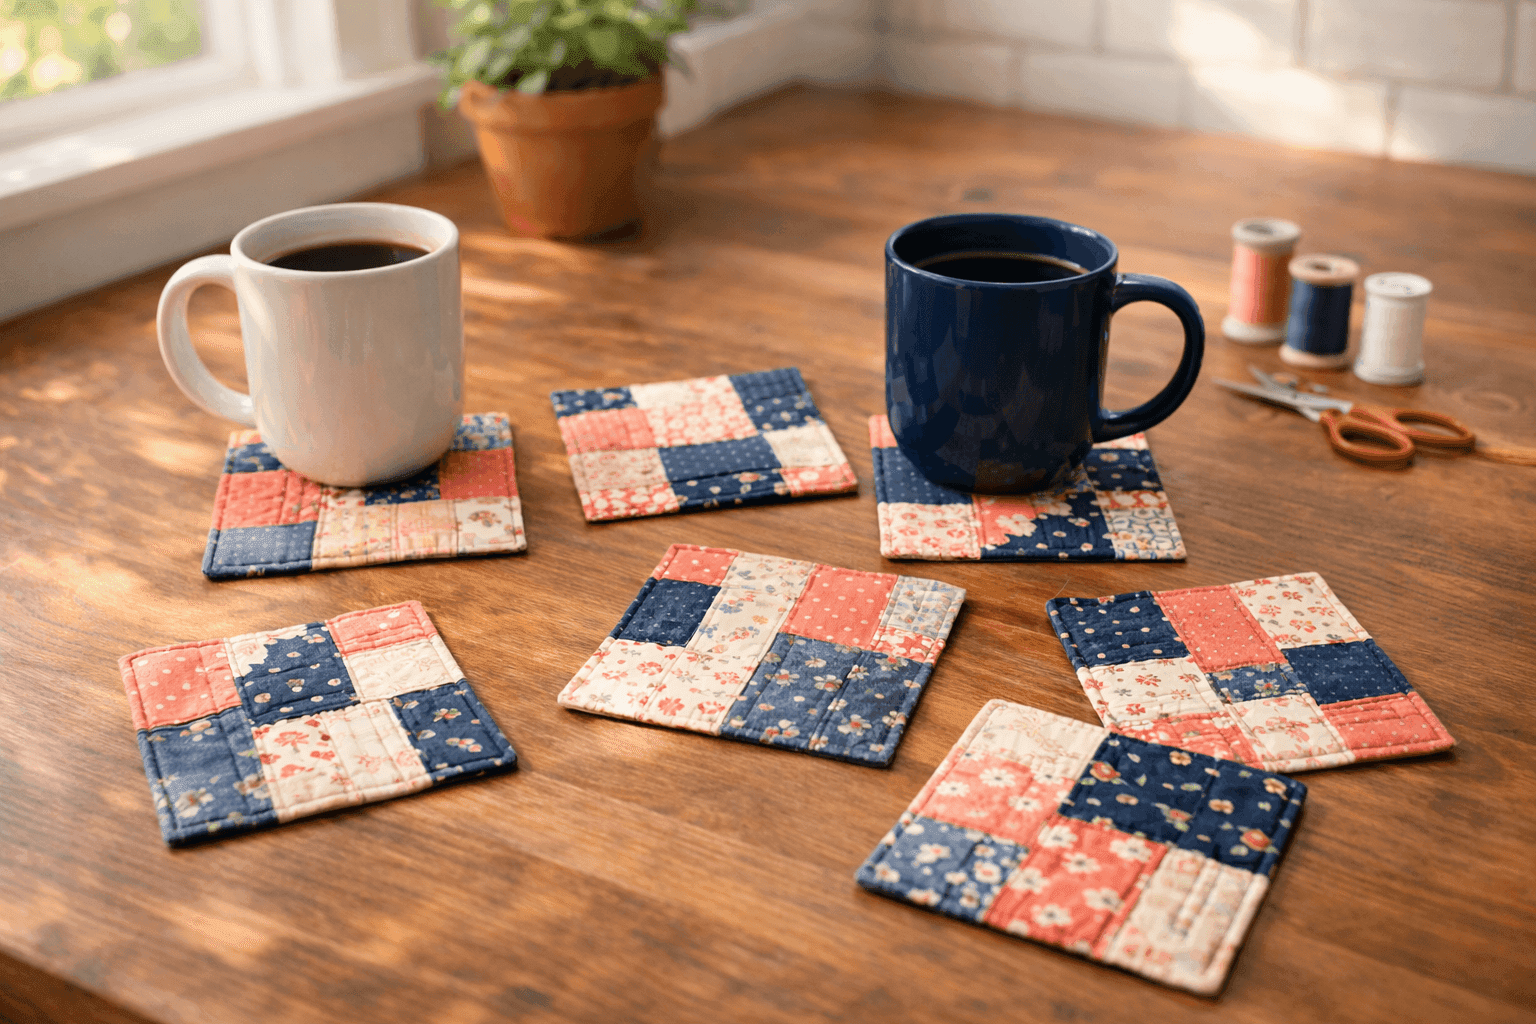
Colorful quilted fabric coasters made from scraps arranged on kitchen table with coffee mugs
DIY PROJECTS

That bag of fabric scraps from past sewing projects sits in your craft closet making you feel guilty because you can't bring yourself to throw away perfectly good material, but you also have no idea what to actually do with random pieces too small for most projects. Store-bought coaster sets cost $15-30 for decent quality, but you literally have the materials to make beautiful quilted versions sitting unused while you keep buying paper napkins to protect your furniture from water rings. Creating fabric scrap coasters takes about two hours to make a set of six, costs absolutely nothing if you're using scraps you already own, and gives you functional kitchen accessories that are genuinely pretty rather than just utilitarian. This project combines practical quilting techniques with sustainable crafting, proving that the most satisfying makes use materials you already have while solving real household needs instead of creating more decorative items that just collect dust.

What You'll Need

  • Fabric Scraps: Cotton remnants in coordinating or contrasting colors from your stash
  • Batting: Cotton or polyester quilt batting for absorbency and padding ($5-8 for enough to make dozens)
  • Backing Fabric: Solid coordinating cotton for coaster backs
  • Sewing Supplies: Sewing machine or needle for hand-stitching, thread, pins
  • Cutting Tools: Rotary cutter and mat or fabric scissors, ruler for measuring
  • Binding: Fabric strips for finishing edges or use scraps cut into bias strips
  • Time Investment: 2 hours for set of 6 coasters including cutting and stitching

Step-by-Step Method

  1. Cut fabric scraps into small squares or strips—2-inch squares work well for patchwork coasters, or cut random shapes for improvisational piecing
  2. Arrange your fabric pieces into pleasing 4x4 inch compositions, playing with color placement until you have designs you actually like looking at
  3. Sew pieces together using quarter-inch seams, pressing seams open as you go to reduce bulk in the finished coasters
  4. Layer your pieced top with batting and backing fabric, creating a quilt sandwich that provides absorbency and structure
  5. Pin layers together securely to prevent shifting during quilting, placing pins away from where you'll be stitching
  6. Quilt through all layers using simple straight lines, X patterns, or meandering stitches—this both decorates and holds layers together permanently
  7. Trim edges even and square, removing any excess batting or backing that extends beyond your pieced top
  8. Bind raw edges using fabric strips sewn around the perimeter, or simply zigzag stitch edges for a quicker casual finish
DESIGNER TIP

Professional quilters recommend making coasters in sets with coordinating but not identical designs—this looks more intentional than trying to create perfectly matching pieces from random scraps. Use the same color palette across all coasters but vary the fabric placement and patterns, which creates cohesion without requiring precise matching. Also, consider making coasters slightly larger than standard 4x4 inches if you regularly use oversized mugs or water bottles that need more coverage. For maximum absorbency, use two layers of cotton batting instead of one, which also creates more substantial coasters that feel quality rather than flimsy. The binding step takes the most time but dramatically improves durability; coasters without bound edges tend to fray after repeated washing even if you use a zigzag stitch. These make excellent last-minute gifts when you need something thoughtful but don't have time to shop—create sets in recipient's favorite colors using your scrap stash and suddenly you have personalized presents that cost nothing but look intentional and handmade rather than just using up your leftovers.


Related Content

DIY Projects

28 October 2026

Post

Wooden Dish Rack: The Dowel Angle That Drains Right

Build a slatted wood dish rack for $18—the dowel tilt angle is what actually drains water into the tray instead of pooling on your counter....

DIY Projects

27 October 2026

Post

Pool Noodle Knife Block: The Slice Depth That Stops Wobble

Turn a $1 pool noodle into a safe knife block—the slice depth is what keeps blades from wobbling loose or slicing through the foam....

DIY Projects

27 October 2026

Post

Build a Wooden Pie Carrier in 2 Hours for $25

Never smash a pie in the car again! Build a snug wooden pie carrier in 2 hours for $25—perfect timing for fall potlucks....

DIY Projects

26 October 2026

Post

Make Herb-Infused Honey in 30 Minutes for $12

Turn raw honey into a cold-season secret weapon—infuse it with thyme and ginger in 30 minutes for about $12, no fancy gear needed....

DIY Projects

25 October 2026

Post

Make Homemade Fire Cider in 20 Minutes for $15

Steep this spicy apple cider vinegar tonic now so it's ready to fight off fall colds in 4 weeks—20 minutes, $15, zero cooking skills....

DIY Projects

23 October 2026

Post

Build a Freestanding Coat Rack in 2 Hours for $35

Sick of coats piled on chairs? Build a sturdy freestanding coat rack in 2 hours for $35 — no wall drilling, just solid joinery....

DIY Projects

22 October 2026

Post

Window Frame to Pet Gate: The Hinge Set That Holds

Turn an old wooden window frame into a swinging pet gate for $22 — the hinge mortise depth is what keeps it from sagging open over time....

DIY Projects

22 October 2026

Post

Make Spiced Homemade Applesauce in 1 Hour for $12

Turn a bag of fall apples into silky spiced applesauce in an hour for $12 — no peeling required if you've got the right tool....

DIY Projects

21 October 2026

Post

Floating Nightstand: The Bracket Depth That Holds Weight

Build a wall-mounted wooden nightstand for $25 — the bracket depth inside the wood is what stops it from sagging under a lamp and books....

DIY Projects

20 October 2026

Post

Foam Letter Wall Art: The Spacing Trick for $6

Turn dollar-store foam letters into custom nursery wall art for $6 — the spacing template is what keeps names looking store-bought, not crooked....

DIY Projects

19 October 2026

Post

Build a Tabletop Fire Bowl in 90 Minutes for $35

Turn a $35 metal bowl and lava rock into a tabletop fire feature perfect for crisp fall evenings and s'mores nights....

DIY Projects

16 October 2026

Post

Build a Pet Food Storage Bin in 1 Hour for $30

Stop losing the war against stale kibble and pantry moths—build an airtight pet food bin in an hour for $30....

DIY Projects

15 October 2026

Post

Whittling a Wooden Spoon

Try meditative spoon whittling for under $15—cutting with the grain (not against it) is the one rule that keeps your blank from splitting mid-carve....

DIY Projects

14 October 2026

Post

Wooden Pet Ramp: The Cleat Spacing That Stops Slips

Build a wooden pet ramp for $20 — the traction cleat spacing is what keeps your dog's paws from sliding on the incline....

DIY Projects

13 October 2026

Post

Build a Compost Sifter Box in 1 Hour for $18

Turn chunky compost into fine garden gold! Build a simple hardware-cloth sifter box in an hour for $18—no more rock-and-stick surprises....
Terms and ConditionsDo Not Sell or Share My Personal InformationPrivacy PolicyPrivacy NoticeAccessibility NoticeUnsubscribe
Copyright © 2026 DIY HomeBoost












